# How to Deploy an API Gateway Within a CI/CD Pipeline
Garen Torikian
Continuous integration and continuous deployment—known colloquially as CI/CD—are essential strategies for building modern software applications. The goal of these processes is to foster a culture of continuous updates.
CI is the process by which an external machine (not your local development environment) fetches your app and dependencies and then runs a test suite to ensure everything in your application builds and runs correctly.
After your CI passes and your changes are merged into the code base, CD takes over to ensure that your application is distributed to production environments—whether that's a single server, a fleet of servers or even a mobile app store.
If your application is architected as a collection of [microservices](https://konghq.com/blog/learning-center/what-are-microservices)microservices, a CI/CD pipeline for each microservice can vastly simplify the software development lifecycle. Each CI/CD step runs on individual repositories, ensuring that every microservice is tested and deployed individually. Kong Gateway simplifies the management of these microservices.
### But what should you do when Kong Gateway *itself *needs to be tested and updated?
Since it's a good practice to continuously test and deploy your microservices, those same habits should also apply to your [orchestration](https://konghq.com/blog/learning-center/microservices-orchestration)orchestration. In this post, we'll take a step-by-step look at how to iterate, test and deploy Kong Gateway using CI/CD. You'll learn how to anticipate and approach changes at the microservice level and how your gateway tests should handle updates—both expected and not.
Install all the Node dependencies with npm install. Then, run node server.js to start the local server. In a browser window, navigate to http://localhost:3000. You should see a greeting message.
By default, Kong expects to use a Postgres database to store information. Enter the admin mode for Postgres by typing psql, then create both a user and a database named kong:
psql
create user kong;
create database kong;
If you have a fresh Kong installation, you'll need to set up your database schema through migrations. To do so, enter the following command in the terminal:
kong migrations bootstrap
You can start the Kong service next:
kong start
For our final configuration step, we'll place the Kong Gateway in front of our Node server. We need to create a service and then map a route from Kong to that service.
To create a service, we can use the Kong API. Run the following curl query in the terminal to set up a service named node-server that maps to our localhost:3000 server:
To verify that this all works, navigate to http://localhost:8000/api in your browser. You should see the same greeting message as before.
## Adding a CI Pipeline
Our repository comes with a little test script that makes a curl request to our Kong route and verifies that everything is working. You can run the test script with the command bash test.sh. An error message will be printed out if there's a failure, as we'll see later in this tutorial.
Now, let's add a CI pipeline to this existing test. For quite some time now, GitHub has been the de facto hosting service for software repositories. They also offer a CI/CD platform called [GitHub Actions](https://github.com/features/actions)GitHub Actions. GitHub Actions allow you to define a sequence of steps to build, test and deploy your code. This makes GitHub the perfect platform to explore establishing a CI/CD pipeline for our Kong Gateway.
A walk-through of the full capabilities of GitHub Actions is beyond the scope of this blog post, but we'll highlight some of the most important aspects. Open up the file called .github/workflows/ci.yml. This file contains the mappings which GitHub Actions uses to prepare and execute our tests. Let's take a look at some of the more relevant key/value pairs.
After that, we install our Node dependencies and run out database migrations. These steps should look familiar since they're the same processes you went through when setting up your local development environment:
 - name: Install Node dependencies
       run: npm install

     - name: Run Kong migrations
       run: sudo kong migrations bootstrap --force
Like we did on our local machine, we need to create a service and route for Kong. That way, Kong understands how to pass requests to our Node server:
- name: Start Kong
       run: sudo kong start -c kong.custom.conf

     - name: Set Kong service/route
       run: |
         curl -X POST -H 'Content-Type: application/json' http://localhost:8001/services -d '{"name":"node-server", "protocol": "http", "host":"localhost", "port": 3000}'
         curl -X POST -H 'Content-Type: application/json' http://localhost:8001/routes -d '{"name":"api-route", "service": { "name": "node-server" }, "paths":["/api"]}'
**Running the Test**
Last but certainly not least, we run our test suite:
 - name: Run test
       run: bash test.sh
Let's take a quick look at this test.sh file:
node server.js &
sleep 3 # give server time to boot
stop_server() { pgrep node | xargs kill
}curl http://localhost:8000/apicode="$?"if [[ ! $code -eq 0]]; then
stop_server
echo "FAIL CODE $code";
exit $code;
fi
stop_server
Before we get into validating that this test suite works, let's see it in action in its current state. Create an empty commit, and then push it up to your repository. This, in turn, will trigger the GitHub CI action to run:
git commit -m "This is an empty commit " --allow-empty
git push origin main
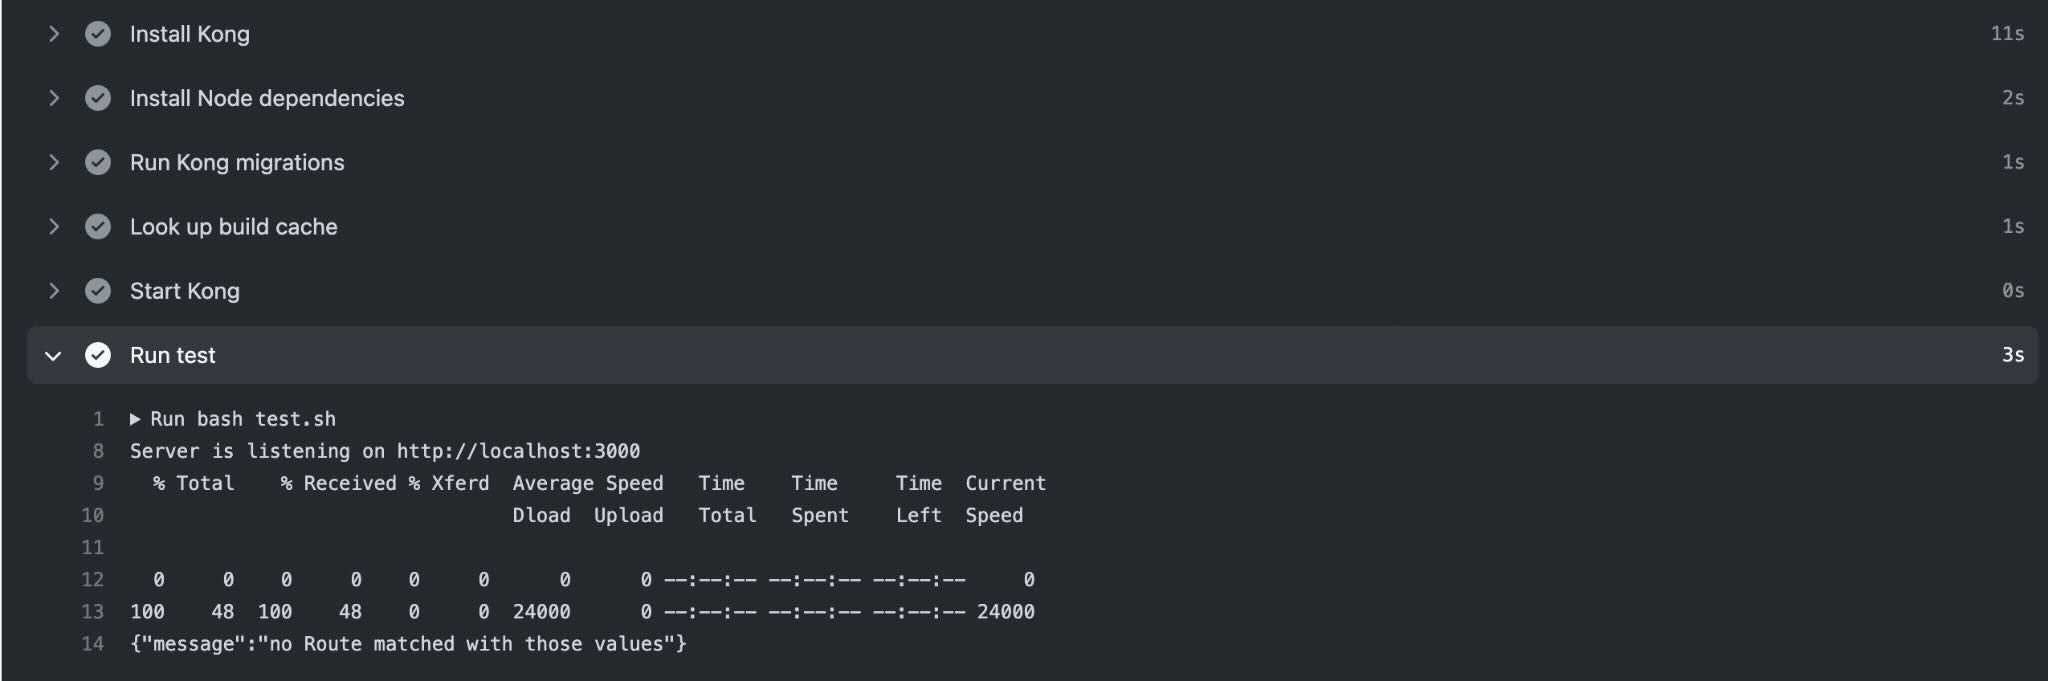
If you navigate to the GitHub Actions tab on your repository, you should see a response from the route, which indicates that the test passed!
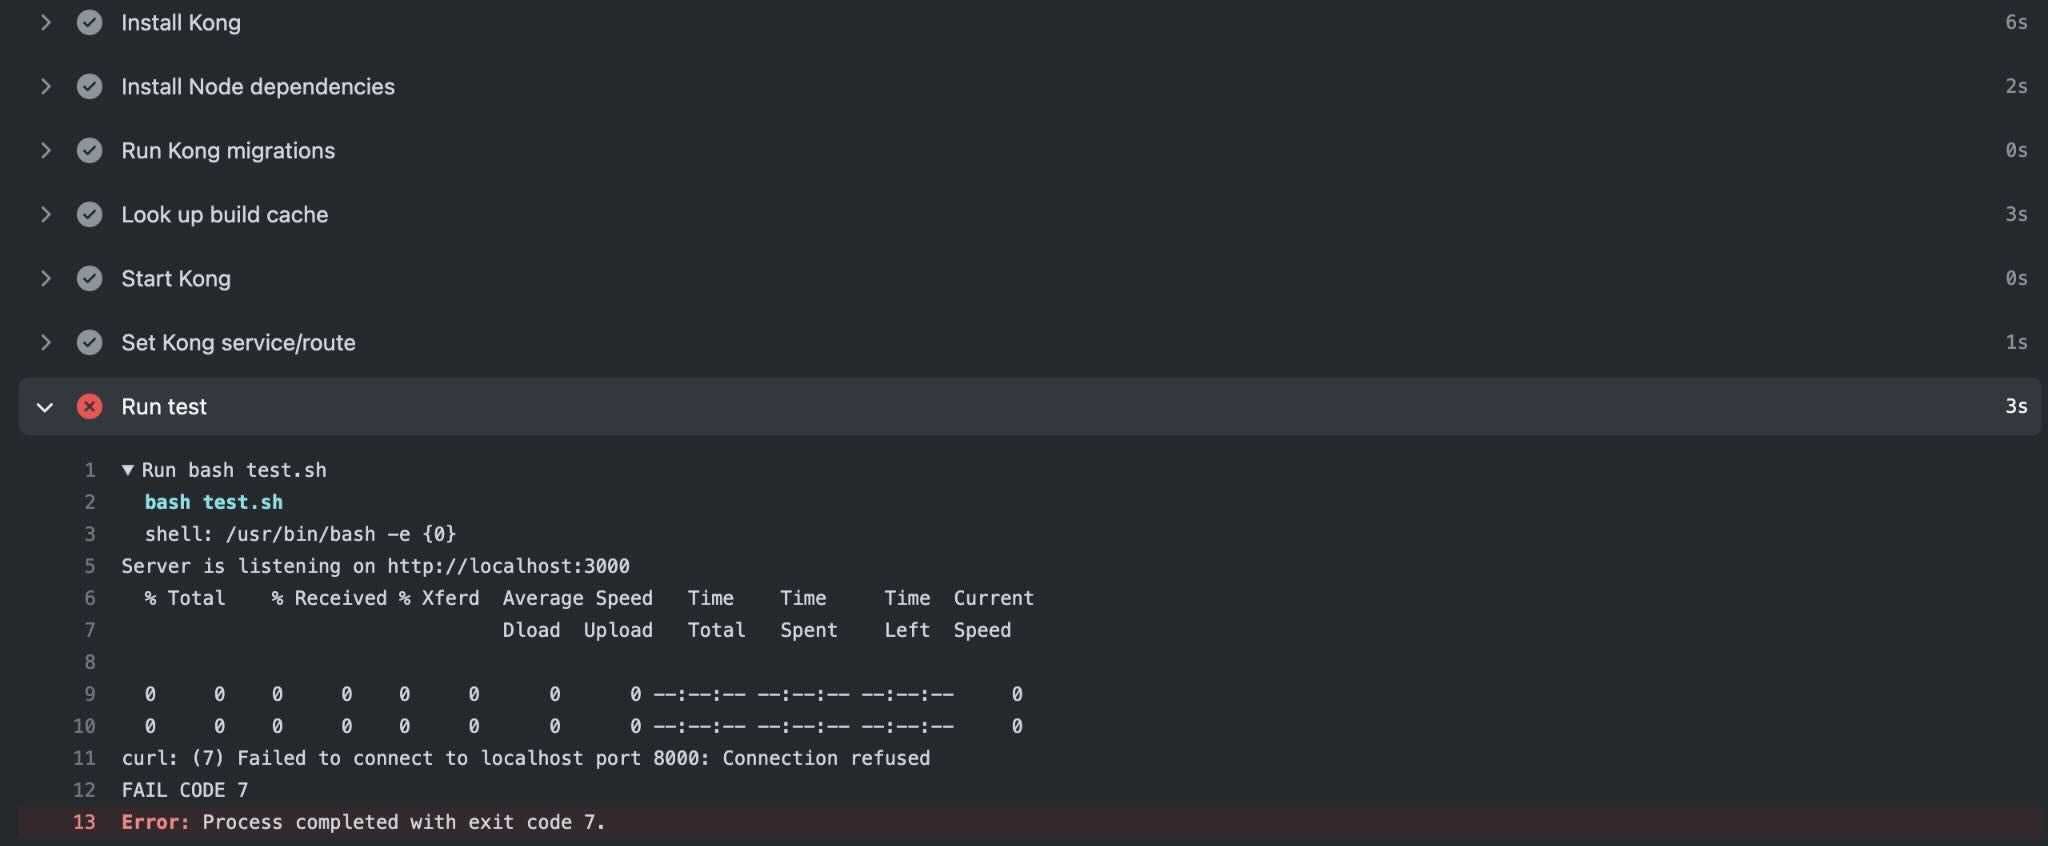
proxy_listen changes Kong's HTTP port to 9001, instead of using the default of 8000. Let's remove the comment (#) to enable this configuration change. Commit this diff and push it up to your repository. Your GitHub Action test should now be failing. Can you guess why?
In test.sh , curl makes a request to http://localhost:8000/api, but we've just changed the Kong proxy port to 9001. Because the Kong Gateway configuration is not in sync with the test's expectations, we've successfully demonstrated two things: 1) that our Kong Gateway is being tested and 2) that our CI can fail. Go ahead and change the port number in test.sh to 9001, commit the change, and push it again. Your CI pipeline should succeed once more!
## Adding a CD Pipeline
The process for adding a continuous deployment pipeline to this project is similar to the one we just went through for CI. The only major difference is that getting the project onto a specific hosting platform is unique to each provider—AWS, Google Cloud, Microsoft Azure or something else.
- DigitalOcean hosts both the Kong Gateway and an existing microservice.
- The infrastructure is *not* containerized.
- Some sort of process manager, like pm2, handles recovering from errors.
While these steps may not precisely match your infrastructure, we're merely practicing how to craft a GitHub Action that performs the deployment. Let's take a look at our GitHub Action workflow in deploy.yaml:
We can break down the deployment into two separate steps. First, we indicate that we only want this workflow to run on *pushes to the main branch*. This ensures that other pull requests and commits don't inadvertently cause a deployment to production.
Second (and more importantly), we're taking advantage of a feature in GitHub Actions: [encrypted secrets](https://docs.github.com/en/actions/reference/encrypted-secrets)encrypted secrets. Secrets are essentially a safe place to store credentials, like environment variables, which are needed to interact with servers. Our actual deployment occurs using [ssh-action](https://github.com/appleboy/ssh-action)ssh-action. We provide ssh-action with our DigitalOcean server's host, username and key, and ssh-action takes this information and uses it to log into the host machine. Next, we navigate to the location of our project on disk and fetch the latest release as a tarball archive. Finally, we stop Kong, and then we restart it with our config file.
In this way, we can ensure that our deployments always occur after a push to main; and a push to main is only possible after all of our Kong Gateway tests pass.
## Conclusion
Continuous integration and deployment is an important procedure - one that enables teams to iterate quickly and confidently. CI/CD eliminates the possibility of developing software that only works on a single developer's machine, removing human error from the deployment process.
### *CI/CD not only applies to application code like in microservices. It can (and should!) be used for your other configurations as well, like the Kong Gateway. *
By doing so, you expand your Kong Gateway usage iteratively. For example, you can see the effect of adding a new plugin on your infrastructure in testing and development *before* promoting the change to production. Consistent and repeatable deployments of configuration changes mean fewer surprises, and that lets you focus on adding new features instead of tracking down production issues.
**Once you've developed and deployed Kong Gateway within CI/CD, you may find these other tutorials helpful:**
As the world's most popular API Gateway , Kong Gateway is flexible and can be adapted to various environments and deployment configurations. This flexibility means some time should be taken to make good architectural decisions for the use cases i
Ahmed Koshok
# New Storage Engine for Kong Hybrid and DB-less Deployments
We understand that our customers need to deploy Kong in a variety of environments and with different deployment mode needs. That is why two years ago, in Kong 1.1, we introduced DB-less mode, the ability to run Kong without the need of connecting to
Infrastructure as code is a core component of all modern SRE team's day-to-day work. There are plenty of options available, but the one that I'm most excited about is Pulumi . Instead of writing a domain-specific language (DSL) to configure your in
Michael Heap
# Deploying With Confidence Using Kong Gateway and Spinnaker
Change is the primary cause of service reliability issues for agile engineering teams. In this post, I’ll cover how you can limit the impact of a buggy change, making it past your quality gates with Kong Gateway and Spinnaker for canary deployment.
Ashwin Sadeep
# Why Your Kafka Event Streams Need an Event Gateway
You wouldn't expose a REST API without a gateway. What about Kafka?
Before we talk about an event gateway, it's worth grounding ourselves on what an event is. An event is simply a record of something that happened. In modern integration, there are
Warren Vella
# Local Previews and Agent-Driven Authoring for Your Konnect Dev Portal
What it is
The Konnect Dev Portal Toolkit is a free extension published by Kong Inc. on the Visual Studio Code Marketplace (ID konghq.vscode-konnect-dev-portal-toolkit) and on Open VSX.
Konnect Developer Portals are how teams publish API document
Adam DeHaven
# A Unified Gateway for APIs + Agentic Applications on VMware VKS with Kong Konnect
Built on top of Kong API Gateway, the Kong AI Gateway is designed to address key challenges in enterprise AI adoption. Modern AI applications rarely rely on a single model; instead, they orchestrate multiple GenAI providers, agent frameworks, Age
Anika Suri
# Scaling Kong Deployments with and without Databases
As the world's most popular API Gateway , Kong Gateway is flexible and can be adapted to various environments and deployment configurations. This flexibility means some time should be taken to make good architectural decisions for the use cases i
Ahmed Koshok
# New Storage Engine for Kong Hybrid and DB-less Deployments
We understand that our customers need to deploy Kong in a variety of environments and with different deployment mode needs. That is why two years ago, in Kong 1.1, we introduced DB-less mode, the ability to run Kong without the need of connecting to
Infrastructure as code is a core component of all modern SRE team's day-to-day work. There are plenty of options available, but the one that I'm most excited about is Pulumi . Instead of writing a domain-specific language (DSL) to configure your in
Michael Heap
# Deploying With Confidence Using Kong Gateway and Spinnaker
Change is the primary cause of service reliability issues for agile engineering teams. In this post, I’ll cover how you can limit the impact of a buggy change, making it past your quality gates with Kong Gateway and Spinnaker for canary deployment.
Ashwin Sadeep
# Why Your Kafka Event Streams Need an Event Gateway
You wouldn't expose a REST API without a gateway. What about Kafka?
Before we talk about an event gateway, it's worth grounding ourselves on what an event is. An event is simply a record of something that happened. In modern integration, there are
Warren Vella
# Local Previews and Agent-Driven Authoring for Your Konnect Dev Portal
What it is
The Konnect Dev Portal Toolkit is a free extension published by Kong Inc. on the Visual Studio Code Marketplace (ID konghq.vscode-konnect-dev-portal-toolkit) and on Open VSX.
Konnect Developer Portals are how teams publish API document
Adam DeHaven
# A Unified Gateway for APIs + Agentic Applications on VMware VKS with Kong Konnect
Built on top of Kong API Gateway, the Kong AI Gateway is designed to address key challenges in enterprise AI adoption. Modern AI applications rarely rely on a single model; instead, they orchestrate multiple GenAI providers, agent frameworks, Age
Anika Suri
## Ready to see Kong in action?
Get a personalized walkthrough of Kong's platform tailored to your architecture, use cases, and scale requirements.