Event streaming allows companies to build more scalable and loosely coupled real-time applications supporting massive concurrency demands and simplifying the construction of services. Ultimately, we may need to grant access to such infrastructure to the most diverse entities, including external applications posting events that will be eventually consumed by internal systems.
The purpose of such exposure is to promote development teams' collaboration. It defines a standardized, programming language–neutral interface to provide access to a large number of users and developers to the extensive list of services and applications.
There are many ways to accomplish this task. In fact, exposing the event streaming infrastructure is the easiest part of the solution. The big difference is in exposure control. In other words, infrastructure exposure is necessary but not sufficient.
This is exactly where the event gateway pattern helps with an elegant and extensible solution, allowing the definition of advanced policies for exposure control and making sure the event streaming infrastructure is being consumed only by trustworthy applications.
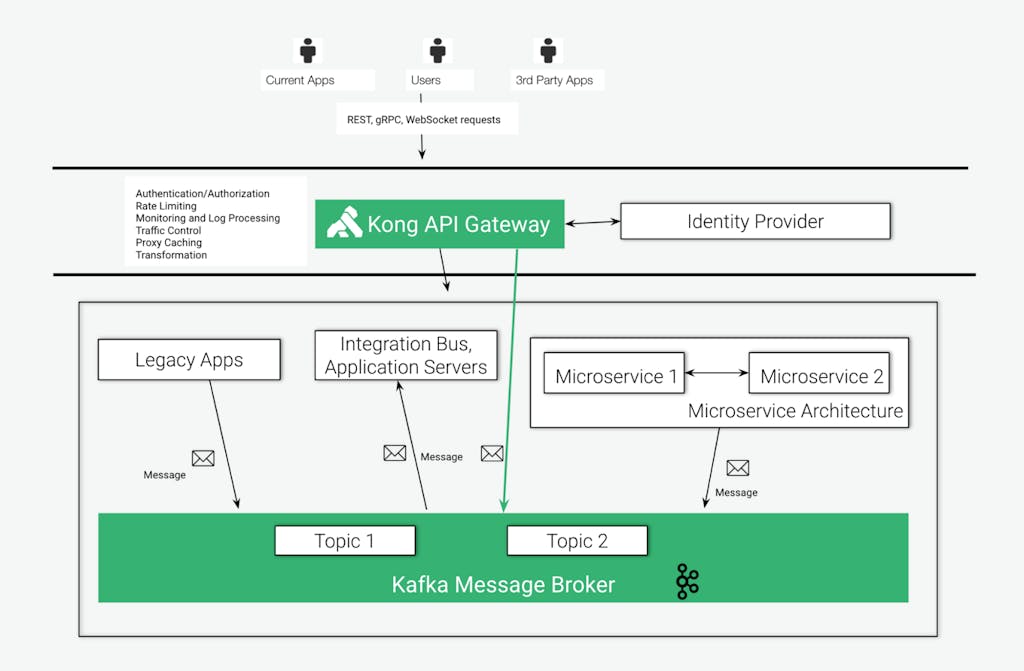
In a nutshell, the event gateway pattern adds API management capabilities to your event streaming platform. It provides a powerful technology solution to address both requirements: exposure and consumption control of the event streaming platform. In such integration architecture design, the API management platform is responsible for implementing critical and complex policies totally abstracted from the event streaming infrastructure, such as authentication/authorization, rate limiting, log processing and real-time monitoring, etc.
In this post, we’ll talk about how to use the Kong Konnect Kafka Upstream plugin to create an event gateway on top of [Amazon Managed Streaming for Apache Kafka (MSK)](https://aws.amazon.com/msk/)Amazon Managed Streaming for Apache Kafka (MSK) with advanced API management capabilities.
Kong Konnect API management
Kong Gateway, the main component of the Kong Konnect API management infrastructure, is a platform-agnostic, scalable API gateway distinguished for its high performance and extensibility via plugins. By providing functionality for proxying, routing, load balancing, health checking, authentication, and more, Kong serves as the central layer for orchestrating microservices or conventional API traffic with ease.
Kong Gateway extensibility
One of the main capabilities provided by Kong Gateway is extensibility.
A comprehensive list of [plugins](https://docs.konghq.com/hub/)plugins extends the gateway by implementing specific policies. The plugins offload critical and complex processing usually implemented by backend services and applications. With the gateway and its plugins in place, the backend services could be focusing on business logic only, leading to a faster application development process.
Here are some of the plugins:
- Authentication/Authorization: plugins to implement all sorts of security mechanisms such as OIDC (OpenID Connect), Basic Authentication, LDAP, Mutual TLS (mTLS), API Key, OPA (Open Policy Agent) based access control policies, etc.
- Rate Limiting: to limit how many HTTP requests can be made in a given period of time
- Serverless: integration with AWS Lambda
- Log Processing: to externalize all requests processed by the gateway to third-party infrastructures
- Analytics and Monitoring: to provide metrics to external systems including Datadog and Prometheus
- Traffic Control: plugins to implement canary releases, mocking endpoints, routing policies based on request headers, etc
- Proxy Caching: to cache commonly requested responses in the gateway
- Transformations: plugins to transform requests before routing them to the upstreams and plugins to transform their responses before returning to the consumers, transform GraphQL upstreams into a REST API, etc.
Kong hybrid deployments
Kong Gateway supports hybrid deployments natively. That is, several platforms can be used at the same time to expose and protect workloads running on such platforms, including Linux-based OSes, Docker, Kubernetes, etc. This is particularly important to address move-to-cloud and modernization application projects where workload transfers might be critical.
The following diagram shows a typical Kong Gateway hybrid deployment:
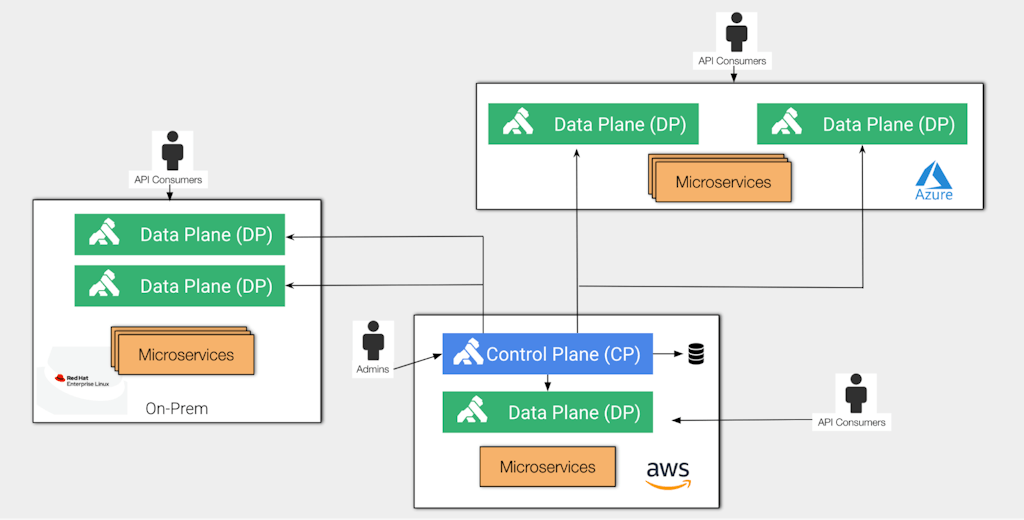
In this context, the control plane (CP) is responsible for administration tasks, while the data plane (DP) is exclusively used by API consumers. Again, in a hybrid deployment, the control plane and data planes run in completely separate environments.
This separation is particularly important to implement elastic data planes to support different throughput along the way.
Kong provides two control plane flavors: Kong Konnect SaaS and self-managed control plane. The data planes should connect to a control plane, regardless of where it is running.
Kong and Kafka
Specifically for transformation policies, the
[Kafka Upstream plugin](https://docs.konghq.com/hub/kong-inc/kafka-upstream/)Kafka Upstream plugin abstracts the Kafka infrastructure transforming REST requests and publishing them as new messages in Topics of the existing Event Processing infrastructure.
The diagram below shows Kong Gateway data plane exposing and controlling the consumption of the services and applications collection with multiple policies and protocols. In such topology, Kong Gateway is responsible for two main roles:
- Providing advanced capabilities to protect the Kafka infrastructure exposure with Kong policies including all capabilities described before.
- Kong is playing the gateway role not just to Kafka infrastructure but to any app/service we have behind it, including K8s clusters, integration buses, app servers, legacy systems, etc. From the API consumer perspective, Kong normalizes the access to all these systems with standard protocols, like Rest, Websockets, gRPC, etc.
AWS deployment
For the purpose of this blog, we're going to explore the Kong Konnect SaaS control plane. That is, while the control plane, managed by Kong, is responsible for administration tasks, the data plane is exclusively used by API consumers. Our data plane will be running on an Amazon EKS Cluster.
The following picture shows the topology:
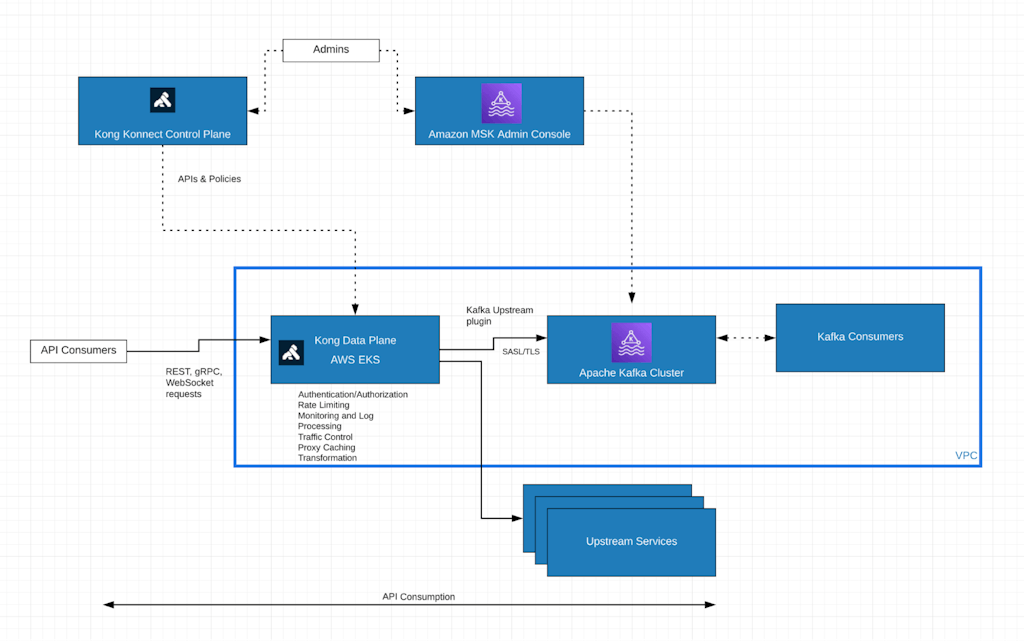
- The Amazon MSK Cluster is being exposed by the Kong Data Plane running on an [Amazon EKS](https://aws.amazon.com/eks/)Amazon EKS (Elastic Kubernetes Service) cluster.
- The Kong data plane, via the Kafka Upstream plugin, connects to the Amazon MSK cluster through a SASL/TLS connection.
- Kong data plane, Amazon MSK and the Kafka Consumer run on the same VPC.
- API consumers, sending requests to the Kong data plane, play the Kafka event streaming producer role.
- API consumers send regular REST based requests to the Kong data plane, which converts them to events and publishes them to an existing Kafka topic.
- The Kafka consumer subscribes to the same Kafka topic.
Amazon MSK cluster
For the purposes of this blog post, we’re going to create a fundamental and simple Apache Kafka cluster. The main point here is to explain how the Kong Konnect data plane instance can expose and protect the event streaming platform.
For a production-ready deployment, the cluster should consider several other capabilities, including scalability, availability, etc. Read the documentation for an extensive description of the [MSK Cluster](https://docs.aws.amazon.com/msk/latest/developerguide/msk-create-cluster.html)MSK Cluster creation process.
The configuration process can be divided into three steps:
- The cluster configuration with fundamental settings related to topics, logs, etc.
- The cluster information setting with specific MSK configurations including subnets, security group, Kafka version, etc.
- The client authentication setting to configure how the cluster will be exposed to its clients, including Kong Konnect data plane. For this blog post, we’re going to expose it with three different mechanisms: unauthorized plaintext, unauthorized through TLS connections and [SASL](https://www.rfc-editor.org/rfc/rfc4422)SASL (Simple Authentication and Security Layer) / [SCRAM](https://www.rfc-editor.org/rfc/rfc5802)SCRAM (Salted Challenge Response Authentication Mechanism) over TLS.
The deployment assumes you have already a VPC created with two public and two private subnets and a security group defined. They’re going to be used by both Amazon MSK and Amazon EKS deployments. For the post, the security group allows all traffic and protocols from all sources.
Cluster Configuration
Create a `cluster_config.txt` file with the following lines:
auto.create.topics.enable = true
delete.topic.enable = true
log.retention.hours = 8
This self-explanatory configuration can be extended with other settings as described in this [MSK documentation page](https://docs.aws.amazon.com/msk/latest/developerguide/msk-configuration-properties.html)MSK documentation page.
Use the following command to push the configuration.
aws kafka create-configuration --region us-east-2 --name "kong-msk" --kafka-versions "3.3.2" --server-properties fileb://cluster_config.txt
You can check the configuration with:
% aws kafka list-configurations --region us-east-2
{
    "Configurations": [
        {
            "Arn": "arn:aws:kafka:us-east-2:<your_aws_account>:configuration/kong-msk/53a7d4b4-b7e7-4e15-8c31-77a0d4dc8f88-6",
            "CreationTime": "2023-03-11T11:59:42.489000+00:00",
            "KafkaVersions": [
                "3.3.2"
            ],
            "LatestRevision": {
                "CreationTime": "2023-03-11T11:59:42.489000+00:00",
                "Revision": 1
            },
            "Name": "kong-msk",
            "State": "ACTIVE"
        }
    ]
}
Save the ARN provided for the configuration as we are going to use it to create our MSK Cluster.
Create another file named `clusterinfo.json` with the Amazon MSK settings.
{
  "BrokerNodeGroupInfo": {
     "BrokerAZDistribution": "DEFAULT",
     "InstanceType": "kafka.m5.large",
     "ClientSubnets": [
         "subnet-0eeacfd94974d3afd", "subnet-0276627021e74b64b"
     ],
     "SecurityGroups": [
         "sg-0c5664862ba548060"
     ]
  },
  "ClusterName": "kong-msk",
  "ConfigurationInfo": {
     "Arn": "arn:aws:kafka:us-east-2:<your_aws_account>:configuration/kong-msk/53a7d4b4-b7e7-4e15-8c31-77a0d4dc8f88-6",
     "Revision": 1
  },
  "EncryptionInfo": {
     "EncryptionInTransit": {
         "InCluster": true,
         "ClientBroker": "TLS_PLAINTEXT"
     }
  },
  "EnhancedMonitoring": "PER_TOPIC_PER_BROKER",
  "KafkaVersion": "3.3.2",
  "NumberOfBrokerNodes": 2
}
The main settings are:
- ClientSubnets: these are the private subnets of your existing VPC
- SecurityGroups: the VPC security group
- ConfigurationInfo: the ARN you got from your Cluster information registration
- EncryptionInfo: allow TLS and plaintext in transit connections with the Kafka consumers
Client Authentication
Create a third file named `clientauthentication.json` with specific Amazon MSK authentication settings like this. The settings say we’re enabling SASL/SCRAM and unauthenticated-based connections.
{
  "Sasl": {
    "Scram": {
      "Enabled": true
    },
    "Iam": {
      "Enabled": false
    }
  },
  "Unauthenticated": {
    "Enabled": true
  }
}
Cluster Configuration
With all files in place, it's time to create the Amazon MSK cluster. Use a command like this:
aws kafka create-cluster --region us-east-2 --cli-input-json file://clusterinfo.json --client-authentication file://clientauthentication.json
You can check the cluster configuration with the following command. Where --cluster-arn has the ARN of your cluster you received with the create-cluster command.
% aws kafka describe-cluster --region us-east-2 --cluster-arn arn:aws:kafka:us-east-2:<your_aws_account>:cluster/kong-msk/<your_msk_cluster_id>
Test the MSK cluster connections
Bootstraps
To run basic tests against our MSK cluster, we need to get a list of its bootstrap endpoints. You can use the following command to list them. Note that the command returns the three main endpoints:
% aws kafka get-bootstrap-brokers --region us-east-2 --cluster-arn arn:aws:kafka:us-east-2:<your_aws_account>:cluster/kong-msk/8d8ef521-35be-459a-9c26-ec511f7fc171-6
{
    "BootstrapBrokerString": "b-2.kongmsk.e85311.c6.kafka.us-east-2.amazonaws.com:9092,b-1.kongmsk.e85311.c6.kafka.us-east-2.amazonaws.com:9092",
    "BootstrapBrokerStringTls": "b-2.kongmsk.e85311.c6.kafka.us-east-2.amazonaws.com:9094,b-1.kongmsk.e85311.c6.kafka.us-east-2.amazonaws.com:9094",
    "BootstrapBrokerStringSaslScram": "b-2.kongmsk.e85311.c6.kafka.us-east-2.amazonaws.com:9096,b-1.kongmsk.e85311.c6.kafka.us-east-2.amazonaws.com:9096"
}
Plaintext test
Make sure you have the Kafka CLI installed on your environment. You can check the Plaintext port to see existing topics with:
./kafka-topics.sh --bootstrap-server "b-2.kongmsk.e85311.c6.kafka.us-east-2.amazonaws.com:9092,b-1.kongmsk.e85311.c6.kafka.us-east-2.amazonaws.com:9092" --list
TLS test
First of all, create a file named `client_ssl.properties` saying the CLI should connect using SSL:
# cat client_ssl.properties
security.protocol=SSL
Check the same topics using the TLS/SSL endpoint and port now:
./kafka-topics.sh --bootstrap-server "b-2.kongmsk.e85311.c6.kafka.us-east-2.amazonaws.com:9094,b-1.kongmsk.e85311.c6.kafka.us-east-2.amazonaws.com:9094" --list --command-config ./client_ssl.properties
SASL/SCRAM connection
Kong data plane user and password
Since the Kong data plane will connect to Amazon MSK through a SASL/SCRAM connection, we need to create a user/password pair to it.
The process comprises three main steps:
- Create the user/password pair and store them as an AWS Secrets Manager secret.
- Associate the secret to the Amazon MSK cluster.
- Use Apache Kafka ACLs to grant permissions to the user to access Kafka topics.
Create an AWS key and secret
The AWS Secret Manager secret containing the user/password pair has to have an AWS KMS key enabled. Check the
[documentation](https://docs.aws.amazon.com/msk/latest/developerguide/msk-password.html)documentation to learn more.
You can create a new KMS key with the following command. Save the key ID as you’re going to use it to create the secret next.
% aws kms create-key --tags TagKey=Name,TagValue=kong-msk
{
    "KeyMetadata": {
        "AWSAccountId": "11488351",
        "KeyId": "ef525077-b308-49a3-ba5c-29a8145e4ed5",
        "Arn": "arn:aws:kms:us-east-2:<your_aws_account>:key/ef525077-b308-49a3-ba5c-29a8145e4ed5",
        "CreationDate": "2023-03-09T19:45:11.420000-03:00",
        "Enabled": true,
        "Description": "",
        "KeyUsage": "ENCRYPT_DECRYPT",
        "KeyState": "Enabled",
        "Origin": "AWS_KMS",
        "KeyManager": "CUSTOMER",
        "CustomerMasterKeySpec": "SYMMETRIC_DEFAULT",
        "KeySpec": "SYMMETRIC_DEFAULT",
        "EncryptionAlgorithms": [
            "SYMMETRIC_DEFAULT"
        ],
        "MultiRegion": false
    }
}
The secret name must begin with the prefix AmazonMSK_. Using the key ID you got from the previous command, you can create the secret with the following command. Note that our credentials for username and password are kong and kongkong.
aws secretsmanager create-secret --region=us-east-2 --name AmazonMSK_kong_msk --kms-key-id ef525077-b308-49a3-ba5c-29a8145e4ed5 --secret-string "{\"username\":\"kong\",\"password\":\"kongkong\"}"
{
    "ARN": "arn:aws:secretsmanager:us-east-2:<your_aws_account>:secret:AmazonMSK_kong_msk-CnuJVr",
    "Name": "AmazonMSK_kong_msk",
    "VersionId": "1dda9307-2fa0-4748-9074-28962c4aba75"
}
Associate the secret to the Amazon MSK cluster
The next step is to associate the secret to the cluster. Use the ARN of the secret you got after creating it. After doing that, the cluster will use it to control the authentication process.
aws kafka batch-associate-scram-secret --cluster-arn <your_amazon_msk_arn> --secret-arn-list <your_secret_arn>
Make sure you have your local CA certs in place. You can use the existing one you have in your Java installation like this. Change the command to reflect your installation.
cp /usr/lib/jvm/java-11-openjdk-amd64/lib/security/cacerts /tmp/kafka.client.truststore.jks
Create another file named client_sasl.properties with specific SASL/SCRAM settings. Note we’re using our user's credentials:
# cat client_sasl.properties
ssl.truststore.location=/tmp/kafka.client.truststore.jks

security.protocol=SASL_SSL
sasl.mechanism=SCRAM-SHA-512

sasl.jaas.config=org.apache.kafka.common.security.scram.ScramLoginModule required \
  username="kong" \
  password="kongkong";
Use Apache Kafka ACLs to grant permissions to the User
Now use Kafka ACL command to allow the user we just created to access all Kafka topics. Note we're connecting to Kafka using the SASL endpoint:
./kafka-acls.sh --bootstrap-server "b-2.kongmsk.e85311.c6.kafka.us-east-2.amazonaws.com:9096,b-1.kongmsk.e85311.c6.kafka.us-east-2.amazonaws.com:9096" --add --allow-principal "User:kong" --operation Create --operation Delete --operation Read --operation Write --topic=* --command-config ./client_sasl.properties
You should receive an output like this:
Adding ACLs for resource `ResourcePattern(resourceType=TOPIC, name=*, patternType=LITERAL)`:
 	(principal=User:kong, host=*, operation=READ, permissionType=ALLOW)
	(principal=User:kong, host=*, operation=CREATE, permissionType=ALLOW)
	(principal=User:kong, host=*, operation=WRITE, permissionType=ALLOW)
	(principal=User:kong, host=*, operation=DELETE, permissionType=ALLOW)

Current ACLs for resource `ResourcePattern(resourceType=TOPIC, name=*, patternType=LITERAL)`:
 	(principal=User:kong, host=*, operation=WRITE, permissionType=ALLOW)
	(principal=User:kong, host=*, operation=DELETE, permissionType=ALLOW)
	(principal=User:kong, host=*, operation=READ, permissionType=ALLOW)
	(principal=User:kong, host=*, operation=CREATE, permissionType=ALLOW)
Test the connection
Now we can check the topics:
./kafka-topics.sh --bootstrap-server "b-2.kongmsk.e85311.c6.kafka.us-east-2.amazonaws.com:9096,b-1.kongmsk.e85311.c6.kafka.us-east-2.amazonaws.com:9096" --list --command-config ./client_sasl.properties
Create a topic with the following command:
./kafka-topics.sh --bootstrap-server "b-2.kongmsk.e85311.c6.kafka.us-east-2.amazonaws.com:9096,b-1.kongmsk.e85311.c6.kafka.us-east-2.amazonaws.com:9096" --create --replication-factor 2 --partitions 1 --topic topic1 --command-config ./client_sasl.properties
Test Kafka Consumer and Producer
In a terminal start a Kafka Producer with:
./kafka-console-producer.sh --broker-list "b-2.kongmsk.e85311.c6.kafka.us-east-2.amazonaws.com:9096,b-1.kongmsk.e85311.c6.kafka.us-east-2.amazonaws.com:9096" --producer.config ./client_sasl.properties --topic topic1
Open another terminal and run the consumer:
./kafka-console-consumer.sh --bootstrap-server "b-2.kongmsk.e85311.c6.kafka.us-east-2.amazonaws.com:9096,b-1.kongmsk.e85311.c6.kafka.us-east-2.amazonaws.com:9096" --consumer.config ./client_sasl.properties --topic topic1 --from-beginning
If you type anything on the producer you should be able to check the consumer with the same data.
Konnect Data Plane EKS Cluster
Now, with the MSK cluster ready, let's build our Kong data plane. First of all, you can create an Amazon EKS cluster with the following command. Note that, since we're using the same private and public subnets, it will be running on the same VPC.
eksctl create cluster --name kong-msk \
  --nodegroup-name kong-msk \
  --version 1.25 \
  --nodes 1 \
  --node-type t2.xlarge \
  --region us-east-2 \
  --vpc-private-subnets=subnet-12345,subnet-67890 \
  --vpc-public-subnets=subnet-abcde,subnet-fghij
Kong Konnect control plane
[Register](https://konghq.com/products/kong-konnect/register)Register to get a Kong Konnect control plane.
Konnect new Runtime
Log in to Kong Konnect.
Go to "Runtime Manager" -> "default" -> "+ New Runtime Instance" -> "Kubernetes". Click on "Generate Certificate" and save the certificate and private key into corresponding files. For example:
Cluster Certificate: tls.crt
Certificate Key: tls.key
Injecting key and digital certificate
Create a Kubernetes namespace for the data plane.
kubectl create namespace kong-dp
Create secrets to digital certificate and key.
kubectl create secret tls kong-cluster-cert --cert=./tls.crt --key=./tls.key -n kong-dp
Konnect Data Plane
Copy and paste this text into a file called `values.yaml` on your local machine.
image:
  repository: kong/kong-gateway
  tag: "3.2.1.0"

secretVolumes:
- kong-cluster-cert

admin:
  enabled: false

env:
  role: data_plane
  database: "off"
  cluster_mtls: pki
  cluster_control_plane: <your_control_plane_endpoint>:443
  cluster_server_name: <your_control_plane_endpoint>
  cluster_telemetry_endpoint: <your_telemetry_server>:443
  cluster_telemetry_server_name: <your_telemetry_server>
  cluster_cert: /etc/secrets/kong-cluster-cert/tls.crt
  cluster_cert_key: /etc/secrets/kong-cluster-cert/tls.key
  lua_ssl_trusted_certificate: system
  konnect_mode: "on"
  vitals: "off"

ingressController:
  enabled: false
  installCRDs: false
Use Helm to deploy the data plane with endpoints provided by Kong Konnect control plane:
helm install kong-dp kong/kong -n kong-dp --values ./values.yaml
Checking the installation
Use kubectl to check the Kubernetes deployment
$ kubectl get deployment --all-namespaces
NAMESPACE     NAME           READY   UP-TO-DATE   AVAILABLE   AGE
kong-dp       kong-dp-kong   1/1     1            1           44s
kube-system   coredns        2/2     2            2           27m


$ kubectl get pod --all-namespaces
NAMESPACE     NAME                            READY   STATUS    RESTARTS   AGE
kong-dp       kong-dp-kong-7b96b8fc8b-cc45x   1/1     Running   0          70s
kube-system   aws-node-jkc4t                  1/1     Running   0          18m
kube-system   coredns-f9c975b5b-94wwn         1/1     Running   0          27m
kube-system   coredns-f9c975b5b-b247x         1/1     Running   0          27m
kube-system   kube-proxy-lbbbg                1/1     Running   0          18m


kubectl get service kong-dp-kong-proxy -n kong-dp --output=jsonpath='{.status.loadBalancer.ingress[0].hostname}'
<ELB_ADDRESS>
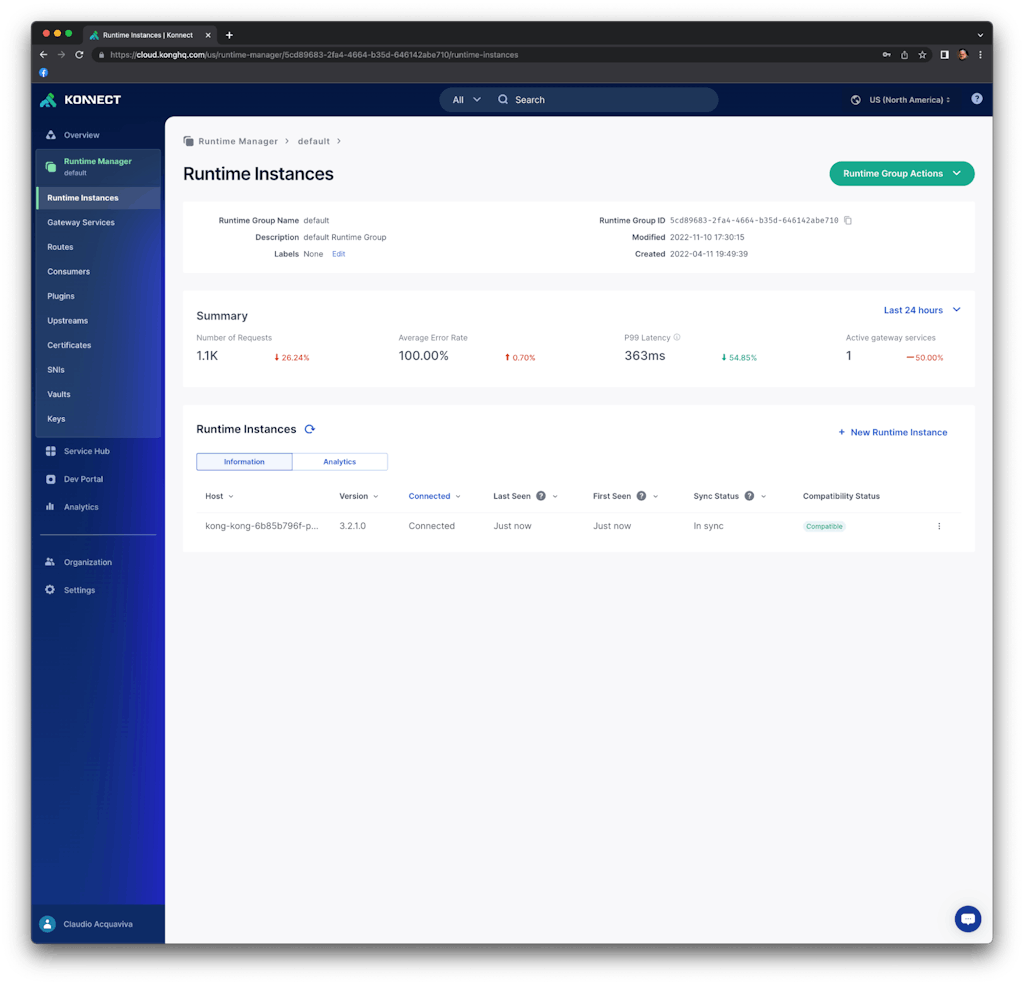
If should be able to see the new runtime in Kong Konnect control plane:
Send a request to the runtime
Use the load balancer provisioned by AWS to send requests to the data plane:
# http <ELB_ADDRESS>
HTTP/1.1 404 Not Found
Connection: keep-alive
Content-Length: 48
Content-Type: application/json; charset=utf-8
Date: Tue, 21 Mar 2023 13:23:14 GMT
Server: kong/3.2.1.0-enterprise-edition
X-Kong-Response-Latency: 0

{
    "message": "no Route matched with those values"
}
Kong serviceless route
With the data plane running it’s time to create the first API. A regular Kong API is based on two constructs:
- Kong Service: an entity representing an external upstream API or microservice
- Kong Route: exposes Kong Services to external consumers
Since the Kafka Upstream plugin is responsible for the Kafka cluster settings, specifically for this integration, we should create a service-less Kong route.
In order to do it, inside the runtime group panel, click on "Routes" -> "Add route". You should see the following panel:
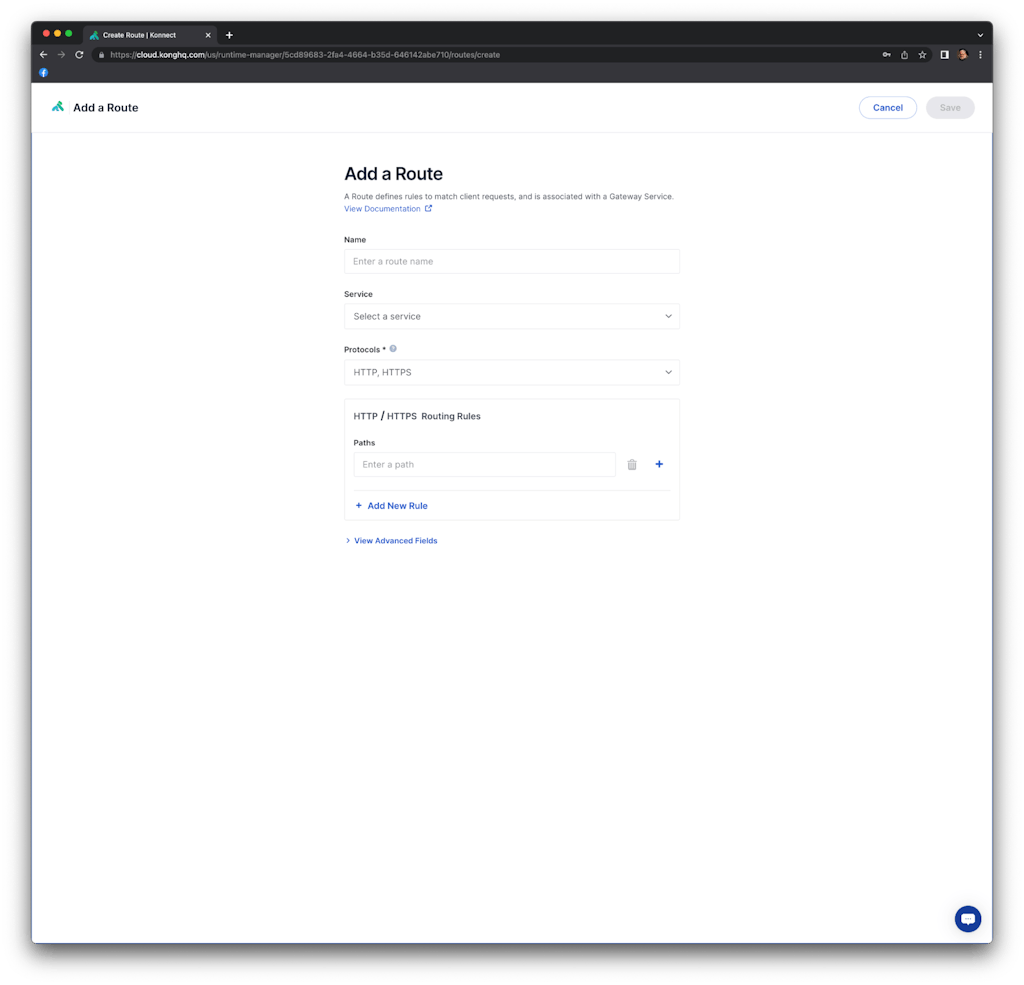
We named the route as "route_kafka" and it's going to be exposed with the "/kafka" path. Note that we could add other protocols besides HTTP, specify method-based routes, define host-based routing, etc.
Kafka Upstream plugin
Now, let's enable and configure the Kong route with the Kafka Upstream plugin.
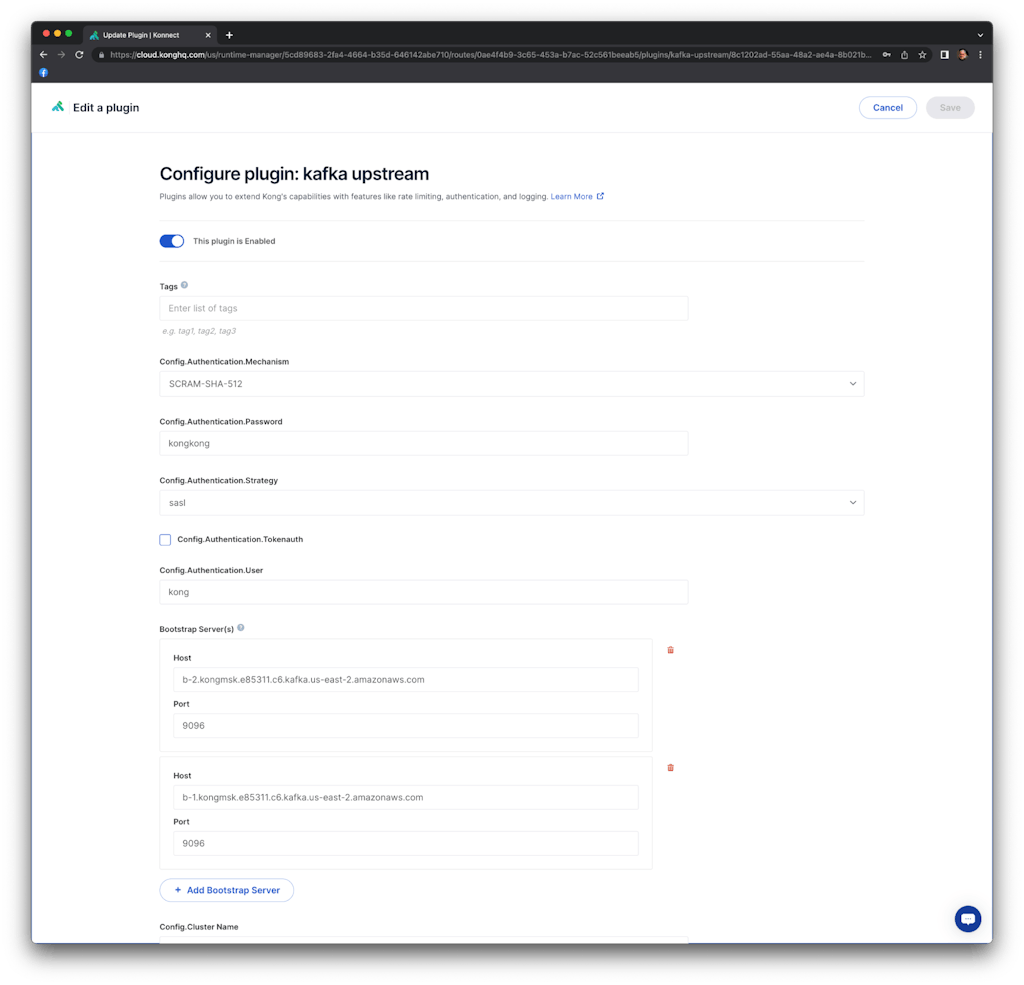
Click on the route and, inside the "Plugins" tab, click on "+ Add plugin" button. Inside the "Transformations" section, select the Kafka Upstream plugin and set the following parameters. Note that we are using the secrets we have previously created and stored in AWS Secret Manager. Also note that the communication between the data plane and the Kafka cluster will be based on a SASL/SSL connection:
Config.Authentication.Mechanism: SCRAM-SHA-512
Config.Authentication.Password: kongkong
Config.Authentication.Strategy: SASL
Config.Authentication.User: kong
Bootstrap Server(s)
	Host: b-2.kongmsk.e85311.c6.kafka.us-east-2.amazonaws.com
	Port: 9096
            and
	Host: b-1.kongmsk.e85311.c6.kafka.us-east-2.amazonaws.com
	Port: 9096
Config.Forward Body: true
Config.Forward Headers: true
Config.Forward Method: true
Config.Forward URI: true
Config.Producer Async: true
Config.Security.SSL: true
Config.Topic: topic1
As you can see, we are using plain texts for both user and password settings. For production environments, we highly recommend using [AWS Secrets Manager](https://aws.amazon.com/pt/secrets-manager/)AWS Secrets Manager and [Kong Secrets Management](https://docs.konghq.com/gateway/latest/kong-enterprise/secrets-management/)Kong Secrets Management capability to manage those secrets.
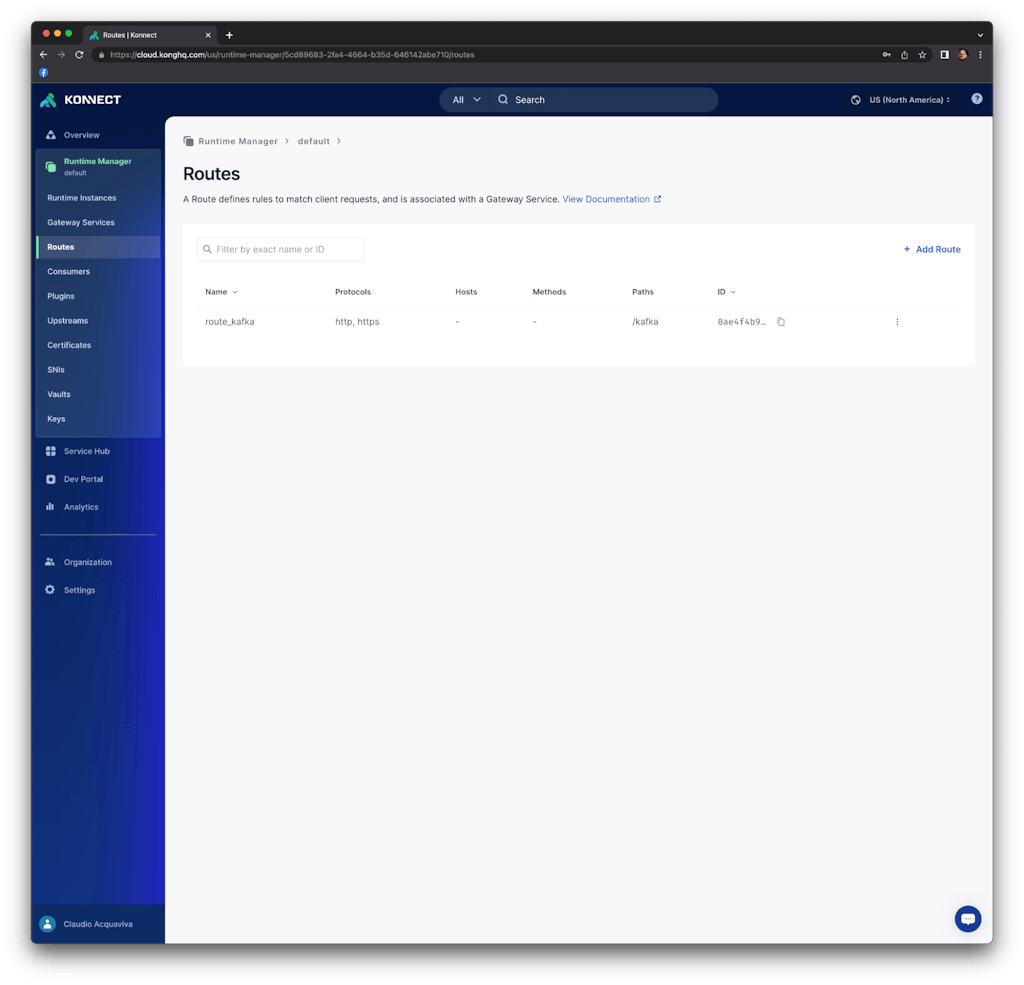
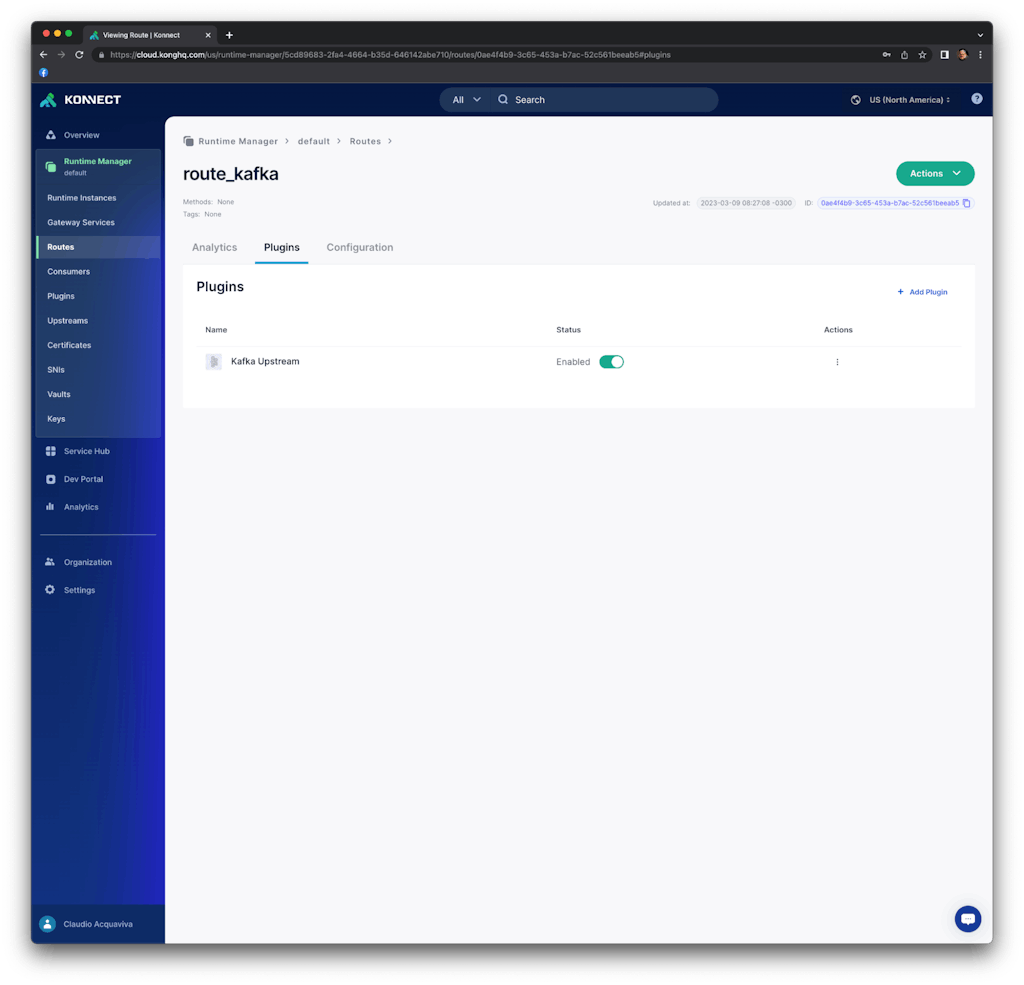
Click on "Save." You should see the Kafka Upstream plugin enabled on our serviceless route.
Consume the route and check the Kafka topic
On a terminal, send a request to consume the route using the load balancer provisioned by AWS. The request includes a new header "aaa" with value "888".
% http <ELB_ADDRESS>/kafka aaa:888

HTTP/1.1 200 OK
Connection: keep-alive
Content-Length: 48
Content-Type: application/json; charset=utf-8
Date: Tue, 21 Mar 2023 13:33:18 GMT
Server: kong/3.2.1.0-enterprise-edition
X-Kong-Response-Latency: 2264

{
    "message": "message sent"
}
The consumer should show the new message
./kafka-console-consumer.sh --bootstrap-server "b-2.kongmsk.e85311.c6.kafka.us-east-2.amazonaws.com:9096,b-1.kongmsk.e85311.c6.kafka.us-east-2.amazonaws.com:9096" --consumer.config ./client_sasl.properties --topic topic1 --from-beginning
{"headers":{"accept":"*/*","accept-encoding":"gzip, deflate","host":"<ELB_ADDRESS>","aaa":"888","user-agent":"HTTPie/3.2.1","connection":"keep-alive"}}
Conclusion
This blog post described Kong’s capabilities to expose and protect an Amazon MSK cluster with enterprise-wide policies implemented by the Kong Gateway data plane. Amazon MSK and Kong Konnect can significantly enhance the usability of a next-generation service connectivity platform to intelligently broker information across modern architectures.
[Kong Konnect](https://konghq.com/konnect)Kong Konnect simplifies API management and improves security for all services across Kafka infrastructure. [Try it for free](https://konghq.com/products/kong-konnect/register)Try it for free today!