In this article, we're going to highlight a handful of Insomnia plugins that we're sure you'll find useful. We'll show you how to use them and demonstrate why they'll come in handy. By the end, you'll feel comfortable using Insomnia plugins and be familiar with some noteworthy ones. You might even feel adventurous enough to start building your own.
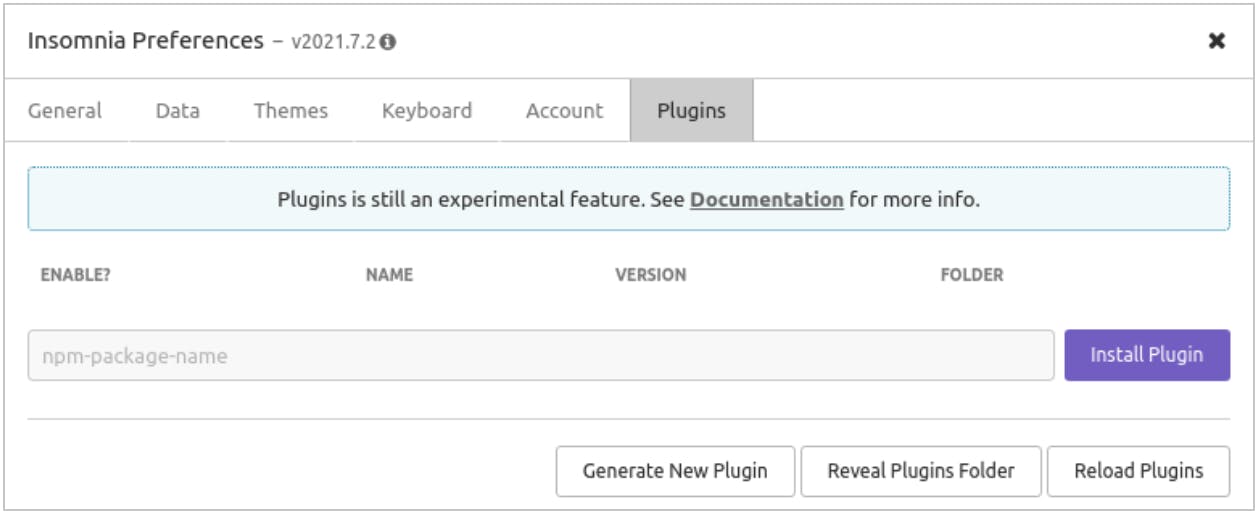
Once you've done that, you'll want to become familiar with how to install a plugin. With Insomnia running, go to **Application | Preferences**. Go to the **Plugins** tab in the dialog.
Each plugin listed at Insomnia's [Plugin Hub](https://insomnia.rest/plugins)Plugin Hub has a unique plugin name. You'll enter the plugin’s name here (in the text input with the placeholder npm-package-name). For example, if we wanted to install the Faker plugin, we would enter insomnia-plugin-faker. Then, we click on **Install Plugin**.
After a few moments, Insomnia will install the plugin, and we can enable it.
All plugins are installed in a plugins folder. For example, if we install Insomnia on Linux, the plugins folder is $HOME/.config/Insomnia/plugins. Each installed plugin has its own sub-folder.
To uninstall a plugin, you can simply delete the plugin's sub-folder. If you want to install a plugin that is not in the Plugin Hub—if you build one yourself, for example—you would simply put your plugin code in its own sub-folder here.
Now that we know how to install plugins and where they live, let's look at our first one: Faker.
To demonstrate this, we'll create a [Mockbin](https://mockbin.org)Mockbin endpoint and then send a request with some Faker-generated values. Afterward, we can check our Mockbin request history to see how those values came across the wire.
### Generate Fake Data for Query Parameters
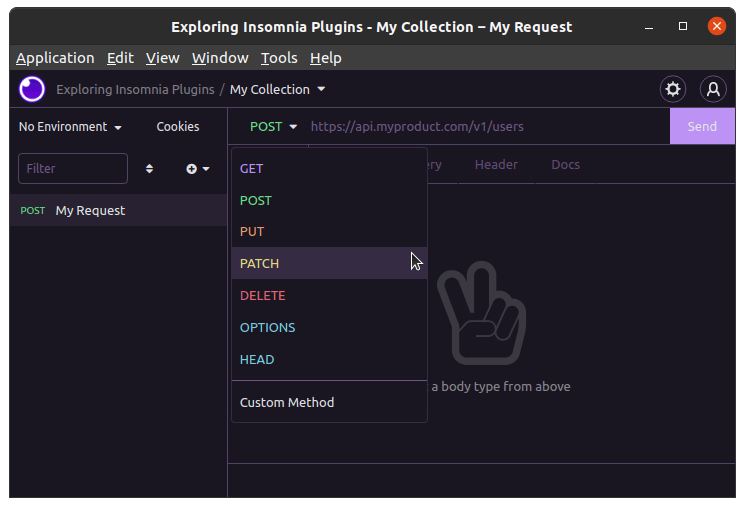
First, we create a GET request to our Mockbin endpoint. Then, we click on **Query** to add some query parameters.
Start by adding a parameter called first_name. For its value, we press ctrl+space (or cmd+space) to bring up the template tags menu. We find **Faker** from the menu list and choose **Name**. Then, we click on the resulting **Faker -> Name** tag, which brings up a dialog with Faker settings. We choose **FirstName** as the kind of name that we want generated.
Similarly, we add an id parameter, which will get its value from the **Faker -> Random** group. We'll configure this tag to generate a random **UUID**.
With our query parameters established, we click **Send**.
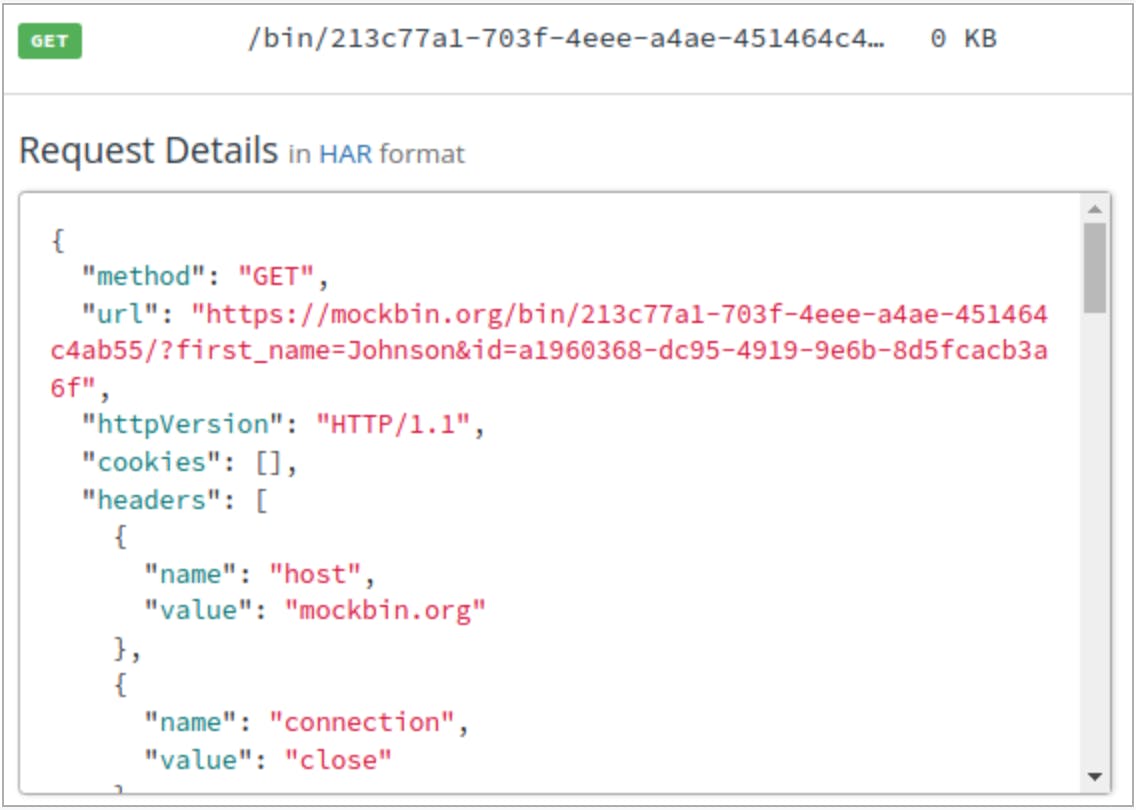
When we navigate to Mockbin to see the request that came through, we can see the resulting query parameters used:
The first_name generated was Johnson, and we can see a random UUID used for id.
### Generate Fake Data for the Request Body
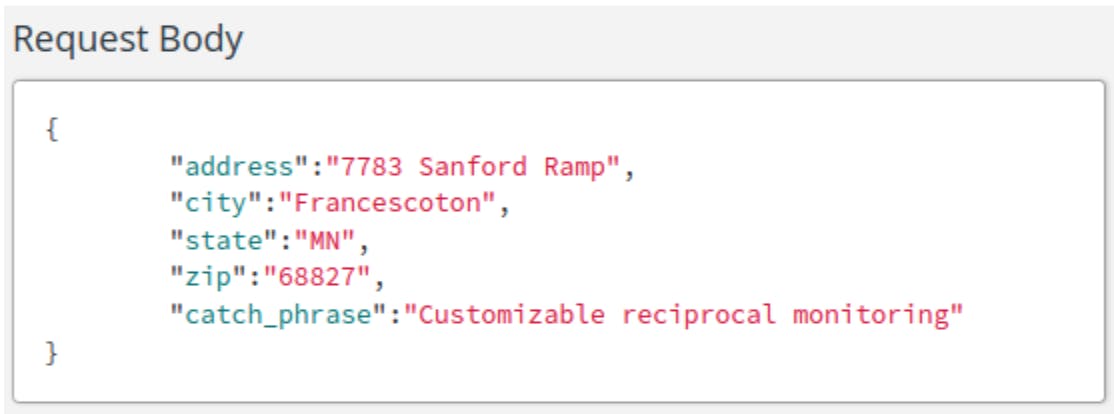
As another example, we'll send a POST request to our Mockbin endpoint. This time we'll send a request body payload with a randomly generated address and business catchphrase (Faker has some fun little hidden gems).
When we look at Mockbin, we see the randomly generated address elements and an invented catchphrase.
## The Path Parameter Plugin
When working with REST APIs, you will have endpoint URLs that use path parameters. These are dynamic values, often representing the id of a resource. However, unlike query parameters, these values make up part of the path. For example, the [Numbers API](http://numbersapi.com)Numbers API returns math trivia facts for any given number. The endpoint URL is http://numbersapi.com/:number/math. Notice how the number you are requesting trivia for is provided as a path parameter.
In the URL bar for your request, at the point where you need a path parameter, insert a template tag and search for **Path parameter** from the list of available options. You can provide a display name for your parameter, and then you provide a value.
The value for your path parameter can be static (as shown above), or it can be retrieved from variables set for an Insomnia environment.
Each .env file has a different value for the variable status_code.
Test this out with [httpstat.us](https://httpstat.us)httpstat.us, a handy site for getting responses with specific HTTP status codes. A request to https://httpstat.us/301, for example, returns a 301 Moved Permanently response.
In Insomnia, the status code we want will depend on the .env file we use. Similar to our previous examples, we'll use a template tag in our endpoint URL, and we'll choose **dotenv** from our template tag options. In our tag settings, we specify the location of the .env file and the variable in that file that we want to use. We can switch between our files to use different sets of values.
As an additional level of indirection, we could configure the template tag to look to our Insomnia environment for the status_code value. Meanwhile, we set up our Insomnia environment to use the dotenv template tag. This way, we simply switch our Insomnia environment to get different values, but those values still come from external .env files.
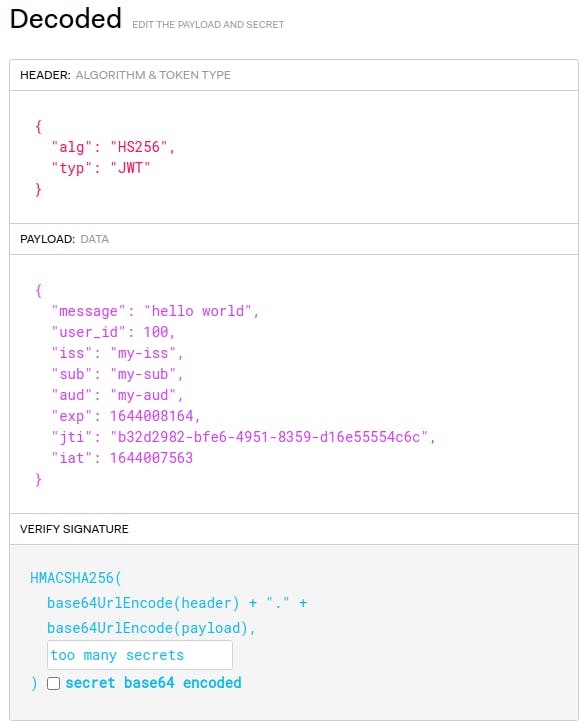
After sending the request to Mockbin, we see the authentication header that came through.
If we were to take this token and decode it at [jwt.io](https://jwt.io)jwt.io, we could verify the signature by providing our signing secret. Then, verify that we included all of our payload options.
## Theme Plugins
While functional plugins may be a huge help in your API design and testing, you might also enjoy exploring plugins that implement a new *theme* (color scheme) for your Insomnia desktop application.
Then, while still in the **Preferences** dialog, click on the **Themes** tab. Find and select the theme you just installed.
The Plugin Hub for Insomnia has a large number of theme plugins. They're worth exploring to find a theme for Insomnia that fits you perfectly.
## Conclusion
Plugins are an excellent way to enhance the power of Insomnia, making it even more useful for your specific scenarios. Many plugins leverage Insomnia's template tag system to let you dynamically set values at request time. As you explore the [Plugin Hub](https://insomnia.rest/plugins)Plugin Hub, you'll find plugins that help with response formatting, integrate with third-party services, assist in team collaboration and more. On top of that, there are also theme plugins for customizing your look and feel.
What You'll Build
To explore the new integration, I'll build a realistic API platform workflow using Konnect, Kong Gateway, and Insomnia.
By the end of this tutorial, I'll have:
A Konnect Control Plane (KongAir Dev)
A local Kong Gateway Data Pl
Juhi Singh
# Insomnia 13: Native Kong Konnect Integration for Real-Time API Testing
Have you ever…. Copied an API spec out of Kong Konnect, or where you manage your APIs, pasted it into your API client, and immediately wondered if it’s the latest version? Sent an email to your platform team with the subject line “ which endpoint sh
Haley Giuliano
# How to parse and forward API logs with Kong plugins
As more companies are undergoing digital transformation (resulting in a huge explosion of APIs and microservices), it's of paramount importance to get all the necessary data points and feedback to provide the best experience for both users and devel
As more companies invest in a cloud native infrastructure , they're choosing to prioritize their applications as microservices —architecting them into distinct servers. Each component is responsible for one (and only one) feature. For example, yo
As part of the Kong Gateway 2.6 release, we shipped a brand new jq plugin for anyone with an enterprise license to use. It’s like we combined the request and response transformer plugins to form a single, more powerful plugin—supercharging the w
Event Hooks is a new Kong Enterprise feature launched in the Kong Gateway 2.5 Release . This feature sends you notifications when certain events happen on your Kong Gateway deployment. Kong Gateway listens for events, like routes, services, consum
As the software application world moves from monolith architectures to microservices , we are also seeing a shift toward developing modular and reusable APIs. According to APIOps , reusable APIs are consumable APIs, which means they must be well-d
Viktor Gamov
# How to Test Gateway APIs Directly from Kong Konnect with Insomnia
What You'll Build
To explore the new integration, I'll build a realistic API platform workflow using Konnect, Kong Gateway, and Insomnia.
By the end of this tutorial, I'll have:
A Konnect Control Plane (KongAir Dev)
A local Kong Gateway Data Pl
Juhi Singh
# Insomnia 13: Native Kong Konnect Integration for Real-Time API Testing
Have you ever…. Copied an API spec out of Kong Konnect, or where you manage your APIs, pasted it into your API client, and immediately wondered if it’s the latest version? Sent an email to your platform team with the subject line “ which endpoint sh
Haley Giuliano
# How to parse and forward API logs with Kong plugins
As more companies are undergoing digital transformation (resulting in a huge explosion of APIs and microservices), it's of paramount importance to get all the necessary data points and feedback to provide the best experience for both users and devel
As more companies invest in a cloud native infrastructure , they're choosing to prioritize their applications as microservices —architecting them into distinct servers. Each component is responsible for one (and only one) feature. For example, yo
As part of the Kong Gateway 2.6 release, we shipped a brand new jq plugin for anyone with an enterprise license to use. It’s like we combined the request and response transformer plugins to form a single, more powerful plugin—supercharging the w
Event Hooks is a new Kong Enterprise feature launched in the Kong Gateway 2.5 Release . This feature sends you notifications when certain events happen on your Kong Gateway deployment. Kong Gateway listens for events, like routes, services, consum
As the software application world moves from monolith architectures to microservices , we are also seeing a shift toward developing modular and reusable APIs. According to APIOps , reusable APIs are consumable APIs, which means they must be well-d
Viktor Gamov
## Ready to see Kong in action?
Get a personalized walkthrough of Kong's platform tailored to your architecture, use cases, and scale requirements.