Infrastructure as code is a core component of all modern SRE team's day-to-day work. There are plenty of options available, but the one that I'm most excited about is [Pulumi](https://pulumi.com?utm_campaign=partners&utm_source=konghq.com&utm_medium=web)Pulumi. Instead of writing a domain-specific language (DSL) to configure your infrastructure, Pulumi lets you write the language you already know. For me, that's Typescript, but if you prefer Go, Python or DotNet programming languages, that's an option too.
As with all of these tools, though, provisioning your infrastructure is only half of the battle. Once you have your virtual machine or Kubernetes cluster available, you must configure it to run your application.
Now that you have Pulumi installed, we can bootstrap a new Pulumi project:
pulumi new aws-typescript --name pulumi-kong-dp --dir pulumi-kong-dp
This creates a new Pulumi project with a new AWS S3 bucket and returns the bucket ID as an output. Now's a good time to check if you configured your AWS credentials correctly, so run pulumi up to try and create the bucket (don't worry, we'll delete it again in a second).
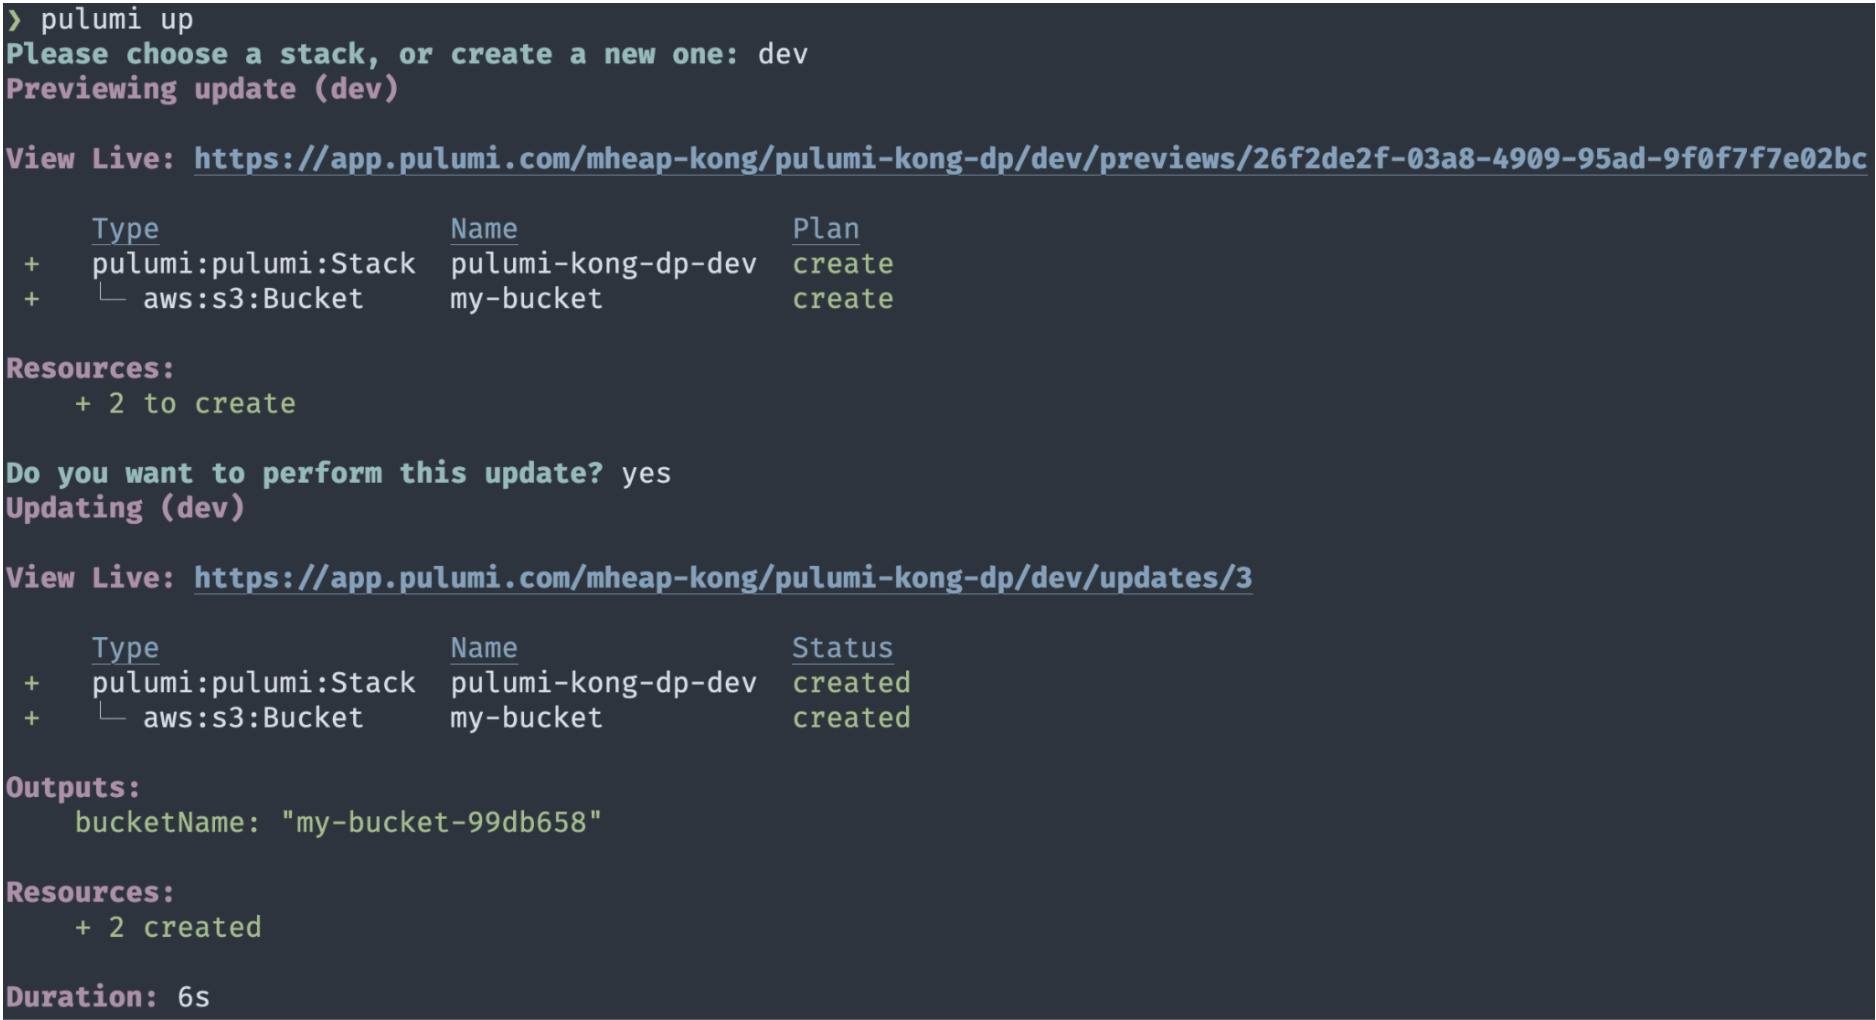
Pulumi will ask you which stack you'd like to use (choose dev) before showing you a preview of the changes it will make. Accept the changes and confirm that you'd like to apply the update. Pulumi will now create your S3 bucket, and you should see a screen that looks like this:
Switching to the AWS console, you can search for my-bucket, and it should show your newly created bucket:
Congratulations! You've just installed Pulumi and created your first piece of infrastructure using its Typescript SDK. Let's go ahead and delete that bucket now by running pulumi destroy, as we don't need it for the rest of this blog post.
## Create an EC2 Instance With Pulumi
We will deploy a new Ubuntu 20.04 instance to EC2 to act as our Konnect data plane. We need to use Pulumi to fetch some configuration values that we need, such as the AMI ID.
Open up index.ts and replace the contents with the following:
import * as aws from "@pulumi/aws";
import * as pulumi from "@pulumi/pulumi";
const ami = pulumi.output(
aws.ec2.getAmi({ filters:[{ name:"name", values:["ubuntu/images/hvm-ssd/ubuntu-focal-20.04-amd64-server-*"],},], owners:["099720109477"],// This owner ID is Canonical mostRecent:true,})
);
This gives us the AMI ID for the most recent release of Ubuntu 20.04 to use later when we create a new EC2 instance.
In addition to the AMI ID, we also need to create a new security group. This group needs to allow SSH access on port 22 for provisioning the machine, plus inbound traffic on port 8080 (the Kong proxy port) and outbound traffic on all ports. To create this security group, add the following to index.ts:
const group = new aws.ec2.SecurityGroup("kong-security-group",{ ingress:[{ protocol:"tcp", fromPort:22, toPort:22, cidrBlocks:["0.0.0.0/0"]},{ protocol:"tcp", fromPort:8080, toPort:8080, cidrBlocks:["0.0.0.0/0"],},], egress:[{ protocol:"tcp", fromPort:0, toPort:65335, cidrBlocks:["0.0.0.0/0"]},],});
At this point, we have everything we need to create a new EC2 instance, so edit index.ts once more and add a new EC2 instance definition:
const server = new aws.ec2.Instance("kong-server",{ instanceType:"t2.micro", vpcSecurityGroupIds:[group.id], ami: ami.id, keyName:"mheap-gateway"// Don't forget to change this});
By putting together the AMI ID, security group and EC2 instance configuration, we now have a Pulumi configuration that deploys everything we need to run a new server using AWS. Run pulumi up now and watch as it creates a new server.
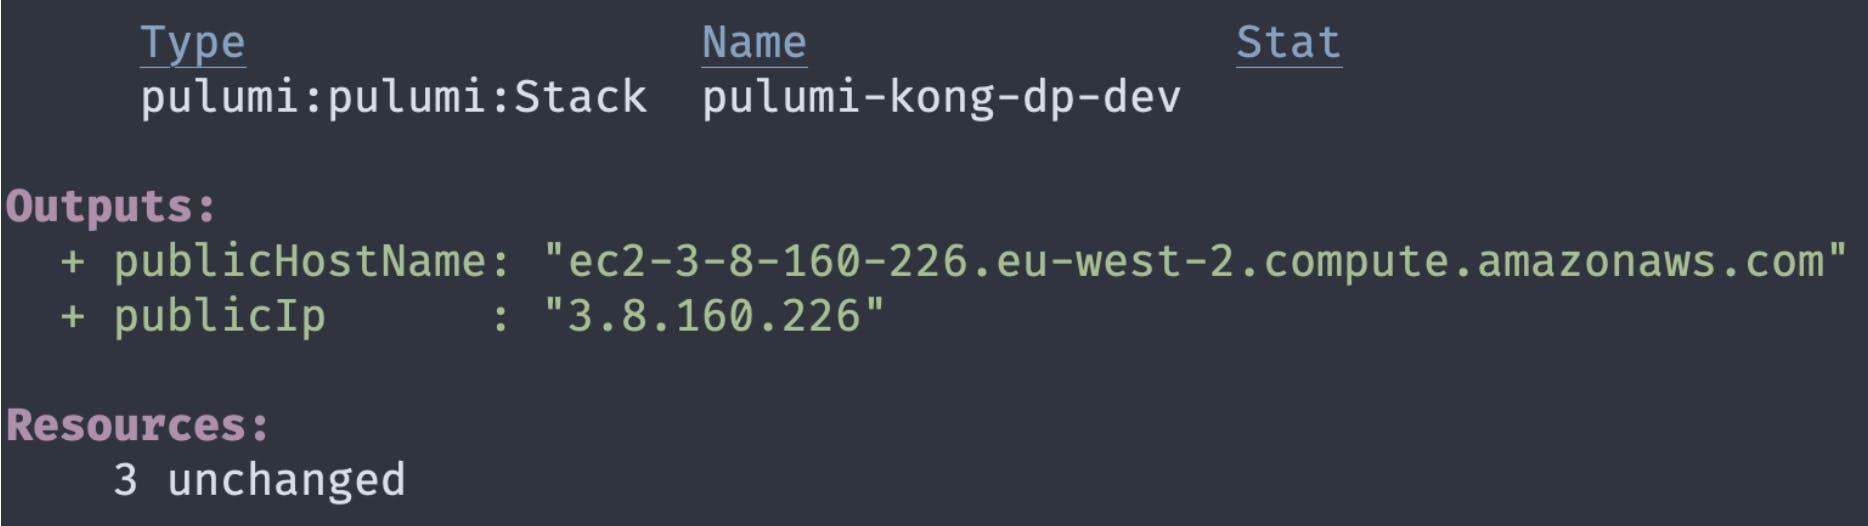
This is great, but we don't know how to connect to the server, as we don't have its public DNS name. Let's make one final change to index.ts to export that data as an output by adding the following to the end of the file:
Pulumi automatically shows any exports in the output, so if you run pulumi up one more time, you should see your server's public IP address and hostname.
Now that we've got a server up and running, it's time to install the Kong Gateway and configure it with the correct certificates that allow you to use it as a Konnect data plane.
Fortunately, there's a kong-pulumi package which takes care of this for you! Run npm install kong-pulumi — save to install it, then add the following to the bottom of index.ts:
import * as fs from "fs";
const connection = { host: server.publicIp, username:"ubuntu", privateKey: fs
.readFileSync("/path/to/mheap-gateway.pem")
.toString(), passphrase:"",};
This code configures the connection details that the plugin requires to connect to your new server. Make sure to change the path to the private key to point to the key you used in the previous step.
Next, we need to provide authentication details for the Konnect API, which we use to fetch certificates. We use the Pulumi secrets system to keep these secure. Run the following to set your Konnect username and password so that you can use them in index.ts:
pulumi config set --secret konnectUsername "<email>"pulumi config set --secret konnectPassword "<password>"
Once that's done, we also need to configure our code to use those secrets. To do so, add the following to the bottom of index.ts:
import * as kong from "kong-pulumi";
const config = new pulumi.Config();
const auth: kong.KongUsernameLogin = { username: config.require("konnectUsername"), password: config.require("konnectPassword"),};
Finally, we need to run the kong-pulumi package to provision our data plane. Add the following to index.ts to provision the server using the connection details and authentication credentials that we created above:
const provisionDp = new kong.CreateKongDataPlane(
"provision-data-plane",{ connection, auth, version:"2.5.0.1",},{ dependsOn: server });
You can see that we pass in connection and auth, along with the version of the gateway that we want to install. Finally, we use a Pulumi feature to specify that this provisioning should not run until the server has finished provisioning.
Change is the primary cause of service reliability issues for agile engineering teams. In this post, I’ll cover how you can limit the impact of a buggy change, making it past your quality gates with Kong Gateway and Spinnaker for canary deployment.
Ashwin Sadeep
# Beyond Static Routing: Modernizing API Logic with Conditional Policy Execution
Imagine you have a single Service, order-api . You want to apply a strict rate limit to most traffic, but you want to bypass that limit—or apply a different one—if the request contains a specific X-App-Priority: High header. Previously, you had t
How OAuth 2.0 Token Exchange Reshapes Trust Between Services — and Why the API Gateway Is Exactly the Right Place to Enforce It
Modern applications don’t run as a single monolithic. They are composed of services — frontend APIs, backend microservi
Veena Rajarathna
# Practical Strategies to Monetize AI APIs in Production
Traditional APIs are, in a word, predictable. You know what you're getting: Compute costs that don't surprise you Traffic patterns that behave themselves Clean, well-defined request and response cycles AI APIs, especially anything that runs on LLMs
Deepanshu Pandey
# Kong Konnect EKS Marketplace Add-on for Kong Gateway Data Planes
Today, we’re excited to release the Kong Konnect EKS Marketplace add-on as a means to deploy your Kong Gateway dataplanes in AWS. The add-ons are a step forward in providing fully managed Kubernetes clusters. It is here to simplify the post-procurem
In the Kubernetes world, the Ingress API has been the longstanding staple for getting access to your Services from outside your cluster network. Ingress has served us well over the years and can be found present in several dozen different implementa
Modern software design relies heavily on distributed systems architecture, requiring all APIs to be robust and secure. GraphQL is no exception and is commonly served over HTTP, subjecting it to the same management concerns as any REST-based API. In
Rick Spurgeon
# Deploying With Confidence Using Kong Gateway and Spinnaker
Change is the primary cause of service reliability issues for agile engineering teams. In this post, I’ll cover how you can limit the impact of a buggy change, making it past your quality gates with Kong Gateway and Spinnaker for canary deployment.
Ashwin Sadeep
# Beyond Static Routing: Modernizing API Logic with Conditional Policy Execution
Imagine you have a single Service, order-api . You want to apply a strict rate limit to most traffic, but you want to bypass that limit—or apply a different one—if the request contains a specific X-App-Priority: High header. Previously, you had t
How OAuth 2.0 Token Exchange Reshapes Trust Between Services — and Why the API Gateway Is Exactly the Right Place to Enforce It
Modern applications don’t run as a single monolithic. They are composed of services — frontend APIs, backend microservi
Veena Rajarathna
# Practical Strategies to Monetize AI APIs in Production
Traditional APIs are, in a word, predictable. You know what you're getting: Compute costs that don't surprise you Traffic patterns that behave themselves Clean, well-defined request and response cycles AI APIs, especially anything that runs on LLMs
Deepanshu Pandey
# Kong Konnect EKS Marketplace Add-on for Kong Gateway Data Planes
Today, we’re excited to release the Kong Konnect EKS Marketplace add-on as a means to deploy your Kong Gateway dataplanes in AWS. The add-ons are a step forward in providing fully managed Kubernetes clusters. It is here to simplify the post-procurem
In the Kubernetes world, the Ingress API has been the longstanding staple for getting access to your Services from outside your cluster network. Ingress has served us well over the years and can be found present in several dozen different implementa
Modern software design relies heavily on distributed systems architecture, requiring all APIs to be robust and secure. GraphQL is no exception and is commonly served over HTTP, subjecting it to the same management concerns as any REST-based API. In
Rick Spurgeon
## Ready to see Kong in action?
Get a personalized walkthrough of Kong's platform tailored to your architecture, use cases, and scale requirements.