In our second Kong and Okta tutorial, we'll go through the authorization code flow applied to user authentication processes. This series will show you how to implement service authentication and authorization for [Kong Konnect](https://konghq.com/kong-konnect)Kong Konnect and [Okta](https://www.okta.com)Okta using the [OpenID Connect](https://konghq.com/blog/openid-connect-api-gateway)OpenID Connect ([OIDC](https://docs.konghq.com/hub/kong-inc/openid-connect)OIDC) plugin. Parts 1, 3 and 4 cover:
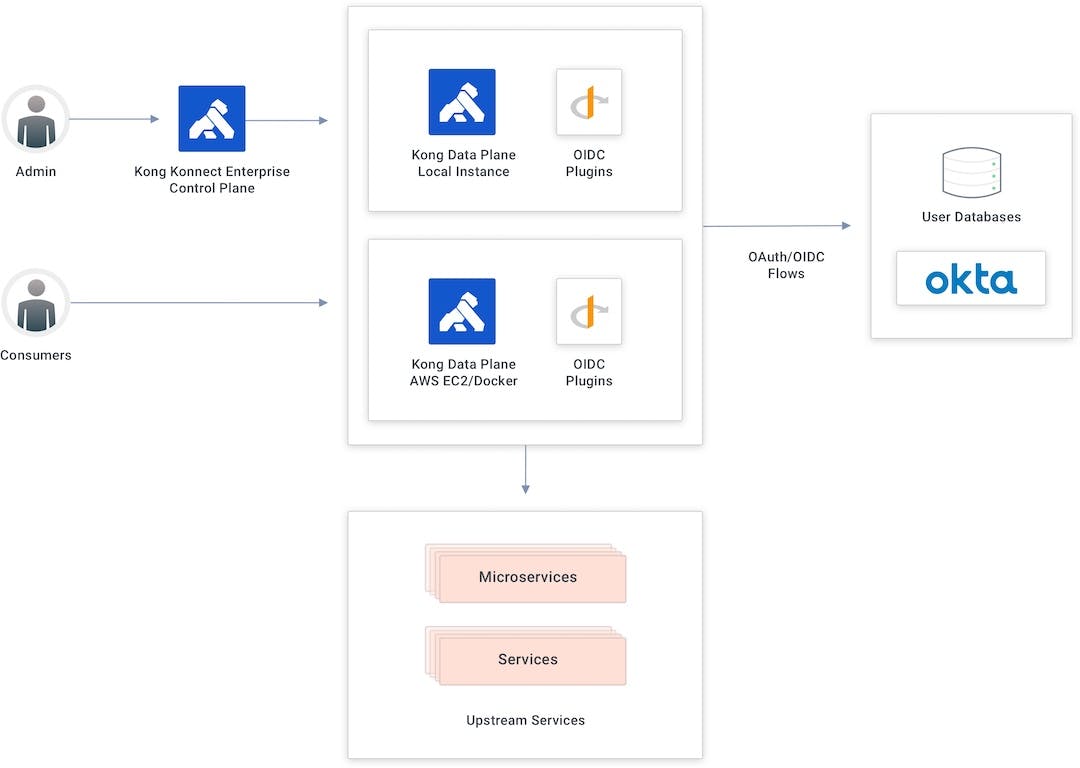
## **Konnect and Okta Integration Topology**
The Konnect control plane creates new APIs and policies and publishes them to the data plane running as a Docker container in an AWS EC2 instance.
### ***Authorization Code Flow***
The authorization code flow goes through the following steps:
- - A user tries to consume the API.
- - If the user doesn’t have a token injected, Kong redirects the user to Okta, the identity provider.
- - The user authenticates on Okta and is sent back to Kong with an authorization code token.
- - Kong validates the parameters and exchanges the authorization code token by calling Okta’s token endpoint.

## **Add Your Services and Routes to Konnect**
In Konnect's ServiceHub, I have a service created already. Follow along in our [Getting Started with Konnect](https://konghq.com/blog/getting-started-konnect)Getting Started with Konnect tutorial to learn how to create a service and routes.
My service has two routes defined already. I used the first service in the previous Kong and Okta tutorial to show the client credentials flow. In this tutorial, I'll use the second service to apply the OIDC plugin utilizing the authorization code flow.

## **Set Up the Okta Application**
In Okta, I prepared an application to implement the authorization flow already. In the Kong authorization code application, we’re going to use the configured OIDC plugin in addition to the client ID and client secret.

The app has the authorization code option turned on and the signing redirect URI set with the route available in my data plane. That means the authorization code is accepted for this URI only.

## **Consume the Route Without a Policy**
Any user is free to consume the route right now since there's no policy to control it.

## **Apply the OpenID Connect Plugin**
Just like we did for the client credentials flow tutorial, let’s go back to the Konnect control plane to apply the OIDC plugin and then implement the authorization code flow.
- - Set the **Config.Client ID**.

- - Enter the **Config.Client Secret**.

- - Add Okta’s **Config.Issuer** endpoint.

- - Click **Create **to enable the OIDC plugin to the route.
## **Test the OpenID Connect Plugin**
If we try to consume the route again, Kong redirects us to Okta’s user interface to present our credentials.

Once we have presented our correct credentials, Okta authenticates and redirects us back to the API gateway. At this time, we’ll consume the API because we got the identity token injected inside our request.

Then we go to [jwt.io](http://jwt.io)jwt.io to check the token.

## **Protect Your Applications With Kong Konnect and Okta**
[Start a free trial](https://konghq.com/kong-konnect)Start a free trial, or [contact us](https://support.konghq.com/support/s/?_ga=2.220853277.461335063.1619442427-852472749.1605808164)contact us if you have any questions as you're getting set up.
Once you've set up Konnect and Okta authorization code flow for user authentication, you may find these other tutorials helpful: