This approach brings greater visibility across microservices and enables decoupled scaling of only those services that need it, and in environments where it's most cost-effective to do so.
However, you need to pair a multi-cloud strategy with a thoughtful approach to unifying your microservices—now sprawled across multiple clouds—for edge connectivity behind a single point of entry. In this post, we'll walk through how to use Kong Gateway to do just that. We'll walk through the following:
- An overview of our mini-project: an application made up of microservices deployed across both GCP and AWS
To simplify this demo, our application will have three services:
- **Users service**: An admin user can fetch a list of all users (GET /users), while a non-admin user can only get their own record (GET /users/:userId). Non-authenticated requests are rejected.
- **Orders service**: An admin user can fetch a list of orders for a given user ID (GET /orders/:userId), while a non-admin user can only get a list of their own orders (GET /orders/:userId). Non-authenticated requests are rejected.
- **Authentication service**: When a request is sent (POST /login) with a valid email and password combination, the authentication service returns a signed JWT to authenticate requests to the Users and Orders services.
For simplicity, each of our services references a JSON file for its data rather than a full-fledged database layer. This will keep us focused on the task at hand: deploying a multi-cloud API gateway.
We have **deployed our Users service to Google App Engine**. Because we implemented some authorization restrictions (based on JWT payload) to access user information, requests to the endpoints will result in a 403 Forbidden error. After we put JWT authentication in place, the response will be 401 Unauthorized.
To confirm that the service is up and running, we've created a /public endpoint that does not have any authorization restrictions:
$ curl -i -X GET kong-multi-cloud-users-service.uc.r.appspot.com/public
HTTP/1.1200 OK
Users Service: PUBLIC ENDPOINT
$ curl -i -X GET kong-multi-cloud-users-service.uc.r.appspot.com/
HTTP/1.1403 Forbidden
Meanwhile, we've **deployed our Orders service as a Docker container running on an AWS EC2 instance**. We've built similar authorization restrictions as well as an open /public endpoint:
$ curl -i -X GET 52.42.165.134/public
HTTP/1.1200 OK
Orders Service: PUBLIC ENDPOINT
$ curl -i -X GET http://52.42.165.134/3HTTP/1.1403 Forbidden
Content-Length:0
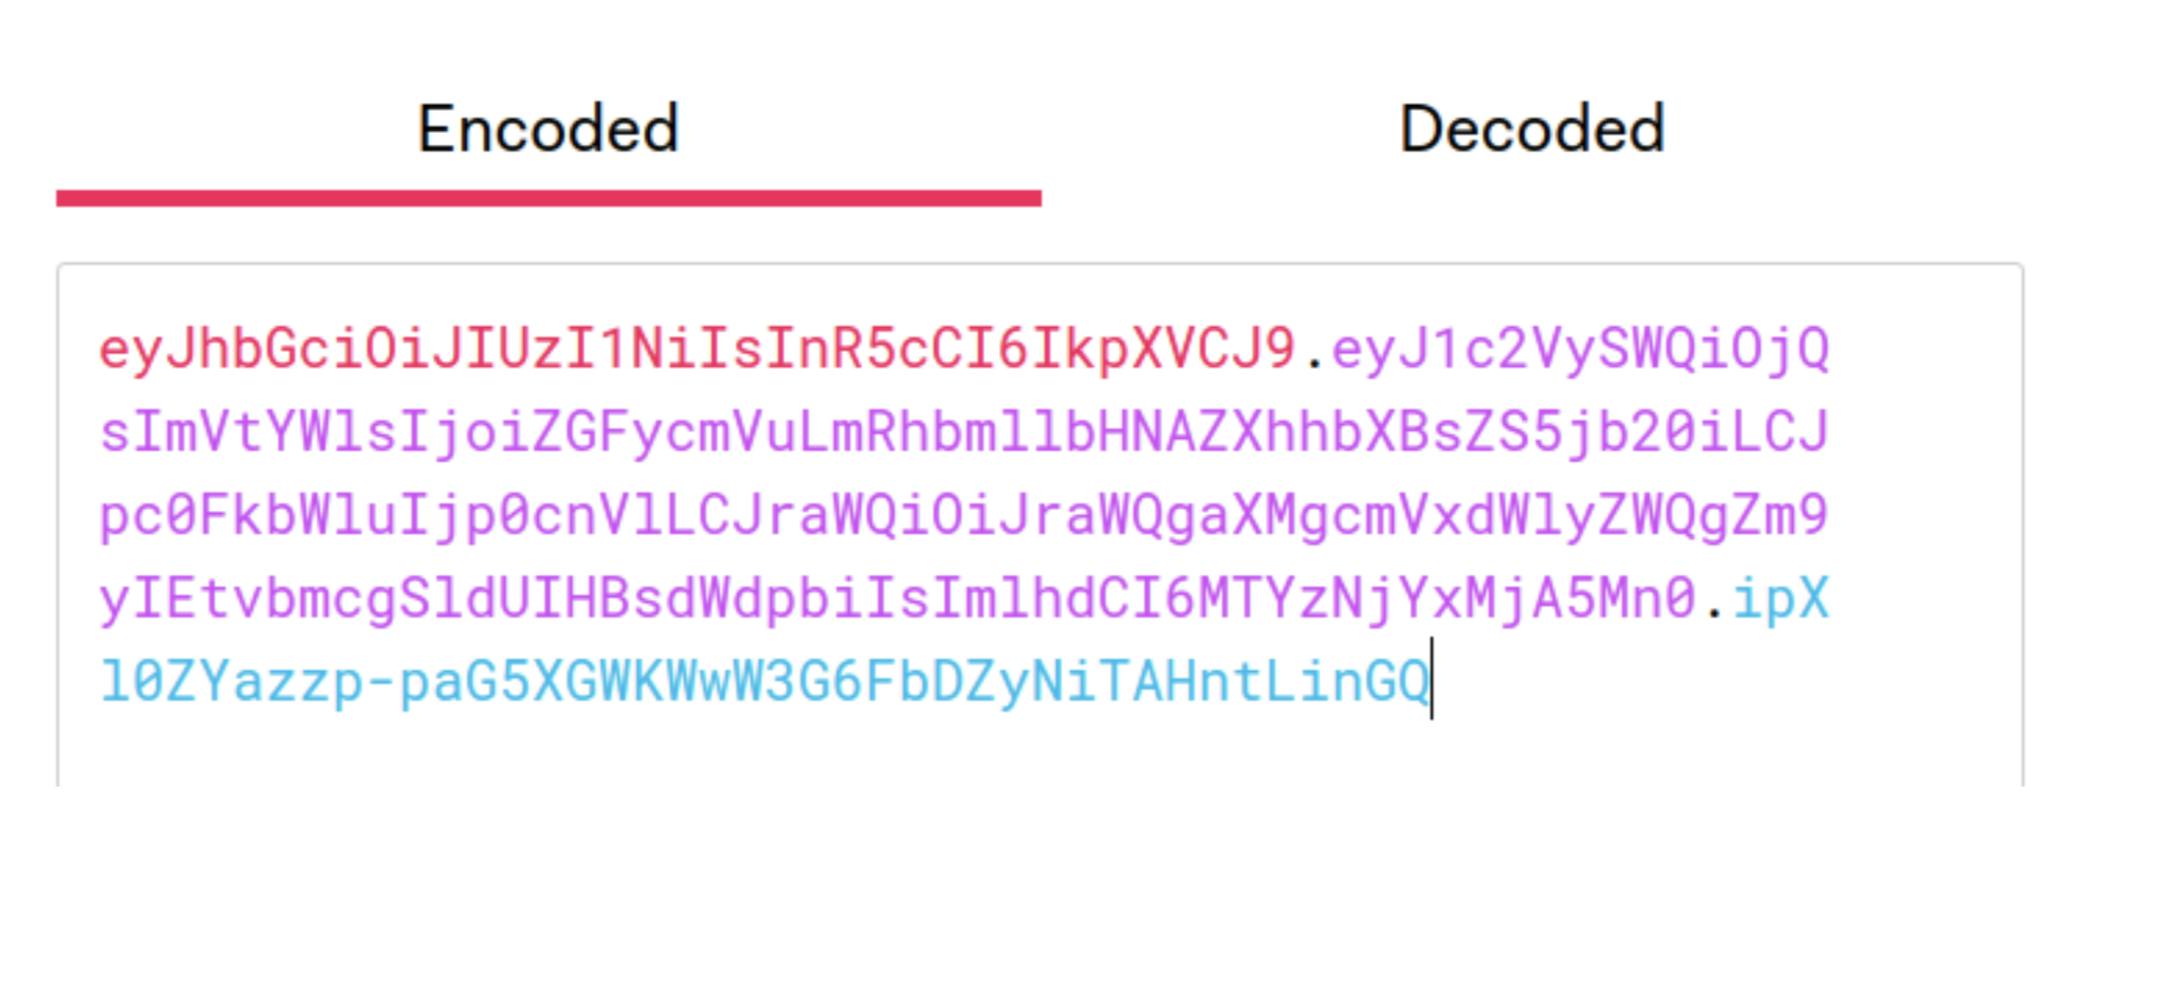
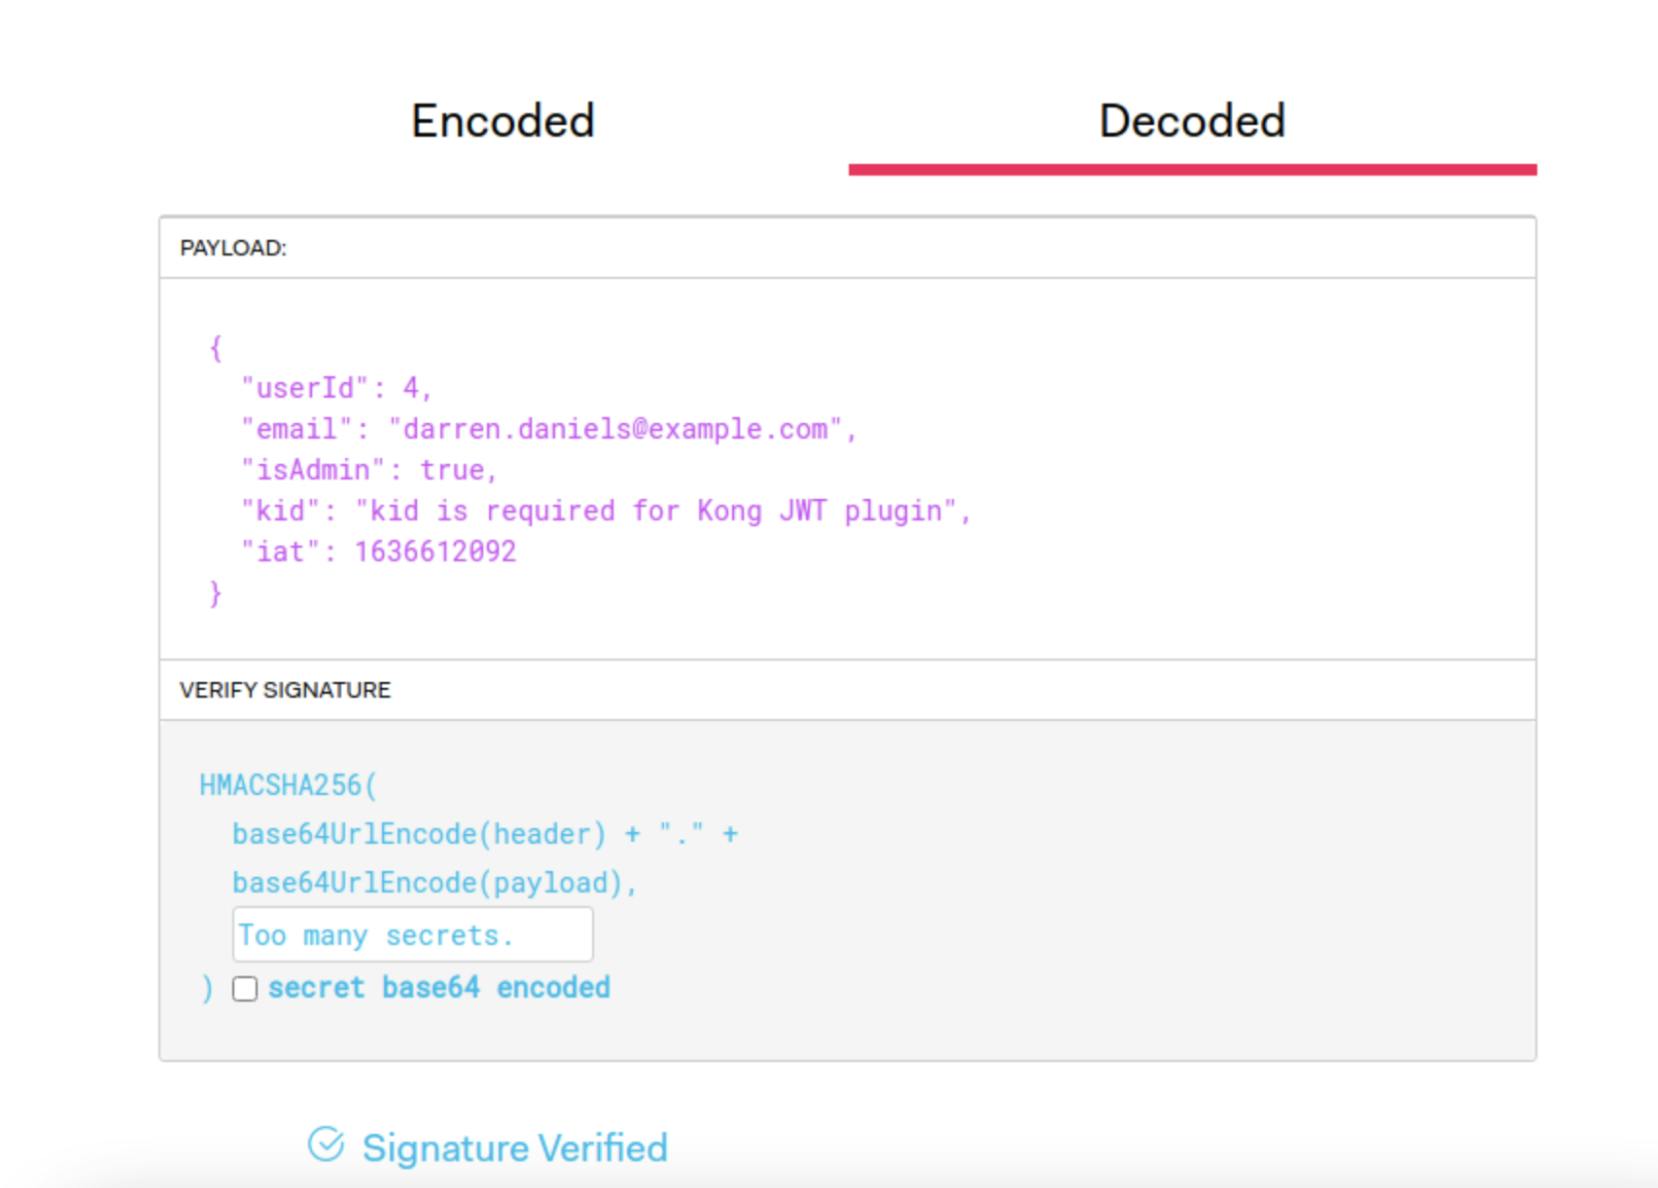
We see that a login attempt with a bad password results in a 401 status code. Meanwhile, a successful login returns a JWT. We can check this JWT at [jwt.io](https://jwt.io)jwt.io to see its payload and to verify the signature.
The payload for our JWT includes the userID and email for the user, along with a boolean isAdmin. We use these values in the Users and Orders services as part of authorization.
Notice the payload includes a string called kid and that we've signed our JWT with the string Too many secrets. We'll discuss both of these pieces later when we set up JWT authentication at the Kong Gateway level.
After installing Kong, we'll configure Kong to use a database-less declarative configuration. We'll configure all of the upstream services, routes and plugins in a YAML file which Kong loads in upon startup.
First, create a project folder, and then use Kong to bootstrap a configuration file:
$ mkdir project
$ cd project
~/project$ kong config init
~/project$ tree
.
└── kong.yml
0 directories,1 file
Next, we'll configure the kong.conf file, which Kong looks to for its startup configuration. The initial Kong installation provides a kong.conf.default file, which we copy and rename to kong.conf.
$ cd /etc/kong
/etc/kong$ cp kong.conf.default kong.conf
We'll edit kong.conf to make two changes.
# Around line 982, uncomment and set database to off
database = off

# Around line 1199, uncomment and set to the absolute path to kong.yml
declarative_config = /PATH/TO/YOUR/PROJECT/kong.yml
### Add Upstream Services
Before we start Kong Gateway, we'll add our upstream services and routes to our declarative configuration file. We edit kong.yml to look like the following:
In our configuration, we've specified two upstream services. The first one, users-service, points to our URL for our Users service's Google App Engine deployment. We set up a route so that requests to /users forward to our Users service. Similarly, orders-service points to our URL for the AWS EC2 container where we've deployed our Orders service. Kong takes any requests to the /orders path and forwards them to our AWS-based service.
With our configuration all ready to go, we start Kong Gateway:
$ sudo kong start
### Test Requests Through Kong Proxy
Now, we can send all of our requests through Kong Gateway, which is listening at http://localhost:8000.
~$ curl -i http://localhost:8000/usersHTTP/1.1403 Forbidden
~$ curl -i http://localhost:8000/users/publicHTTP/1.1200 OK
Users Service: PUBLIC ENDPOINT
~$ curl -i http://localhost:8000/orders/2HTTP/1.1403 Forbidden
~$ curl -i http://localhost:8000/orders/publicHTTP/1.1200 OK
Orders Service: PUBLIC ENDPOINT
With Kong Gateway set up, our single entry point now manages traffic across our services spread out among two different cloud providers. This is multi-cloud at its most basic.
Let's update our kong.yml configuration file to use the plugin. We add the following lines to the file:
routes: - name: login-route
paths: - /login
plugins: - name: aws-lambda
route: login-route
config: aws_key:[AWS KEY FOR IAM USER] aws_secret:[AWS SECRET ACCESS KEY FOR IAM USER] aws_region: us-west-2 function_name: kong-multi-cloud-auth-service
forward_request_body:true
We've added a new route and path for Kong Gateway to listen on. Ordinarily, routes map to upstream services, but we're using the AWS Lambda plugin in place of an upstream service. With the plugin associated with the route, the Kong proxy will listen for requests to the /login path and then invoke the AWS Lambda, passing along the request body. We made sure to configure the plugin with the access key and secret for the IAM user with invocation privileges for this Lambda.
Now, we can restart Kong and test out requests to /login.
~$ sudo kong restart
~$ curl -i \
-d '{"email":"darren.daniels@example.com","password":"WRONG PASSWORD"}' \
-X POST http://localhost:8000/loginHTTP/1.1200 OK
{"statusCode":401}
~$ curl -i \
-d '{"email":"darren.daniels@example.com","password":"DARRENDANIELS"}' \
-X POST http://localhost:8000/loginHTTP/1.1200 OK
{"statusCode":200,"body":"eyJhbGciOiJIUzI1NiIsInR5cCI6IkpXVCJ9.eyJ1c2VySWQiOjQsImVtYWlsIjoiZGFycmVuLmRhbmllbHNAZXhhbXBsZS5jb20iLCJpc0FkbWluIjp0cnVlLCJraWQiOiJraWQgaXMgcmVxdWlyZWQgZm9yIEtvbmcgSldUIHBsdWdpbiIsImlhdCI6MTYzNjYxMjYwOX0.k59yuUp-snHdRFDEfksA6OHZrO9prkEvQtqwTsZZFMY"}
Excellent. Successful login attempts return a signed JWT in the body.
These are not like the 403 Forbidden errors we received before. Because we didn't provide a valid JWT to get through the door, Kong has refused to forward our requests to the upstream services. You'll notice that even our previously public endpoint has been restricted from access too.
### Add Consumers and Secrets
To complete the JWT authentication setup, we need to add a consumer and associate a signing secret with that consumer. The plugin will verify that an incoming JWT was signed with that secret and forward authenticated requests to their final destination.
### Update JWT Authentication Service to Use a Consumer Key
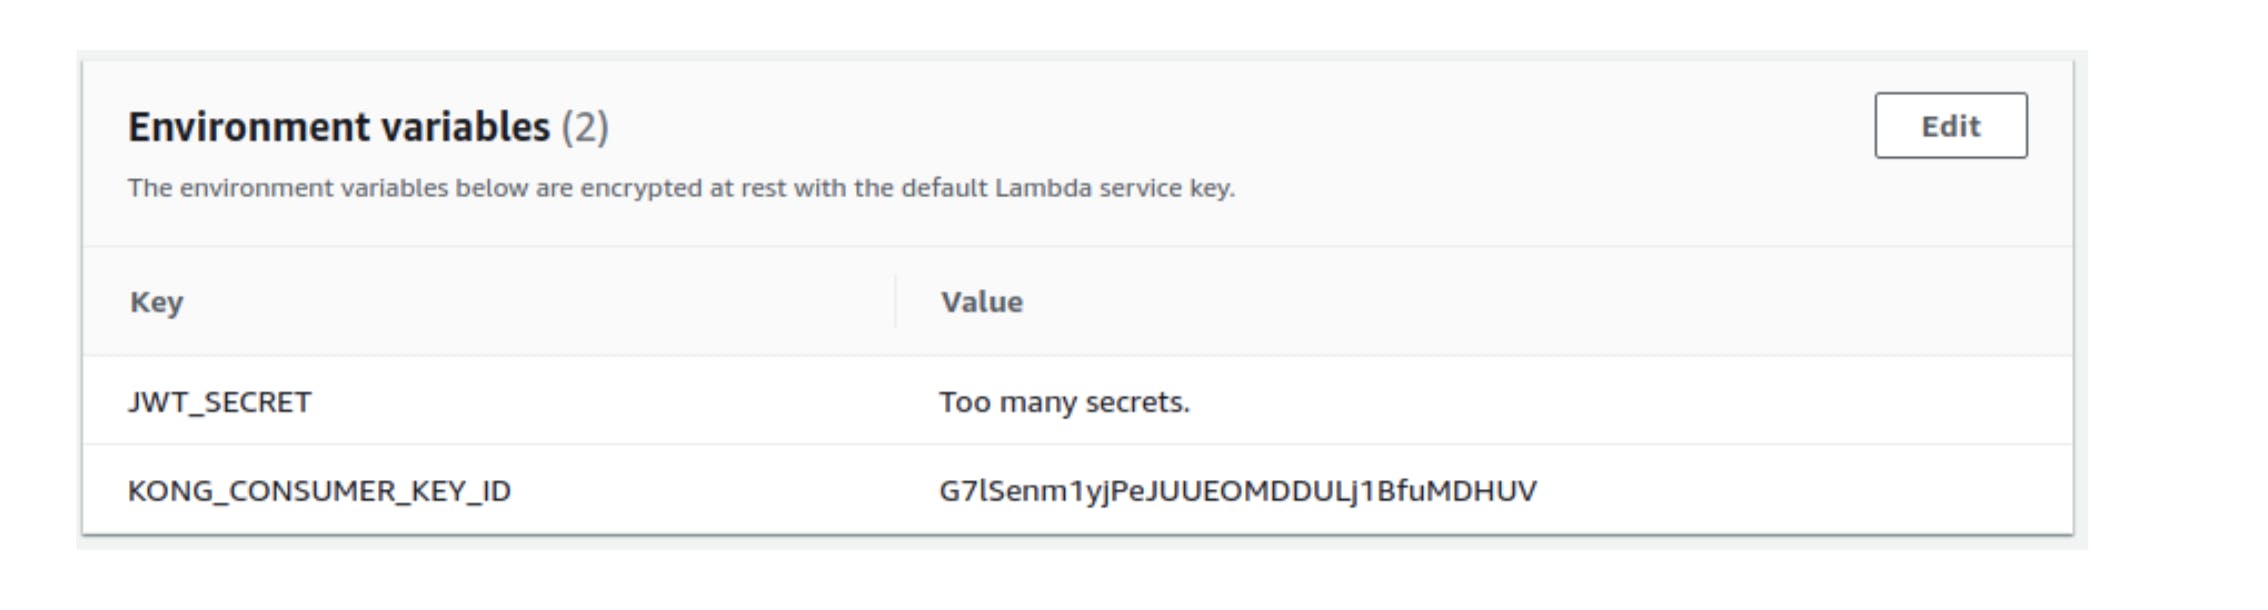
Our Authentication service needs the JWT signing secret and the Kong consumer key ID (kid) to generate a JWT that passes verification. We have the secret (Too many secrets), and we've set an environment variable for our AWS Lambda to use that secret.
We need to get the key ID for the consumer we just created in Kong and then set an additional environment variable at AWS Lambda to use that as our JWT payload's kid value. To get the key ID, we call Kong's Admin API:
~$ curl http://localhost:8001/consumers/auth-service-consumer/jwt{"data":[{"consumer":{"id":"bf912025-7384-5ae6-96e3-79725b93712f"},"tags":null,"created_at":1636611119,"algorithm":"HS256","rsa_public_key":null,"id":"55375bba-b64b-461e-80e5-a2e6607b0aa4","key":"G7lSenm1yjPeJUUEOMDDULj1BfuMDHUV","secret":"Too many secrets."}],"next":null}
The key associated with this consumer is what we need to set as the kid for every JWT that we generate. We update our AWS Lambda environment variables accordingly.
### End-to-End Test
Now that we're all set up, it's time to test it. We'll log in with good credentials, get a signed and valid JWT, and then use that JWT as we send requests to our Users and Orders services.
It works! Kong Gateway is now set up with JWT authentication on our Users and Orders services, validating JWTs that come from our Authentication service—and all of these services are running on different clouds!
## Rate Limiting and Other Plugins
We've just demonstrated how to leverage the JWT plugin to apply authentication consistently across all our multi-cloud services. Kong has countless plugins that we could apply across the board—for security, traffic control, monitoring and more.
plugins: ...
- name: rate-limiting
service: users-service
config: minute:3 policy: local
- name: rate-limiting
service: orders-service
config: minute:10 policy: local
With these settings, we can send requests to the Users service up to a limit of three per minute. For the Orders service, we allow up to 10 per minute.
After we restart Kong, we make repeated requests to the Users service. The first three requests return good data. Then, on our fourth request:
$ curl -i --header "Authorization: Bearer eyJhbGciOiJIUzI1NiIsInR5cCI6IkpXVCJ9.eyJ1c2VySWQiOjQsImVtYWlsIjoiZGFycmVuLmRhbmllbHNAZXhhbXBsZS5jb20iLCJpc0FkbWluIjp0cnVlLCJraWQiOiI3ZG80SFdzS1R0R0ZSMFJQUGhOYWdSVFUzaTFUdzBEcyIsImlhdCI6MTYzNjYxNDEyMH0.8FemIID9nH4iwzbfuuPS4jYR_prQlm9WMlh39FtGn-Q" http://localhost:8000/usersHTTP/1.1429 Too Many Requests
{"message":"API rate limit exceeded"}
Similarly, our eleventh request to the Orders service returns the following:
$ curl -i --header "Authorization: Bearer eyJhbGciOiJIUzI1NiIsInR5cCI6IkpXVCJ9.eyJ1c2VySWQiOjQsImVtYWlsIjoiZGFycmVuLmRhbmllbHNAZXhhbXBsZS5jb20iLCJpc0FkbWluIjp0cnVlLCJraWQiOiI3ZG80SFdzS1R0R0ZSMFJQUGhOYWdSVFUzaTFUdzBEcyIsImlhdCI6MTYzNjYxNDEyMH0.8FemIID9nH4iwzbfuuPS4jYR_prQlm9WMlh39FtGn-Q" http://localhost:8000/orders/1HTTP/1.1429 Too Many Requests
{"message":"API rate limit exceeded"}
You'll notice that we used the local policy in our rate limiting plugin configuration. With this policy, we store request counters locally in-memory. We can also configure the plugin to use Redis, in which case we could store counters on a service like [Amazon ElastiCache](https://aws.amazon.com/elasticache/redis)Amazon ElastiCache.
This article demonstrated how Kong Gateway provides that single point of entry for services deployed across multiple clouds. In addition, we're able to leverage powerful plugins to apply authentication and traffic control measures consistently across all of our services.
If your system is in the cloud***s***, Kong Gateway is a great way to manage and secure your multi-cloud deployment of microservices.
Managed Redis cache is a turnkey "Shared State" add-on for Kong Dedicated Cloud Gateways. It is designed to combine the performance of an in-memory data store with the simplicity of a SaaS product. When you spin up a Dedicated Cloud Gateway in Kong
Why switch to Dedicated Cloud Gateways?
Well, the drivers for moving to managed cloud gateways are simple enough, as they mirror all the reasons behind why you would want to move any workload to the cloud. By choosing a DCGW, you benefit from faster
Michael Field
# Configuring Kong Dedicated Cloud Gateways with Managed Redis in a Multi-Cloud Environment
Architecture Overview
A multicloud DCGW architecture typically contains three main layers.
1\. Konnect Control Plane
The SaaS control plane manages configuration, plugins, and policies. All gateways connect securely to this layer.
2\. Dedicated C
Hugo Guerrero
# Deploying Hybrid Kong API Gateway with EKS Anywhere
Modern microservices -based architectures require companies to change not just the way they build applications but also how to deploy them. Basically, the new microservices foundation should be based on two main pillars: hybrid deployments and Kub
Claudio Acquaviva
# Building Kong Clusters in AWS with the Terraform API Gateway Module
We created the Terraform API gateway module to help you follow DevOps best practices while implementing Kong using infrastructure as code (IaC). Terraform is an open source tool that allows you to implement IaC using a declarative declaration defini
Kong
# How to Automate Deployment of Microservices With an API Gateway to a Multi-Cloud Environment
In today’s enterprise computing landscape, multi-cloud organizations are quickly becoming the norm rather than the exception. By leveraging an API-first strategy with a microservice-based architecture, companies can achieve significant speed to mark
Mike Bilodeau
# Why Your Kafka Event Streams Need an Event Gateway
You wouldn't expose a REST API without a gateway. What about Kafka?
Before we talk about an event gateway, it's worth grounding ourselves on what an event is. An event is simply a record of something that happened. In modern integration, there are
Warren Vella
# Kong Simplifies Multicloud Cloud Gateways with Managed Redis Cache
Managed Redis cache is a turnkey "Shared State" add-on for Kong Dedicated Cloud Gateways. It is designed to combine the performance of an in-memory data store with the simplicity of a SaaS product. When you spin up a Dedicated Cloud Gateway in Kong
Why switch to Dedicated Cloud Gateways?
Well, the drivers for moving to managed cloud gateways are simple enough, as they mirror all the reasons behind why you would want to move any workload to the cloud. By choosing a DCGW, you benefit from faster
Michael Field
# Configuring Kong Dedicated Cloud Gateways with Managed Redis in a Multi-Cloud Environment
Architecture Overview
A multicloud DCGW architecture typically contains three main layers.
1\. Konnect Control Plane
The SaaS control plane manages configuration, plugins, and policies. All gateways connect securely to this layer.
2\. Dedicated C
Hugo Guerrero
# Deploying Hybrid Kong API Gateway with EKS Anywhere
Modern microservices -based architectures require companies to change not just the way they build applications but also how to deploy them. Basically, the new microservices foundation should be based on two main pillars: hybrid deployments and Kub
Claudio Acquaviva
# Building Kong Clusters in AWS with the Terraform API Gateway Module
We created the Terraform API gateway module to help you follow DevOps best practices while implementing Kong using infrastructure as code (IaC). Terraform is an open source tool that allows you to implement IaC using a declarative declaration defini
Kong
# How to Automate Deployment of Microservices With an API Gateway to a Multi-Cloud Environment
In today’s enterprise computing landscape, multi-cloud organizations are quickly becoming the norm rather than the exception. By leveraging an API-first strategy with a microservice-based architecture, companies can achieve significant speed to mark
Mike Bilodeau
# Why Your Kafka Event Streams Need an Event Gateway
You wouldn't expose a REST API without a gateway. What about Kafka?
Before we talk about an event gateway, it's worth grounding ourselves on what an event is. An event is simply a record of something that happened. In modern integration, there are
Warren Vella
## Ready to see Kong in action?
Get a personalized walkthrough of Kong's platform tailored to your architecture, use cases, and scale requirements.