Runtime Groups allow you to manage your configurations independently. You might need to isolate changes between departments or want to create a staging environment to test changes before promoting them to production.
Today, we're going to take a look at how to use Runtime Groups to test changes in staging before using decK and GitHub Actions to promote those changes to production.
## Kong Bank
We're going to be testing out Runtime Groups in my Kong Bank demo environment. I have four services running at Kong Bank – Accounts, Balance, Contacts, and Loans.
All four services are running in production in my default runtime group, but the team that is running the Balance service wants to try out some new rate-limiting features due to an unexpected performance issue.
They don't want to experiment in production and impact real-world transactions, and need a way to run a staging environment. Thankfully, Kong Bank has access to the new Konnect Runtime Groups functionality, which we'll use to test the changes before promoting them to production.
## Creating a runtime group
You can create a new runtime group in the [Runtime Manager](https://cloud.konghq.com/runtime-manager/)Runtime Manager section of Konnect (you'll need an enterprise account to create additional runtime groups – contact sales if you want to learn more). Provide a name (I've used staging) and description then press "Create".
Your Runtime Group will be immediately available – no need to wait 15 minutes for it to be provisioned!
First, we need to download our existing configuration to our local machine. We use deck dump to do this, and provide our email address, password and the name of the runtime group to download (which isdefaultin this case)
This will create a file namedkong.yamlin the current directory. If you've used deck before, you might try running deck sync next, changing the runtime group name from default to staging. Unfortunately that won't work due to a safety feature in deck that prevents you running deck sync against the wrong runtime group:
deck sync \
 --konnect-email $KONNECT_EMAIL \
 --konnect-password $KONNECT_PASSWORD \
 --konnect-runtime-group-name staging

Error: warning: runtime group 'staging' specified via --konnect-runtime-group flag is different from 'default' found in state file(s)
Thanks, decK! However, we're sure that we want to run against a different runtime group, so we can disable the check by deleting the_konnectsection fromkong.yaml. If we run deck syncagain after doing so, the service is created as expected:
Now that our service has been copied into the staging environment, we can add rate limiting using deck. We want to limit consumers to 5 requests per minute by adding the following to our service definition:
Once the change has been applied, we want to test that the rate-limiting works as intended before promoting the change to production. We'll create a new runtime by visiting the [Runtime Manager](https://cloud.konghq.com/runtime-manager/)Runtime Manager page, selecting the staging runtime group and clicking "New Runtime Instance".
Use the Docker quick setup script to create a runtime (this may take a minute or two whilst Docker pulls down the image)
> This command will fail if you currently have an active runtime for the default runtime group. In this instance, provide -pp 8001 at the end of the command to bind to port 8001 instead
Once the runtime is online, call your endpoint six times in rapid succession and watch as Kong returns a message stating that you've been rate limited.
## Promoting to Production
Now that we know our configuration change is working as intended we can promote it to production! As we've already made the changes in kong.yaml, all we need to do is run deck sync and select the default runtime group:
And in no time at all, we've made a change to our infrastructure, validated it in a staging environment and updated production!
Now that we know the process works, it's time to build it into our development workflow. For me, that means automatically applying the changes to staging when a commit is made to develop, and to production when a commit is added to main. I'll be using GitHub Actions to accomplish this.
## Automating with GitHub Actions
GitHub Actions has an "environment" concept, which allows us to customize our running workflow based on the selected environment. For this example we need two environments, staging and production.
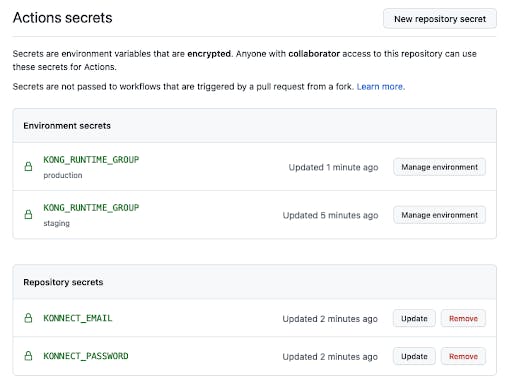
Create a staging environment by going to your repository settings -> Environments -> New environment. Once you've created an environment, you'll be given the option to add *environment secrets* at the bottom of the screen. Go ahead and create a secret named KONG_RUNTIME_GROUPthat contains your runtime group ID for staging. You can find your ID on the [Runtime Manager](https://cloud.konghq.com/runtime-manager/)Runtime Manager page.
Once that's done, create another environment named production, making sure to set theKONG_RUNTIME_GROUP secret to the ID of your default runtime group.
Finally, we need to add some secrets that are scoped to the repository rather than a specific environment by going to the repository settings -> Secrets -> Actions
We'll need to authenticate with Konnect using decK, so go ahead and add your KONNECT_EMAIL and KONNECT_PASSWORD as secrets to the repo.
Once you're done, your secrets page should look like this:
We're going to deploy changes made to the develop branch to our staging runtime group, and changes to the main branch to the default runtime group, which we're using for production.
We can accomplish this using the following GitHub Actions workflow which lives at .github/workflows/deck.yml in your repository:
There's a lot going on in that workflow. Let's take it step by step:
- Run the workflow on any push to the main or develop branch
- Set the environment and runtime_group variables based on which branch was pushed
- Run a deploy job in the correct environment
- Clone our repository
- Install deck using kong/setup-deck
- Run deck sync to apply the changes
## See it in action
For the above workflow to run, you'll need a deck configuration file. Copy your kong.yaml from earlier into the root folder of your repo, commit and push to the develop branch.
GitHub Actions will detect this and apply the changes to the staging environment. Once you're happy, merge those changes into main and watch as the default runtime group is updated too.
If you want to test another change, try changing the minute value in your kong.yaml file to a different value and committing that to develop. GitHub Actions will pick up the change and apply it to staging as expected.
## Conclusion
It's time to wrap up and review what we learned today! Runtime Groups in Kong Konnect allow you to test your infrastructure changes before you apply them to production.
Declarative configuration allows you to use a git repo as a source of truth for your configuration. Using GitHub Actions and git flow, you can automatically apply changes to your environments as they are promoted from develop to main.
Finally, all of this is done with a single Konnect account. That means consistent user management, access control, and most importantly, all your configuration in the same place.
**Why not give runtime groups a try? We'd love to hear what you think.**
Most teams handle field-level data protection with client-side interceptors — code that has to live in every producer and consumer, in every language, maintained by every team that touches the topic. Renaming a topic means a migration project. And
# Why Your API Gateway Should Be Your Testing Environment
You invested in Kong Konnect. You centralized your API governance, locked down your routing, enforced your security policies, and gave your organization a single source of truth for every API in your estate. That work is done, and it is working. So
Haley Giuliano
# Stop AI Token Overspend: Prepaid Credits Are Now Live in Kong Konnect
Before we jump into prepaid credits, let’s review the basics. The two terms, tokens and credits, sometimes get used interchangeably in the space, so it’s worth untangling. A token is a unit of data for large language models that can be either co
Haley Giuliano
# KAi v2 is Live: The Agent Building Infrastructure for Agents
Until now, KAi could tell you how to set up a service, suggest the right plugins, and point you at the docs. Useful, but you still had to do some of the work yourself. V2 changes that. With our new Code Mode MCP integration, KAi can create, update
Alex Drag
# Insomnia 13: Native Kong Konnect Integration for Real-Time API Testing
Have you ever…. Copied an API spec out of Kong Konnect, or where you manage your APIs, pasted it into your API client, and immediately wondered if it’s the latest version? Sent an email to your platform team with the subject line “ which endpoint sh
Haley Giuliano
# kongctl 1.0: A Declarative, AI-Native CLI for Kong Konnect
kongctl was built with the modern development stack in mind. Developers working in a terminal want the ability to query systems quickly to verify state, behaviors, and capabilities. Coding harnesses need well defined tools and accurate schemas for
Rick Spurgeon
# Introducing Kong Agent Gateway: The Complete AI Gateway for Agent-to-Agent Communication
Kong Agent Gateway Is Here — And It Completes the AI Data Path
Kong Agent Gateway is a new capability within Kong AI Gateway that extends our platform to more robustly cover agent-to-agent (A2A) communication. With this release, Kong AI Gateway n
Alex Drag
# Kong Event Gateway 1.2 Brings Field-Level Encryption, Topic Aliasing, and Analytics to Konnect
Most teams handle field-level data protection with client-side interceptors — code that has to live in every producer and consumer, in every language, maintained by every team that touches the topic. Renaming a topic means a migration project. And
# Why Your API Gateway Should Be Your Testing Environment
You invested in Kong Konnect. You centralized your API governance, locked down your routing, enforced your security policies, and gave your organization a single source of truth for every API in your estate. That work is done, and it is working. So
Haley Giuliano
# Stop AI Token Overspend: Prepaid Credits Are Now Live in Kong Konnect
Before we jump into prepaid credits, let’s review the basics. The two terms, tokens and credits, sometimes get used interchangeably in the space, so it’s worth untangling. A token is a unit of data for large language models that can be either co
Haley Giuliano
# KAi v2 is Live: The Agent Building Infrastructure for Agents
Until now, KAi could tell you how to set up a service, suggest the right plugins, and point you at the docs. Useful, but you still had to do some of the work yourself. V2 changes that. With our new Code Mode MCP integration, KAi can create, update
Alex Drag
# Insomnia 13: Native Kong Konnect Integration for Real-Time API Testing
Have you ever…. Copied an API spec out of Kong Konnect, or where you manage your APIs, pasted it into your API client, and immediately wondered if it’s the latest version? Sent an email to your platform team with the subject line “ which endpoint sh
Haley Giuliano
# kongctl 1.0: A Declarative, AI-Native CLI for Kong Konnect
kongctl was built with the modern development stack in mind. Developers working in a terminal want the ability to query systems quickly to verify state, behaviors, and capabilities. Coding harnesses need well defined tools and accurate schemas for
Rick Spurgeon
# Introducing Kong Agent Gateway: The Complete AI Gateway for Agent-to-Agent Communication
Kong Agent Gateway Is Here — And It Completes the AI Data Path
Kong Agent Gateway is a new capability within Kong AI Gateway that extends our platform to more robustly cover agent-to-agent (A2A) communication. With this release, Kong AI Gateway n
Alex Drag
## Ready to see Kong in action?
Get a personalized walkthrough of Kong's platform tailored to your architecture, use cases, and scale requirements.