Blog
  • Engineering
  • Enterprise
  • Learning Center
  • Kong News
  • Product Releases
    • API Management
    • API Development
    • API Design
    • Automation
    • Service Mesh
    • Insomnia
  • Home
  • Blog
  • Engineering
  • Build Your Own Internal RAG Agent with Kong AI Gateway
Engineering
July 9, 2025
11 min read

Build Your Own Internal RAG Agent with Kong AI Gateway

Antoine Jacquemin
Senior Staff Field Engineer, Kong

What Is RAG, and Why Should You Use It?

RAG (Retrieval-Augmented Generation) is not a new concept in AI, and unsurprisingly, when talking to companies, everyone seems to have their own interpretation of how to implement it.

So, let’s start with a refresher.

RAG (short for Retrieval-Augmented Generation) is a technique that injects relevant data from an external knowledge source directly into a prompt before sending it to a Large Language Model (LLM).

“But wait, my model is already fine-tuned on my domain-specific data. Why would I need RAG?”

Great question! But consider:

  • Has your model really been trained on all your data?
  • What happens when your data changes or grows?
  • What if you want to use an open model like GPT-4?

RAG allows you to dynamically fetch up-to-date data, adapt across domains, and avoid repeated fine-tuning cycles.

Plus, fine-tuning won’t fix core LLM limitations such as:

  • Hallucination: The model generates incorrect or fabricated information.
  • Lack of Transparency: There's no way to trace the source of a generated response.

For a deeper dive, I highly recommend reading this blog on RAG (Retrieval-Augmented Generation).

“OK. You’ve convinced me, but RAG sounds complex. And I don’t have the resources!”

Don’t worry! This guide walks you through every step. 😊

The two-step RAG Process

RAG consists of two main stages:

  1. Ingest Pipeline: You load your documents into a vector database.
  2. Retrieve Pipeline: When a user makes a query, you fetch the most relevant content to inject into the LLM inference request.

Ingest Pipeline: Add your data

In this step, your documents are split into smaller chunks, transformed into vectors using an embedding API, and pushed into a vector database.

What embedding dimension should you use?

Embeddings are numerical representations of text, often spanning hundreds or thousands of dimensions. These dimensions capture the semantic meaning of your content.

Yes, it sounds like magic, and this magic happens under the hood via the embedding API. Your data becomes points in a vector space, enabling similarity searches, and the dimension of your embeddings plays a critical role for this.

“So what dimension should I use?”

There’s no single right answer . You’ll need to test and evaluate based on your use case.

It also depends on the embedding model. For instance, OpenAI's text-embedding-3 lets you customize the dimension:

  • More dimensions = richer representation, but also more memory, storage, and cost. And also a risk of overfitting or capturing noise
  • Lower dimensions = improve speed and performance, but might miss out important nuance and lead to less accurate matches

Consider applying dimensionality reduction techniques like PCA, t-SNE, or UMAP to retain only the most meaningful components and filter out noise.

In the below demo, you will see that I am using 1536 as dimensions, a good balance between cost, quality, and latency.

What chunk size and overlap should you use?

This is another "it depends" scenario. Chunk size depends on your data, query type, and trade-off between precision and performance.

  • Small chunks: means precision, fine-grained matches, faster retrieval, but higher memory use and loss of context.
  • Large chunks: contain more context, but may include noise or irrelevant data, increasing cost.

Typical chunk sizes range from 200 to 1000 tokens.

Also consider:

  • Chunking method: how you split your text: Token-based, sentence-based, or semantic.
  • Overlap: Keeps preserving context across chunks.

In the below demo we'll use sentence-based chunking with 50-token overlap (~2 sentences) for better continuity.

Any pro tips?

Absolutely! There are many other things to consider during your RAG journey.

I would recommend reading the following article, especially to dive deeper into RAG and its common pitfalls: What is RAG and How to Solve Its Challenges.

At Kong, we're also exploring how to support more advanced RAG strategies, such as Hierarchical Indexes and Relational Indexing, to scale your system to the next level.

Retrieve pipeline: Search for relevant content

Once your documents are ingested into the vector database, it’s time to handle incoming user queries. In this step, we’ll retrieve the most relevant chunks based on the user prompt and inject them into the LLM request.

How retrieval works

When a user makes a request:

  1. An embedding of the user prompt is created using the same embedding API used during ingestion.
  2. This prompt vector is then compared against the stored vectors in the vector database.
  3. The vector database returns the most relevant chunks.

“Can you explain how the similarity is calculated and measured?”

We use Nearest Neighbor algorithms with:

  • Cosine Similarity: Measures the angle between vectors. This is ideal for semantic similarity, making it the preferred method for test comparison in most RAG applications.
  • Euclidean Distance: Measures the actual distance between points. It’s more appropriate for use cases involving coordinate or pixel-based data.

In short: Cosine Similarity is generally the best choice when dealing with text-based embeddings in RAG.

Inject the chunks into the prompt

Once the relevant chunks are retrieved, they can be included in the LLM request to provide context.

“Should I include the RAG context as a system message or user message?”

That’s a great question. It depends on your use case:

  • System messages offer strong guidance to the LLM, making them ideal for injecting context. But be cautious malicious chunks can lead to prompt injection. If they’re in a system message, the consequences are more severe.
  • User messages allow the context to be closer from the question. This can be slightly less influential than a system message but is generally safer in terms of prompt injection risk.

With Kong AI Gateway, you can choose the injection method easily by configuring the plugin’s "Inject As Role" field, allowing flexibility between system, user, or assistant roles.

Any pro tips?

Yes, there's more to consider! While the ingestion and retrieval steps are essential, we strongly recommend adding security and optimization layers to improve both performance and safety.

Many policies are important, such as:

  • Validate incoming prompts
  • Sanitize retrieved content
  • Monitor for abuse or injection patterns
  • Compress the prompt for reducing cost

And guess what?

All of this is available using Kong AI Gateway!

Let’s explore the Kong AI Prompt Compressor plugin to compress retrieved chunks before sending them to the LLM. This helps reduce prompt size, improve latency, and stay within token limits.

AI Prompt Compression

The AI Prompt Compressor is a Kong plugin designed to compress prompts before they are sent to an LLM. It leverages the LLMLingua library to perform intelligent compression while preserving the semantic meaning of the text.

To use this plugin, you'll need to deploy the Compress Service (available as a Docker image) close to your Kong Data Plane. Configuration is done easily through the Konnect UI.

How does it work?

The AI Prompt Compressor plugin compresses your final prompt before it's sent to the LLM.

  • Uses LLMLingua 2 for fast, high-quality compression.
  • Can compress based on ratio (e.g., reduce to 80% of original length) or target token count (e.g., compress to 150 tokens)
  • Use a define compression ranges, for example: Compress prompts under 100 tokens with a 0.8 ratio or compress it to 100 tokens
  • Supports selective compression using <LLMLINGUA>...</LLMLINGUA> tags to target specific parts of the prompt.

Why does it matter?

When used alongside the AI RAG Injector, this plugin helps retrieve relevant chunks and ensure your final prompt stays within reasonable limits  —  avoiding oversized requests that can lead to:

  • Increased latency
  • Token limit errors
  • Unexpected bills from your LLM provider

For our setup, we chose LLMLingua 2 over LongLLMLingua. Why?

  • In a RAG context, chunks are already filtered for relevance.
  • LLMLingua 2 offers a better trade-off between latency and compression quality.
  • It's task-agnostic, fast, and uses advanced NLP techniques to preserve meaning while reducing token count.

Key benefits

  • Faster responses
  • Lower latency
  • Potentially improved LLM output for models with context length limitations
  • Lower token usage, which means lower cost

In short: "Compress your prompts without sacrificing performance or quality."

And of course… the best part: smaller prompt = smaller bill 😄

Now, let’s see it in action!

Prepare the Kong Environment

Before diving into the configuration, let’s set up the Kong infrastructure using Konnect and Docker Compose.

You will need access to our Cloudsmith repository to pull the Compress service image. Please contact Kong Sales to obtain the necessary credentials.

Step 1: Create your control plane in Konnect

  1. Go to your Konnect account: https://cloud.konghq.com/
  2. Create a new Control Plane.
  3. When prompted to configure a Data Plane, choose the Docker option.
  4. Download the following:
  • The cluster certificate (cluster.crt)
  • The cluster key (cluster.key)
  • Your Control Plane Endpoint ID (used in environment variables)

Step 2: Clone the project repository

$ git clone https://github.com/AntoineJac/ai-compress-demo
$ cd ai-compress-demo

Step 3: Add credentials and update the Docker compose file

  1. Save the downloaded cluster.crt and cluster.key to the /certs directory in the cloned project.
  2. Open the docker-compose.yaml file.
  3. Replace all instances of {$CP_ID} with your actual Control Plane Endpoint ID.

Step 4: Deploy the architecture

Start all containers with:

$ docker compose up -d

What this setup includes

  • A custom Docker network to allow seamless communication between services
  • A Kong Data Plane connected to your Konnect Control Plane
  • A Redis Stack Server acting as the Vector Database
  • A Compressor Service used by the AI Prompt Compressor plugin

Performance tip

For optimal performance of the compression service, it is strongly recommended to run it on a host with NVIDIA GPU support.

For this demo, we run on a GPU-enabled AWS EC2 instance:

  • Image: Deep Learning Base OSS NVIDIA Driver GPU AMI (Ubuntu 24.04)
    Easy as CUDA drivers are pre-installed by default on this image!
  • Instance Type: g4dn.xlarge
    Make sure your instance is supporting CUDA drivers
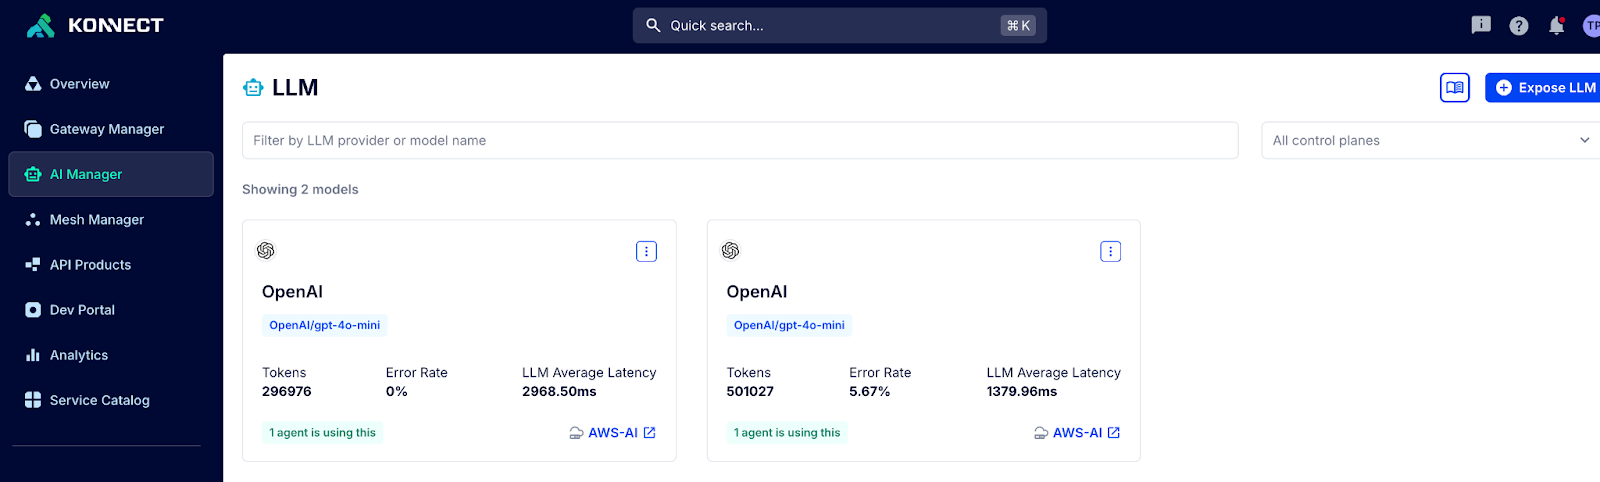
Configure your Kong setup

We will use the new AI Manager tool for this:

1/ Expose the LLM service

  1. In your Konnect account, go to the AI Manager section.
  2. Click Expose LLM.
  3. Configure the following:
  • LLM Provider and Model
  • A route, e.g., /test-compress
  • The Control Plane you created earlier

2/ Configure the AI RAG Injector plugin

Once your LLM service is created:

  1. Attach the AI RAG Injector plugin to this service.
  2. Set it up to use the Redis vector database.
    Follow the documentation here:
    🔗 AI RAG Injector Plugin Docs
  3. Plugin configuration:
  • Use redis directly as your redis_host.
  • Inject template: <LLMLINGUA><CONTEXT></LLMLINGUA> | <PROMPT>
  • Inject as role: user
  • Use Cosine distance metrics and dimensions 1536 as explained earlier

This configuration ensures the RAG context is injected into the user message only and will be compressible thanks to the <LLMLINGUA> tags.

3/ Add the AI Prompt Compressor plugin

Add the AI Prompt Compressor plugin to the same service:

  • Use http://compress-service:8080 as compressor_url
  • Define a wide compression range (e.g., 0-100000 with 0.5 ratio)

Ingest data to the vector DB

1/ Ingest documents into the vector database

Let’s create an ingestion route to add data into your Redis vector DB.

  1. Create a new route /ingest-chunks on your service.
  2. Attach a Pre-function plugin.
  3. In the access phase, paste the following code from this GitHub file, replacing RAG_PLUGIN_ID with your actual plugin ID:
    🔗 pre-function-script.lua

This script takes content from incoming requests and stores it in the Vector DB.

2/ Test the ingestion with a Python script

You can use the ingest_chunk.py script provided in the repo to test ingestion:

  • It retrieves content from the Wikipedia Elephants page
  • Converts and reads a PDF file about Sharks
  • Chunks text using sentence-based logic
  • Adds overlap for context
  • Sends all data to your vector DB

Setup instructions

  1. Open a terminal and run:
$ python -m venv venv
$ source venv/bin/activate
$ pip install requests nltk tiktoken pymupdf4llm

2. In ingest_chunk.py, replace the API_ENDPOINT variable with your ingestion endpoint (e.g., http://localhost:8000/ingest-chunks).

3. Then run:

$ python ingest_chunk.py

Everything is now set! You're ready to test document ingestion and verify compression and retrieval in your AI-powered LLM gateway.

Force the LLM to use only RAG data

“Wait! I want to make sure my LLM only uses RAG data, not external data.”

If you want to restrict your LLM to only use the context retrieved via RAG — and block it from relying on external or pre-trained knowledge — no problem! You can enforce this behavior with the AI Prompt Decorator plugin.

Setup instructions

Add the AI Prompt Decorator plugin to the same service:

  • Use System as prompts.append.role
  • For prompts.append.contentused: “Use only the information passed before the question in the user message. If no data is provided with the question, respond with ‘no internal data available’ ”.

This system prompt will explicitly instruct the LLM to rely solely on the injected RAG context. If the context is missing or empty, the model will return a safe fallback response instead of hallucinating or guessing.

Test your setup!

Send and test the request:

$ curl --location 'http://localhost:9000/test-compress' \
--header 'Content-Type: application/json' \
--data '{ "messages": [ { "role": "user", "content": "How many shark species is there in the world and how many dangerous" } ], "temperature": 1, "max_tokens": 256, "stream": false }'

The response will contain:

{ ... "content": "Scientists have described 370 species of sharks, and only four have been known to attack humans." ... }

Inspect the logs

If you’re using the http logs plugin, you’ll notice a new property in your logs:

"ai": {
 "compressor": {
     "compress_items": [
       {
         "save_token_count": 360,
           "compress_token_count": 485,
           "original_token_count": 845,
           "compress_type": "rate",
           "information": "Compression was performed and saved 360 tokens",
           "compressor_model": "microsoft/llmlingua-2-bert-base-multilingual-cased-meetingbank",
           "compress_value": 0.5,
           "msg_id": 1
         }
 },
 ...
}

This property contains details about the prompt compression.

In my case, the plugin saved 360 tokens—a significant reduction!

Now try asking: "How many dog species are there?"

And the LLM will respond with “No internal data available.” because it can only use data based on your internal content.

You now have a fully functional internal LLM agent!

You can now replace the sample articles with your own internal resources, and you've effectively deployed an LLM agent that:

  • Searches internal sources
  • Responds strictly based on those vetted internal sources

And that’s just a small part of what you can achieve with Kong AI Gateway!

Conclusion

The benefits of Retrieval-Augmented Generation (RAG) are clear — and Kong makes it easy for any team to set up and manage the full solution pipeline.

Looking ahead, Kong is actively developing additional features to enhance control and relevance of RAG-based responses:

  • Chunk relevance scoring to filter out low-quality or unrelated information
  • Metadata tagging and filtering (e.g., only retrieve documents dated after 04/2021, or from internal sources only)
  • Policy enforcement mechanisms to ensure data compliance

And that’s just a small part of what the Kong AI Gateway enables.

Next steps with Kong

Leverage Kong's robust ecosystem to maximize your RAG implementation:

  • Kong Gateway Docs
  • Kong Konnect for cloud-native API management
  • Kong AI Plugins (RAG, Prompt Compressor, Decorator)

At Kong, we're committed to helping every team unlock the true potential of AI — from developers and data scientists to enterprise leaders.

Let us help you accelerate your RAG journey!

AI-powered API security? Yes please!

Learn MoreGet a Demo
Topics:AI Gateway
|
AI
|
LLM
Powering the API world

Increase developer productivity, security, and performance at scale with the unified platform for API management, AI gateways, service mesh, and ingress controller.

Sign up for Kong newsletter

Platform
Kong KonnectKong GatewayKong AI GatewayKong InsomniaDeveloper PortalGateway ManagerCloud GatewayGet a Demo
Explore More
Open Banking API SolutionsAPI Governance SolutionsIstio API Gateway IntegrationKubernetes API ManagementAPI Gateway: Build vs BuyKong vs PostmanKong vs MuleSoftKong vs Apigee
Documentation
Kong Konnect DocsKong Gateway DocsKong Mesh DocsKong AI GatewayKong Insomnia DocsKong Plugin Hub
Open Source
Kong GatewayKumaInsomniaKong Community
Company
About KongCustomersCareersPressEventsContactPricing
  • Terms•
  • Privacy•
  • Trust and Compliance
  • © Kong Inc. 2025