Interconnected. Shared. That's the norm for today's applications, networks and data. Regardless of your space — social, financial, medical, local, global — your users expect seamless connectivity and access to their data across services. The way to provide smooth and secure authorization for sharing resources is with OAuth 2.0.
## **Authentication vs. Authorization**
**Authentication **is the verification that a user is who they say they are.
**Authorization **determines what resources a user is allowed to access.
For example, a user might *authenticate* as Cassandra Thomas by logging in with a username and password. She is *authorized* to access the "add new payment" functionality for her account.
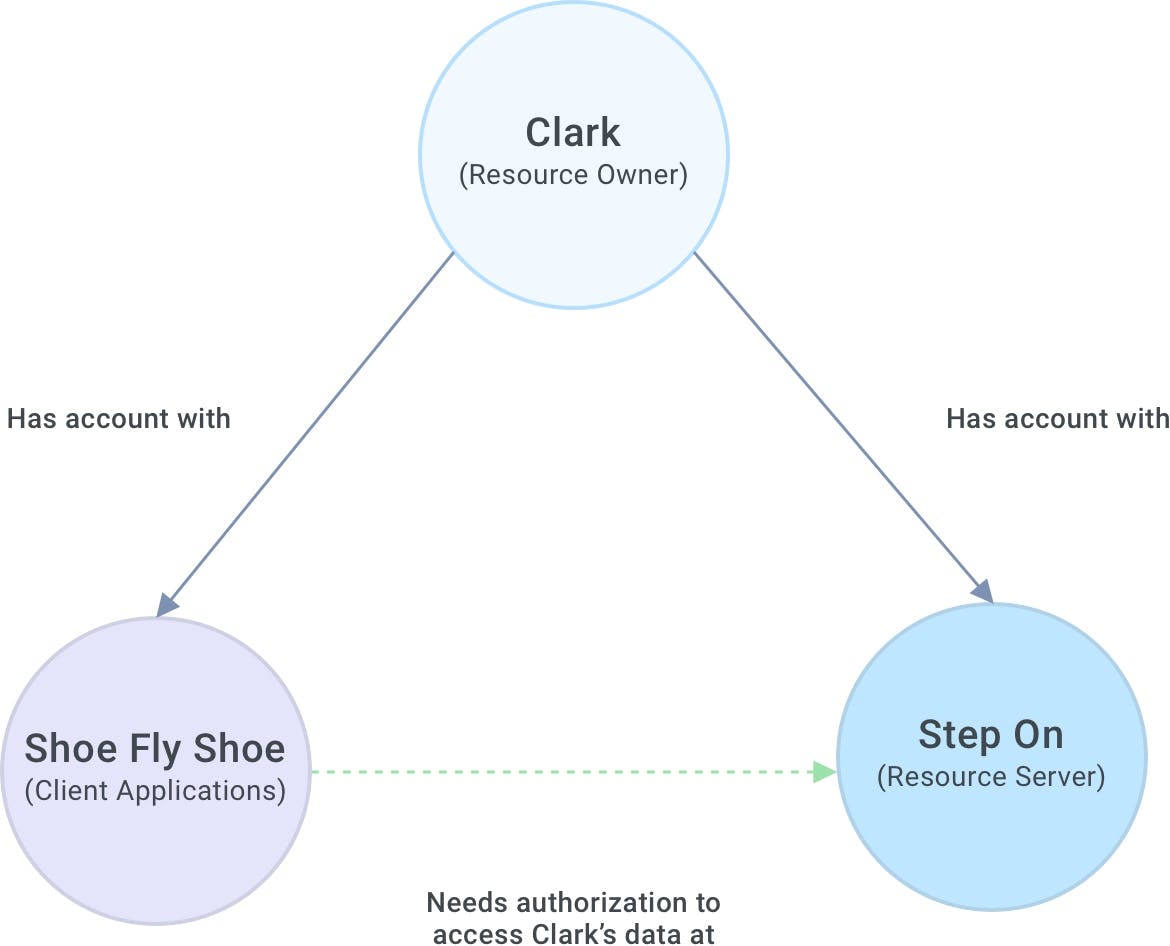
Here's an example that explains the fundamental concepts of OAuth:Meet Clark. Clark got a shiny, new pedometer for his birthday, and he has an account with Step On (stepon.me) to track his daily step count. Step On stores some information for Clark — his user profile, biometric data and daily step count.
In OAuth terminology, Clark is the **resource owner**, and his resources (user profile, biometric data and daily step count) are held by Step On, the **resource server**.
Clark *also* has an account with Shoe Fly Shoe (shoeflyshoe.store), an online store that gives discounts when customers hit certain step counts. If any customers have an account with Step On, the store can connect to the customer's Step On accounts to download those step counts automatically. Super convenient!
Shoe Fly Shoe is the **client application**, needing access to Clark's resources at the resource server. For this to happen, Clark needs to let Step On know that he **authorizes** the store to access those resources.
The OAuth protocol negotiates this process. It starts when a resource owner authorizes a client application to access resources on the resources server. Upon authorization, the client application gets an authorization code and exchanges it for an access token and a refresh token. When the client application presents the access token to the authorization server, it essentially says, "Hey, remember me? I'm that application that Clark said would be allowed to access his stuff. Let me in, please." After some time, the access token will expire. The client application presents the refresh token to the authorization server to request a new access token.
## **What Does the Kong Gateway OAuth2 Plugin Do?**
As Kong Gateway sits in front of a resource server, the OAuth2 plugin adds authorization server functionality to that resource server — handling authorization requests, inspecting and refreshing tokens, and permitting or forbidding access to resources.
## **Example: Adding Kong Gateway OAuth2 to Your API Server**
Now that you understand the fundamentals, you should be able to build an example project:
- **Set up an express API service and endpoint** by building a Node.js Express server as the API Server for Step On. There will be only one API endpoint, which returns a JSON with dates and step counts for a user.
- **Put your API server behind Kong Gateway.**
- **Enable the OAuth2 plugin for Kong Gateway.** In my example, I'll register Shoe Fly Shoe as a client application — a plugin consumer — that would like its users to connect to their accounts with Step On.
- **Walk through OAuth2 flow of requests** — HTTPS requests that demonstrate the OAuth process in action.
Ready to go? Buckle up for our Oauth2 authorization tutorial in 4 easy steps!!
### **1. Set Up an Express API Server and Endpoint**
In your terminal, create a project folder and initialize a new Node.js project. I'll use yarn as my package manager, but you could use npm too:
~$ mkdir project
~$ cd project
~/project$ yarn init
# Accept all of the defaults
Add the packages you'll need:
~/project$ yarn add express https
#### **HTTPS on localhost**
Because of OAuth specification requirements and the plugin's recommendations, it will be smoother to serve up your API server with HTTPS. The simplest way to do this is to generate a self-signed certificate for [https://konghq.com](https://konghq.com)https://konghq.com. Then, tell your API Client to disable certificate verification. Self-signed certificates are typically bad news, but you can trust yourself since you're just doing local development.
To do this, create a sub-folder and generate a certificate and key:
~/project$ mkdir certificate
~/project$ cd certificate~/project/certificate$ openssl req -x509 -newkey rsa:2048 -keyout keytmp.pem -out cert.pem -days 365# Choose a pass phrase for the key
~/project/certificate$ openssl rsa -in keytmp.pem -out key.pem
# Enter the pass phrase you chose above.
~/project/certificate$ tree
.
├── cert.pem
├── key.pem
└── tempkey.pem
With this certificate and key, you can spin up your Express server with HTTPS.
#### **Mock Step Count Data**
Your single GET /stepcounts endpoint will need to retrieve daily step counts for a given user. Mock up some JSON data in project/data.json:
- First, gather the SSL key and certificate needed to spin up the server with HTTPS. Initialize the Express application, and read in your mock data.
- getCurrentUser mocks your server's "authentication" functionality. Set a header mock-logged-in-as to mock being logged in as a specific user (like clark, for example). There is also a x-authenticated-userid header that could indicate the user for which the request is being made. (This is related to the OAuth plugin, which I'll explain later in this article.)
- Create a GET endpoint at /stepcounts.
- In this endpoint, if there is no "logged in" user, send back a 401. If there *is* a user, then send a response with that user's step count data.
- Lastly, start your server, using https on port 3000.
Finally, start up your API server:
~/project$ node index.js
Server is listening on https://konghq.com:3000
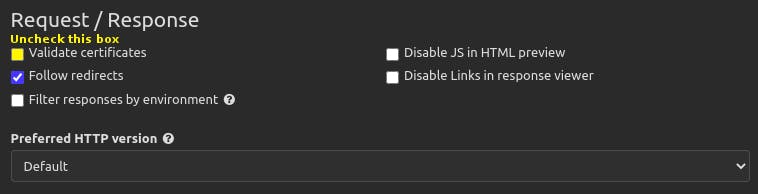
After installing and starting, go to *Preferences* and **uncheck** the box labeled "Validate certificates." I'm using a self-signed SSL certificate for local development.
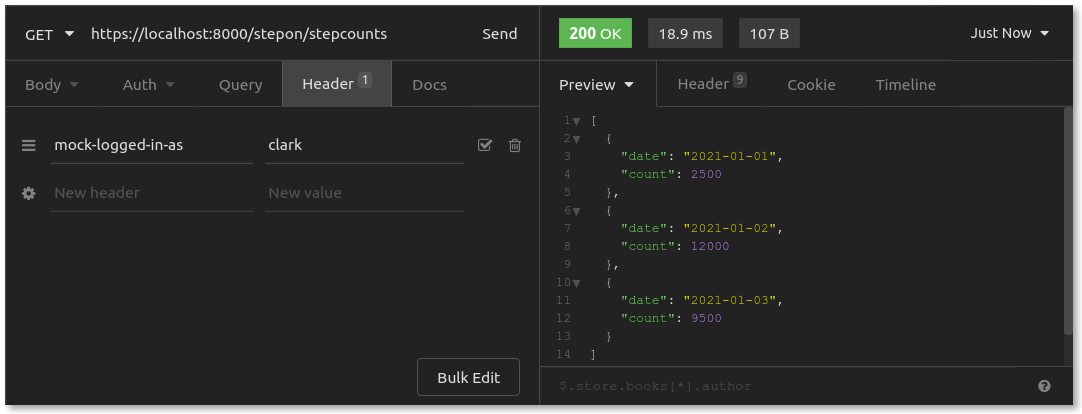
Once your API server is running, send a request to the /stepcounts endpoint, without any logged-in user:
As expected, 401 Unauthorized. That's because getCurrentUser() didn't find a user.
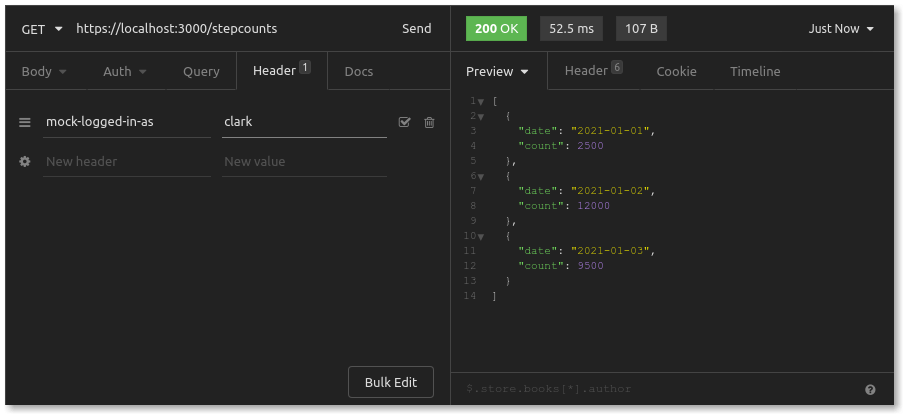
Next, add a header mock-logged-in-as, setting the value to clark:
Great! Now you should see Clark's step count data. Remember: this step count data is Clark's *resource*, and only he (or any client he *authorizes*) should be allowed to access it.
### **2. Put Your API Server Behind Kong Gateway**
The Kong Gateway OAuth2 plugin requires a database to store settings, authorization codes and tokens. The simplest setup is to have PostgreSQL running on your local machine. While logged into your PostgreSQL server, create a user and database for Kong:
postgres=# create user kong with password 'kong';
CREATE ROLE
postgres=# create database kong owner kong;
CREATE DATABASE
After installing Kong Gateway, you'll have a few configurations left to set. First, go to /etc/kong. There, you will find a kong.conf.default template file. Copy it and rename it as kong.conf, and then edit (you'll need root privileges) as follows:
# PATH: /etc/kong/kong.conf
# Near line 268 - Set gateway to listen on https://konghq.com:8000proxy_listen= 127.0.0.1:8000 ssl
# Near line 377 - Set admin API to listen on https://konghq.com:8001admin_listen = 127.0.0.1:8001 ssl
# Near line 519 - Set certificate/key to use for gateway SSL
ssl_cert = /PATH/TO/YOUR/project/certificate/certificate.pem
ssl_cert_key = /PATH/TO/YOUR/project/certificate/key.pem
# Near line 542 - Use same certificate/key for admin API SSL
admin_ssl_cert = /PATH/TO/YOUR/project/certificate/certificate.pem
admin_ssl_cert_key = /PATH/TO/YOUR/project/certificate/key.pem
# Around line 839 - Set database information
database = postgres
pg_host = 127.0.0.1pg_port = 5432pg_user = kong
pg_password = kong
pg_database = kong
Lastly, set up the newly created database and start up Kong (as root):
/etc/kong$ kong migrations bootstrap
...
40 migrations processed
40 executed
Database is up-to-date

/etc/kong$ sudo kong start
Kong started
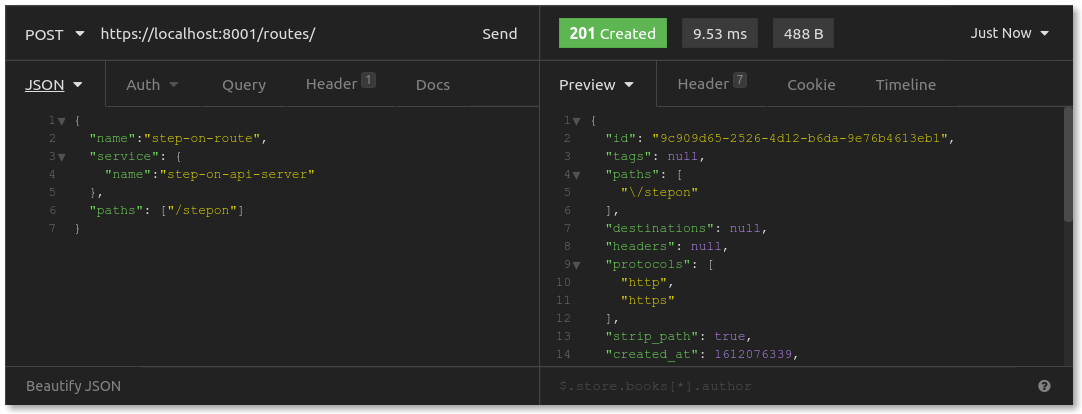
It works! You should now be sending your requests through Kong Gateway at port 8000. As you request the path /stepon, Kong Gateway routes that to your API Server at port 3000. Of course, in a production environment, you would lock down your API Server to be accessible only via routing from the Kong Gateway.
### **3. Enable the Kong Gateway OAuth 2 Plugin**
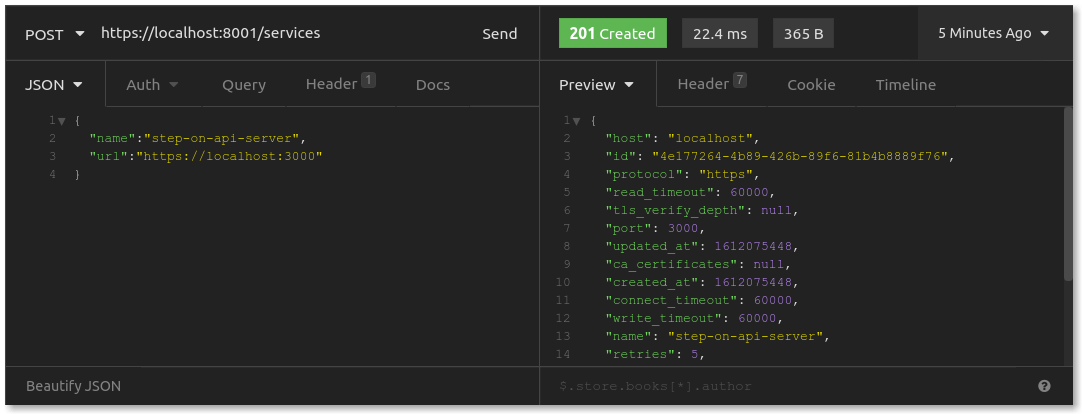
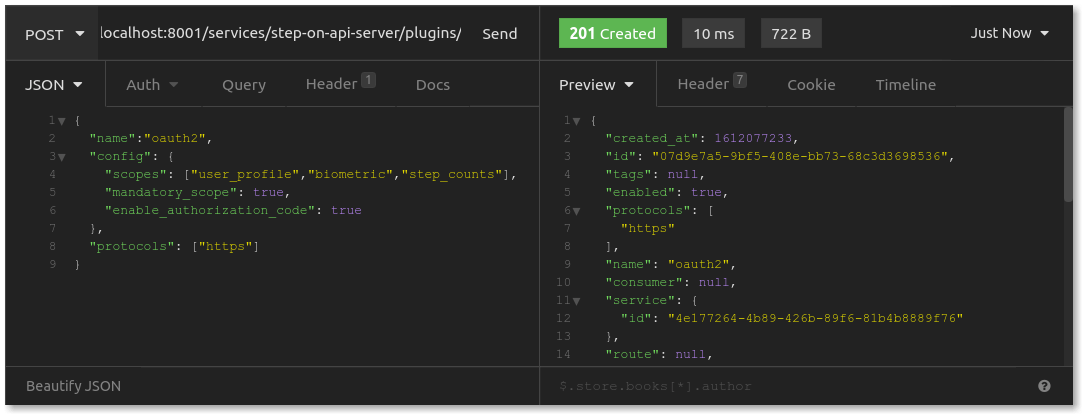
Next, add the OAuth2 plugin. Send a POST request to the admin API at /services/step-on-api-server/plugins. You can see the RESTful API route here, as this plugins path is underneath your specific service:
In this API request body, you'll note the configuration value called scopes, which you have set to an array of three strings: user_profile, biometric and step_counts. Step On may allow many different client applications to connect through OAuth, and **various applications may ask for authorization to access different resources**. [**Scopes**](https://oauth.net/2/scope)**Scopes** in OAuth2 enable the resource server to limit what resources a client application is authorized to access. Shoe Fly Shoe should only need to access step counts, whereas a different application might request authorization for step counts *and* biometric data. Scopes give more granular control to authorization.
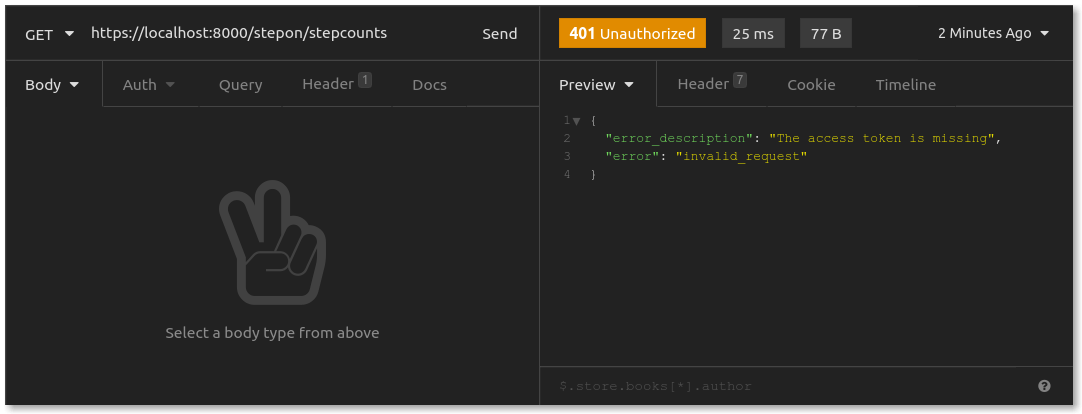
Now that you have set up OAuth authorization, try to get Clark's step counts again with the GET request you just used:
"*The access token is missing.*" With the Kong Gateway OAuth2 plugin enabled, Kong Gateway rejected my request because I didn't provide an OAuth **access token**. This is exactly the behavior you should expect. All requests now need to pass through the OAuth authorization server. No token? No entry.
#### **Add Client Application (API Consumer) to the Plugin**
In my example, the developers at Shoe Fly Shoe would submit their application to Step On for connection approval: "*I want my users to connect me to their accounts with Step On, so that I can access their daily step counts. I noticed you support OAuth2. Can you grant me a client ID and secret so that I can ask users to authorize us to access resources at your API server?*"
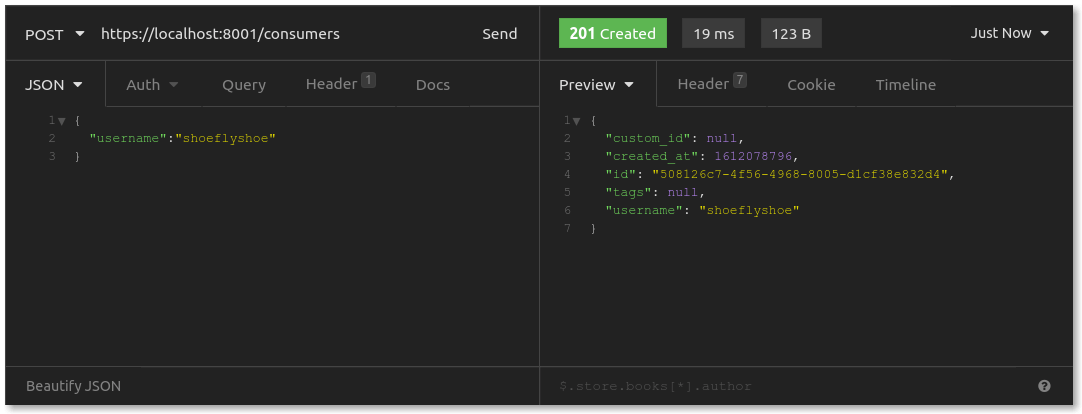
Next, add OAuth credentials for the store, which it will use when requesting authorization or tokens. Send a POST request to /consumers/shoeflyshoe/oauth2:
Here, you should provide a name for your client application: Shoe Fly Shoe Customer Rewards. The important data you get back is the client_id and the client_secret. You might notice that your request body also included redirect_uris. This is a good time to explain the OAuth2 authorization flow.
#### **The OAuth2 Authorization Flow**
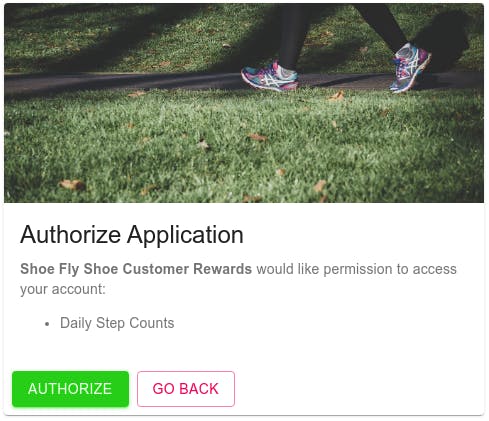
Imagine Clark is logged into the store. He sees that he can connect his Step On account to download his step counts. Awesome! Clark clicks on the button to connect his account.
The store redirects Clark to the authorization request page on Step On's website. Shoe Fly Shoe includes the following data:
- Shoe Fly Shoe's client_id so that Step On knows which client application is asking Clark for authorization
- Shoe Fly Shoe's requested scopes so that Clark knows what kinds of resources the store would like to access
- A redirect_uri so that Step On knows where to redirect Clark after this authorization process completes
This assumes Clark is logged in at Step On. If not, Step On would ask him to log in first and then redirect him to this authorization page.
When Clark clicks on "Authorize," the Step On web server sends a behind-the-scenes POST request to a specific OAuth authorization endpoint for Step On, which generates an **authorization code**. Then, the webserver redirects Clark to the redirect_uri with this authorization code tacked on as a query param.
In your credential configuration, you should set a redirect_uri to be a specific address on the store's website, which it will use to capture the authorization code in order to exchange it for an access token.
### **4. Walk Through OAuth2 Flow of Requests**
Now that your API server, gateway, plugin and consumer are all set up, I'll walk through all of the HTTP requests that make up the authorization flow.
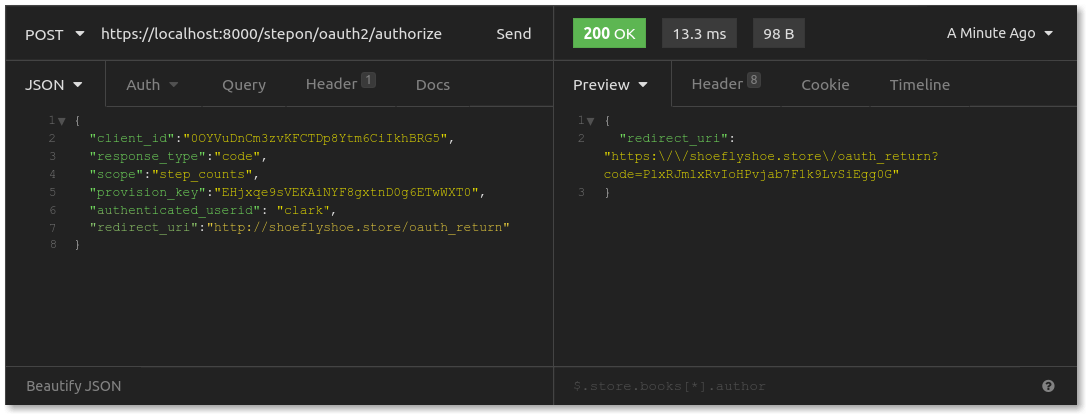
#### **User Submits POST Request to Authorize Application**
The provision_key is a unique identifier for the Kong Gateway OAuth2 plugin enabled on your API Server. This information, along with the authenticated_userid— that's Clark's username on the Step On site — is *not* information that the store would be privy to when requesting authorization. Step On's web server needs to provide this information, tacking it on as it requests an authorization code.
The response that comes back is a redirect_uri, which is the address provided by the store, with an authorization code appended to the end. The web server redirects Clark's web browser back to the store's website.
#### **Client Application Exchanges Code for Access Token**
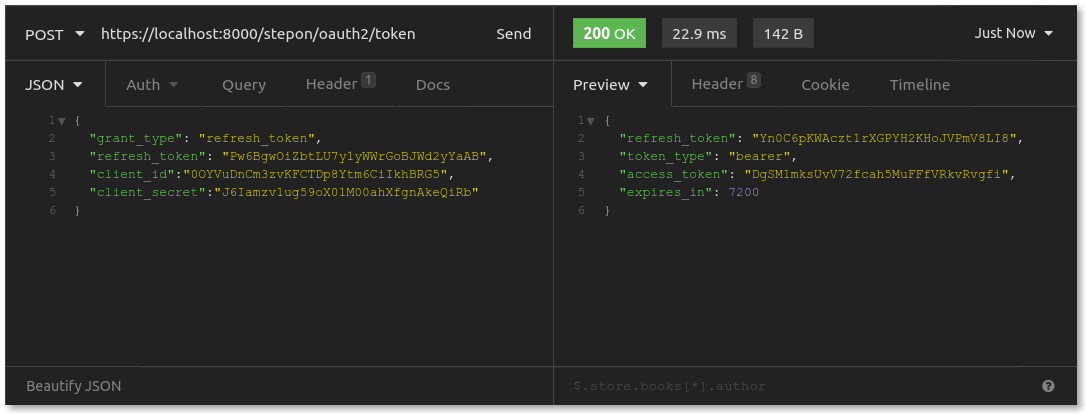
Clark's web browser brings him to a page that the store has set up to process successful authorization requests. The store’s web server takes the authorization code, and *it* sends a behind-the-scenes POST request to the authorization server's /oauth2/token endpoint at Step On, asking for an access token. The request from the store looks like this:
Shoe Fly Shoe includes its client_id *and* its client_secret, along with the authorization code it just captured. The authorization server response includes an access_token, which expires in two hours, and a refresh_token. The store saves these tokens to its database, associating them with its account for Clark and his association with Step On.
#### **Client Application Uses Access Token to Request Resource**
The response is a 200 OK. The access_token that the store presented with its request gave it access to Clark's resources on the Step On API Server. Here's what just happened:
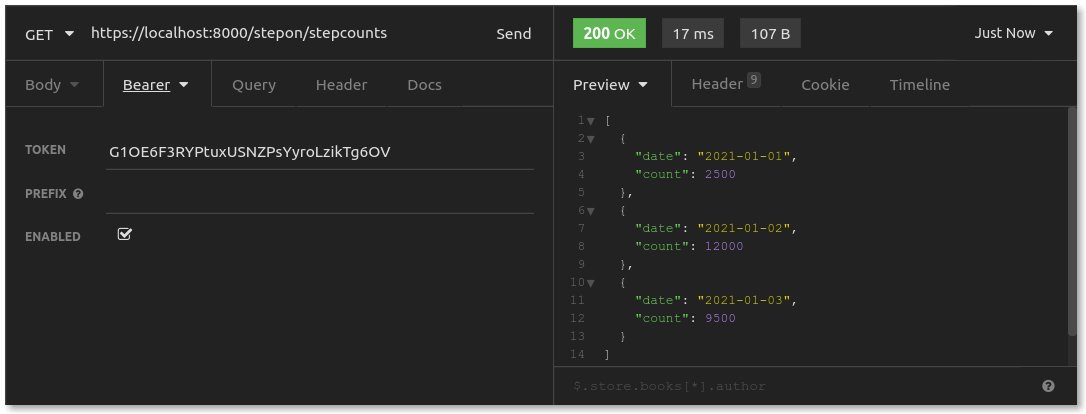
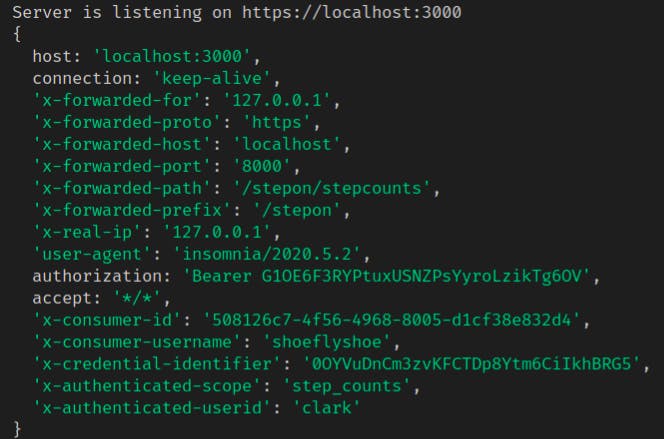
Kong Gateway received this request routed for the Step On API Server. The Kong Gateway OAuth2 plugin protects that service. The plugin looks for a Bearer Auth token, and it finds one. The plugin checks the database of valid tokens and finds that this token belongs to the store, authorizing it to access resources for the user clark, scoped to step_counts resources only.
You should see the consumer username as shoeflyshoe— that's how you know *who* is requesting this resource. You should also see the x-authenticated-userid as clark. This is the resource owner. In my endpoint, I wrote a getCurrentUser() function to look for this x-authenticated-userid header so that I would know whose step count data I should be looking up.
Lastly, you should see x-authenticated-scope as step_counts. Recall that Clark's authorization for Shoe Fly Shoe was limited in scope to step_counts only. While Kong will let a request with a valid access_token through to your API server, it's your API server's responsibility to enforce scopes. For example, this token might get us through the gateway to a biometric data endpoint, but the API server would see x-authenticated-scope doesn't include biometric and would reject the request.
#### **Requesting a Refreshed Access Token**
In case an access_token is about to expire, the store can issue a refresh token request:
This request is quite similar to the one that exchanged an authorization code for an access token, except that now a refresh_token is used to obtain a new access_token and refresh_token. Note that this request *invalidates* the original access_token and refresh_token.
## **Additional Use Cases**
Before I wrap up, I'll touch upon two additional use cases.
### **"Anonymous" Access on Authorization Fail**
By default, the Kong plugin responds to failed authentication with a 401 Unauthorized. You can, however, configure it to *allow* requests onto the service, setting the upstream header to note that this is an "anonymous" user. There might be a case where an authenticated user would have full access to resources, while an "anonymous" user might have limited access, but access nonetheless.
### **OAuth2 Introspection With a Third-Party Authorization Server**
In my example, I used the Kong Gateway OAuth2 plugin to extend my API server to act also as the authorization server. Kong added the /oauth2/* endpoints to my service's routes, and my database holds onto tokens and authorization codes.
OAuth2 Introspection involves authorization and validation of tokens at a third-party authorization server, delegating responsibility to that trusted third party. Kong provides the [OAuth2 Introspection plugin](https://docs.konghq.com/hub/kong-inc/oauth2-introspection)OAuth2 Introspection plugin to handle this. Authorization requests and token presentations to your Kong Gateway are sent to that authorization server for introspection, and that server sends a response so that Kong knows how to proceed.
## **Service Authorization Complete**
You've just journeyed through a hands-on, practical deep dive building an API server protected by Kong Gateway and OAuth2. Hopefully, you acquired a deeper understanding of the OAuth2 framework and gained experience in using tools like the plugin for quick setup of secure authorization.
OAuth2, now the widely accepted standard for authorization protocols, provides a secure and seamless way for unrelated services to share authorized resources. It does this while facilitating a nearly transparent user experience. In today's tech world, services belonging to different organizations or industries expect to talk to one another and share resources, securely and expediently. OAuth2 provides just that, and the Kong Gateway OAuth2 plugin makes implementation smooth and quick.
You have what you need now. It's time to get up and running. 👟
**Have questions or want to stay in touch with the Kong community? Join us wherever you hang out:**
In the modern IT stack, API gateways act as the first line of defense against attacks on backend services by enforcing authentication/authorization policies and validating and transforming requests. When backend services are protected with a token-b
Samuele Illuminati
# Implementing Client Credentials With Kong and Okta
Using Kong's OpenID Connect (OIDC) plugin, Kong and Okta work together to solve three significant application development challenges: Connectivity Authentication Authorization The OIDC plugin enables Kong, as the API gateway , to communicate w
How OAuth 2.0 Token Exchange Reshapes Trust Between Services — and Why the API Gateway Is Exactly the Right Place to Enforce It
Modern applications don’t run as a single monolithic. They are composed of services — frontend APIs, backend microservi
OAuth (short for Open Authorization) is a popular, standardized API protocol that provides a secure way for services to quickly share resources for a seamless user experience. Examples of OAuth in action include giving a greeting card service acce
API gateway authentication is an important way to control the data that is allowed to be transmitted using your APIs. What is an API Gateway? In essence, it authenticates that a particular consumer has permission to access the API, using a predefin
Kong
# Level Up Your Digital Health Platform with Kong, SMART on FHIR, Okta
The golden triangle: Kong, Okta, and FHIR Together, these three technologies enable healthcare organizations to connect systems with confidence, manage identities responsibly, and share data securely. FHIR Server: Your source of truth. It houses th
Biswa Mohanty
# How to Implement Secure Access Control with OPA and Kong Gateway
Ensuring secure access to applications and APIs is critical. As organizations increasingly adopt microservices architectures and cloud native solutions, the need for robust, fine-grained access control mechanisms becomes paramount. This is where the
Raja Ravi Varman
# Adopt a Zero Trust Approach with OAuth 2.0 Mutual TLS Client Authentication
In the modern IT stack, API gateways act as the first line of defense against attacks on backend services by enforcing authentication/authorization policies and validating and transforming requests. When backend services are protected with a token-b
Samuele Illuminati
# Implementing Client Credentials With Kong and Okta
Using Kong's OpenID Connect (OIDC) plugin, Kong and Okta work together to solve three significant application development challenges: Connectivity Authentication Authorization The OIDC plugin enables Kong, as the API gateway , to communicate w
How OAuth 2.0 Token Exchange Reshapes Trust Between Services — and Why the API Gateway Is Exactly the Right Place to Enforce It
Modern applications don’t run as a single monolithic. They are composed of services — frontend APIs, backend microservi
OAuth (short for Open Authorization) is a popular, standardized API protocol that provides a secure way for services to quickly share resources for a seamless user experience. Examples of OAuth in action include giving a greeting card service acce
API gateway authentication is an important way to control the data that is allowed to be transmitted using your APIs. What is an API Gateway? In essence, it authenticates that a particular consumer has permission to access the API, using a predefin
Kong
# Level Up Your Digital Health Platform with Kong, SMART on FHIR, Okta
The golden triangle: Kong, Okta, and FHIR Together, these three technologies enable healthcare organizations to connect systems with confidence, manage identities responsibly, and share data securely. FHIR Server: Your source of truth. It houses th
Biswa Mohanty
# How to Implement Secure Access Control with OPA and Kong Gateway
Ensuring secure access to applications and APIs is critical. As organizations increasingly adopt microservices architectures and cloud native solutions, the need for robust, fine-grained access control mechanisms becomes paramount. This is where the
Raja Ravi Varman
## Ready to see Kong in action?
Get a personalized walkthrough of Kong's platform tailored to your architecture, use cases, and scale requirements.