To check that you've started Kong, make a quick request to port 8001 (the default for the Kong admin API). A response status code of 200 means that Kong is up and running.
**Watch the video guide below, or keep reading for the full written guide with screenshots.**
###
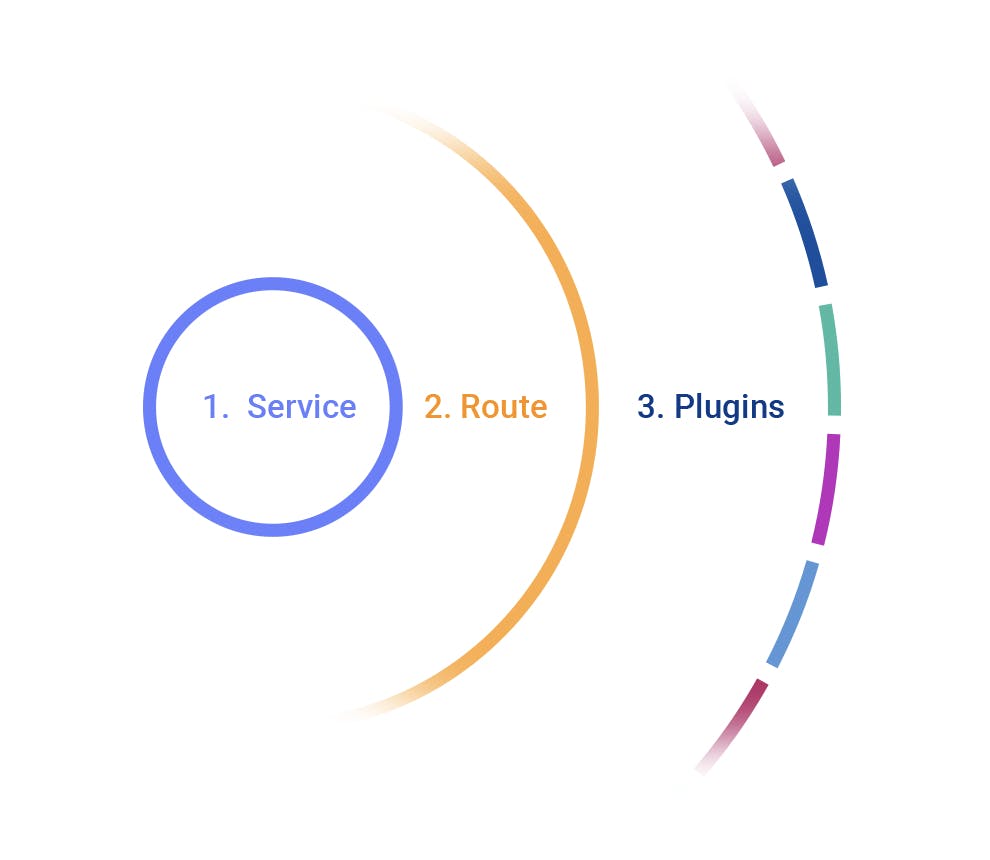
### Add a Service
Kong exposes a RESTful Admin API on port 8001 that allows you to change Kong configurations, such as adding Services and Routes via the command line. Begin by making a post request to the Admin API/Service Route.
Then, create a new example Service that points to the [Mockbin API](http://mockbin.org)Mockbin API. Press enter, and the system will generate the response status code of 201. You'll see the name example Service within the response JSON as well as some other information.
### Add a Route
Next, create a new Route for the Service. Start by making a post request to the admin API. Hit the example Service you created earlier and then hit the Route’s endpoint for that example Service. Specify the host headers of example.com.
Now that you have a Route and a Service, you're ready to proxy your request through Kong Gateway. Go ahead and issue a curl command, but this time use port 8000.
If you receive a successful response, Kong will now forward requests made to localhost port 8000 to the URL you configured back in step one, the Mockbin API.
If you make the same request again and this time strip out the header, you’ll see a code of 200, which means a successful request. It’s a proxy via Kong 1.3, so you can see the version, and you can also see how much latency the Kong proxy is adding to the request. As you make more and more requests, the number should get lower because Kong can cache the response and request that you make.
### Add a Plugin
Now that you have your Route and Service set up, you'll need to add a plug-in to secure your Service. To configure the [key-auth plugin](https://docs.konghq.com/hub/kong-inc/key-auth)key-auth plugin for the Service you configured in Kong Gateway, issue the following curl request. Once again, you'll be utilizing the admin API to create a plugin.
Start by hitting the example Service you started in earlier steps to add a plugin called key-auth. After making the request, the key-auth plugin will have some information in the response JSON.
Then, make the same request to port 8000. You'll immediately get a 401 saying that it’s unauthorized. The request is still proxied through Kong; Kong is just looking for the key authentication. So, now that you’ve configured the key-auth plugin, you see how quickly you can secure any Services. Additionally, you can specify plugins to services, routes or consumers. Key authentication allows you to choose who can access your services, giving you more control over your microservices.
Next, configure the key-auth plugin and add a Consumer to your Service. Create a Consumer through the restful API. Once again, utilize the admin API to hit the Consumer’s endpoint and adding a Consumer named Jason.
```
curl -i -X POST \
--url http://localhost:8001/consumers/ \--data "username=Jason"```
Afterward, you'll see a 201 created as well as an ID for Jason.
To provision key credentials for your Consumer, use the admin API once again as a post-request through the Consumers/Jason/key-auth endpoint. Where it says key=ENTER_KEY_HERE, enter the ID that you see in Jason’s response JSON.
After successful creation, Jason now has the credentials necessary to make the request. If you go back and make the request to port 8000, you still keep the host header, example.com, but now you have to add a field called apikey. Take the key for Jason, and plug it in. Now you see the request starts to work again. Strip the body and just look at the header, and you'll get a response of 200.
That's it! You've successfully added a Service, created a Route for that Service, and secured that Service using a key-auth plugin with a Consumer named Jason. For more information, visit our [documentation page](http://docs.konghq.com)documentation page.
**Have questions or want to stay in touch with the Kong community? Join us wherever you hang out:**
While JSON-based APIs are ubiquitous in the API-centric world of today, many industries adapted internet-based protocols for automated information exchange way before REST and JSON became popular. One attempt to establish a standardized protocol sui
This tutorial shows you how to create a custom Kong Gateway plugin with Go programming language. The sample plugin I created adds an extra layer for security between consumers and producers. The way it works is it identifies consumers through a
Mert Simsek
# Supporting Legacy Web Services (SOAP) With Kong API Gateway
Let's admit it - web services (SOAP) are here to stay for a few more years, and maybe for a long time in some places where there is no business incentive to rebuild them. However, with a decline in new SOAP web services and most applications moving
A common requirement for API gateways is to rewrite the published URL to a different URL for the upstream service’s endpoint. For example, due to legacy reasons, your upstream endpoint may have a base URI like /api/oilers/. However, you want your pub
Peter Kim
# How to Test Gateway APIs Directly from Kong Konnect with Insomnia
What You'll Build
To explore the new integration, I'll build a realistic API platform workflow using Konnect, Kong Gateway, and Insomnia.
By the end of this tutorial, I'll have:
A Konnect Control Plane (KongAir Dev)
A local Kong Gateway Data Pl
Juhi Singh
# Beyond Static Routing: Modernizing API Logic with Conditional Policy Execution
Imagine you have a single Service, order-api . You want to apply a strict rate limit to most traffic, but you want to bypass that limit—or apply a different one—if the request contains a specific X-App-Priority: High header. Previously, you had t
How OAuth 2.0 Token Exchange Reshapes Trust Between Services — and Why the API Gateway Is Exactly the Right Place to Enforce It
Modern applications don’t run as a single monolithic. They are composed of services — frontend APIs, backend microservi
Veena Rajarathna
# Using Kong Gateway to Adapt SOAP Services to the JSON World
While JSON-based APIs are ubiquitous in the API-centric world of today, many industries adapted internet-based protocols for automated information exchange way before REST and JSON became popular. One attempt to establish a standardized protocol sui
This tutorial shows you how to create a custom Kong Gateway plugin with Go programming language. The sample plugin I created adds an extra layer for security between consumers and producers. The way it works is it identifies consumers through a
Mert Simsek
# Supporting Legacy Web Services (SOAP) With Kong API Gateway
Let's admit it - web services (SOAP) are here to stay for a few more years, and maybe for a long time in some places where there is no business incentive to rebuild them. However, with a decline in new SOAP web services and most applications moving
A common requirement for API gateways is to rewrite the published URL to a different URL for the upstream service’s endpoint. For example, due to legacy reasons, your upstream endpoint may have a base URI like /api/oilers/. However, you want your pub
Peter Kim
# How to Test Gateway APIs Directly from Kong Konnect with Insomnia
What You'll Build
To explore the new integration, I'll build a realistic API platform workflow using Konnect, Kong Gateway, and Insomnia.
By the end of this tutorial, I'll have:
A Konnect Control Plane (KongAir Dev)
A local Kong Gateway Data Pl
Juhi Singh
# Beyond Static Routing: Modernizing API Logic with Conditional Policy Execution
Imagine you have a single Service, order-api . You want to apply a strict rate limit to most traffic, but you want to bypass that limit—or apply a different one—if the request contains a specific X-App-Priority: High header. Previously, you had t
How OAuth 2.0 Token Exchange Reshapes Trust Between Services — and Why the API Gateway Is Exactly the Right Place to Enforce It
Modern applications don’t run as a single monolithic. They are composed of services — frontend APIs, backend microservi
Veena Rajarathna
## Ready to see Kong in action?
Get a personalized walkthrough of Kong's platform tailored to your architecture, use cases, and scale requirements.