# Protect Your Services With Kong Gateway Key Authentication
Aapo Talvensaari
This tutorial will walk through a common use case for the Kong Gateway Key Authentication [plugin](https://docs.konghq.com/hub/kong-inc/key-auth)plugin: using API key authentication to protect a route to an API server endpoint. It’s a simple use case, but it will give you the foundation to deploy and configure the plugin for your own unique project needs.
Before we walk through our mini-project, let’s cover a few core concepts. Feel free to skip ahead to the tutorial or watch the below video if you're already familiar with the basic key authentication and API gateway concepts.
## **What Is an API Key?**
You can use an API key for authentication. That way, when a user makes a request, they present an API key to validate that they are who they claim to be-assuming the user keeps their API key secure and out of reach from malicious users.
That’s why you often see warning messages like “Keep this API key secure! Don’t share it with anyone or hard-wire it into your code!” Requiring and using API keys is a standard industry practice.
## **Why Use a Key Authentication Plugin?**
Restricting access to your API is a must-have best practice, regardless of your business case. It makes sense to limit API access to authenticated users with proper authorization for data security reasons or resource monitoring. The standard approach to managing API access is by using API keys. Only those users who submit requests with a valid API key will get access to your API.
At first glance, “rolling your own” solution to manage and validate API keys might seem tempting. But when well-tested and robust solutions to common problems already exist—and that is the case for API keys—integrating these solutions into your systems will save you time and allow you to focus your energy on solving your unique business problems instead.
The Kong Gateway Key Authentication Plugin provides a highly configurable API key management system that is simple to set up and quick to deploy. We’re going to see the ease and power of this plugin in our walkthrough.
## **Mini Project: Protect an Upstream Service**
For our basic use case, we will protect an upstream service—an API server with a single endpoint—by only allowing access to users who include a valid API key in their request header. To do this, we’re going to go through the following steps:
- Set up a Node.js Express API server with a single endpoint.
- Set up Kong Gateway to sit in front of an upstream service: our API server.
- Set up the Key Authentication plugin to protect the route by requiring a valid API key in the request header. If the user provides no key, they'll receive a 401 Unauthorizedresponse.
- Use Kong to create a consumer (a valid user) and a credential (an API key).
- Demonstrate that a request through Kong—if it includes a valid API key—is forwarded to our API server.
It’s going to be quick and easy, and we’ll walk you through it step by step. Are you ready? Let’s get started.
We’re going to create the simplest of API servers: a single endpoint Express API server. To do this, create a new folder for your project. Then, initialize a Node.js project with a package manager (we’ll use yarn for our walkthrough).
~$ mkdir project
~$ cd project
~/project$ yarn init
# Accept all the defaults
Next, add the express package, which is the only package we’ll need for our simple server.
~/project$ yarn add express
In our project folder, we’re going to create one file, called index.js. It should look like this:
# PATH: ~/project/index.js
const express = require('express')
const server = express()
const port = 3000server.get('/', (req, res) => { console.log(req.headers)
res.status(200).send('Hello world!')
})
server.listen(port, () => { console.log(`Server is listening on http://localhost:${port}`)})
Pretty simple! Our server listens on port 3000 for a GET request to the / path. If a request comes through, it logs the request headers and then responds with the string “Hello world!” That’s all there is to it. To try it out, start up your server:
~/project$ node index.js
Now, in your browser, visit http://localhost:3000. Here's what you should see:
Hooray! Our API server, with its single endpoint, is up and running. Back in your terminal window, you probably see the logged headers. It might look something like this:
~/project$ node index.js
Server is listening on http://localhost:3000{ host: 'localhost:3000', connection: 'keep-alive', 'sec-ch-ua': '"Google Chrome";v="89","Chromium";v="89",";Not A Brand";v="99"', 'sec-ch-ua-mobile': '?0', 'upgrade-insecure-requests': '1', 'user-agent': 'Mozilla/5.0 (X11; Linux x86_64) AppleWebKit/537.36 (KHTML, like Gecko) Chrome/89.0.4389.90 Safari/537.36', accept: 'text/html,application/xhtml+xml,application/xml;q=0.9,image/avif,image/webp,image/apng,*/*;q=0.8,application/signed-exchange;v=b3;q=0.9',
'sec-fetch-site': 'none',
'sec-fetch-mode': 'navigate',
'sec-fetch-user': '?1',
'sec-fetch-dest': 'document',
'accept-encoding': 'gzip, deflate, br',
'accept-language': 'en-US,en;q=0.9'
}
We’ll need to leave our API server running, so let’s open another terminal and do the rest of our work there.
Because the Key Authentication plugin will need to manage API keys, Kong Gateway will need to maintain its data state in a database. The simplest configuration is to run a Postgresql database on your machine, alongside Kong. You can configure Kong for other data stores too, but we’ll use Postgresql for simplicity.
First, while logged in to psql with root privileges, we’ll create a new user called “kong” and give him the password “kong.” Then, we’ll create a database (also called “kong”) and make our “kong” user the owner of that database:
~\project$ psql -h localhost -p 5432 -U postgres
Password for user postgres: ********
postgres=# create user kong with password 'kong';
CREATE ROLE
postgres=# create database kong owner kong;
CREATE DATABASE
Great! Now, let’s configure Kong to use the database. When you installed Kong, it provided you with a kong.conf.default template file. Let’s copy that file as kong.conf and then edit our copy:
~/project$ cd /etc/kong
~/project$ sudo cp kong.conf.default kong.conf
The only edits we need to make to kong.conf are at around line 922, where we configure Kong’s access to the Postgresql database. The lines should look like this:
# AROUND LINE 922database = postgres # Determines which of PostgreSQL or Cassandra
# this node will use as its datastore.
# Accepted values are `postgres`, # `cassandra`, and `off`.
pg_host = 127.0.0.1 # Host of the Postgres server.
pg_port = 5432 # Port of the Postgres server.
pg_timeout = 5000 # Defines the timeout (in ms), for connecting, # reading and writing.
pg_user = kong # Postgres user.
pg_password = kong # Postgres user's password.
pg_database = kong # The database name to connect to.
Now that we've configured Kong to use our database, let’s bootstrap the database by running this command:
~/project$ kong migrations bootstrap
...
41 migrations processed
41 executed
Database is up-to-date
The database is all ready for Kong to use. Let’s start up our Kong Gateway:
~/project$ sudo kong start
Yes, that command is all it took to start it up.
### **Use Kong Admin API to Add Upstream Service**
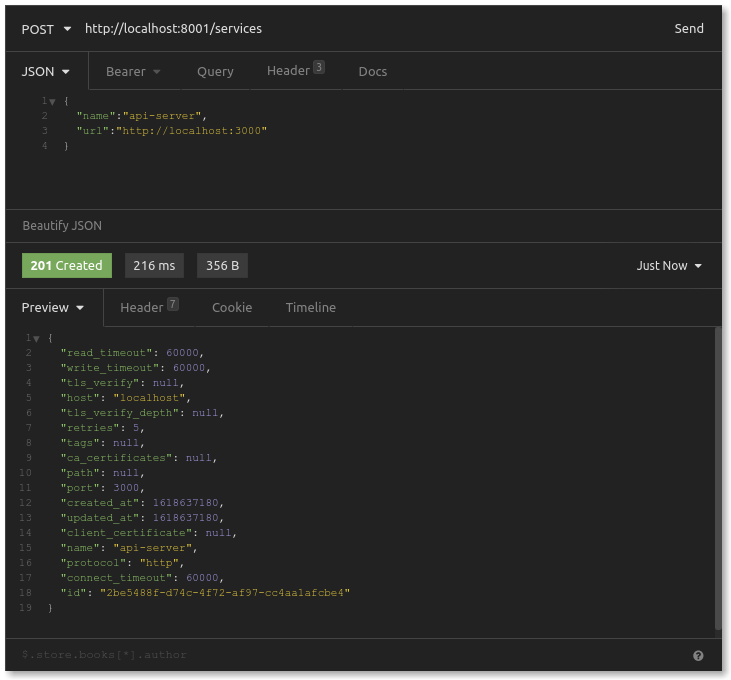
To add a service, we send a POST request to the Kong Admin API. We provide a name for our service, along with the URL where the service is found:
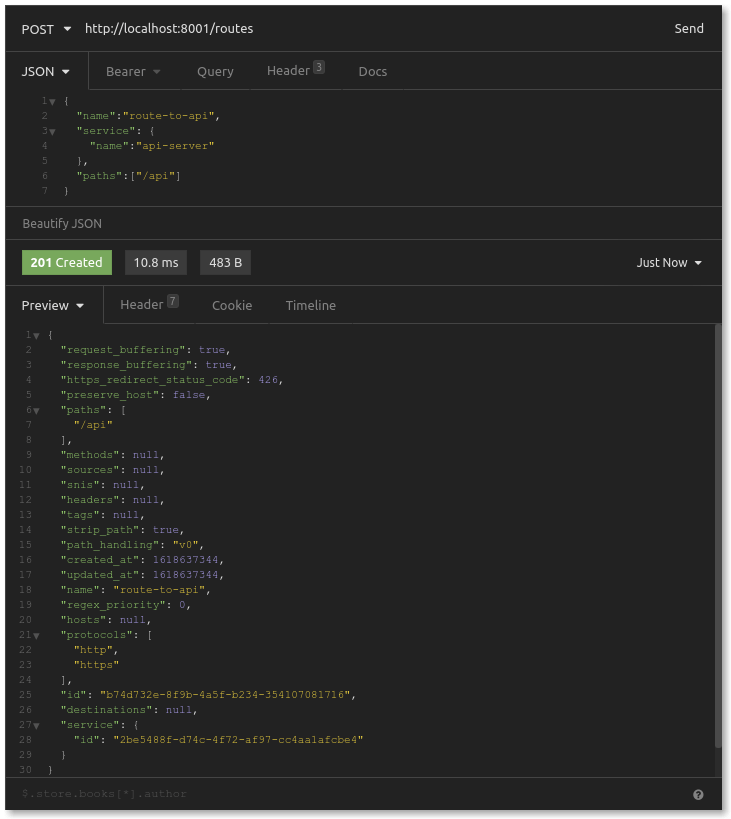
Next, we create a route. A route is a path that Kong Gateway will listen to, which it will then forward to the upstream service.
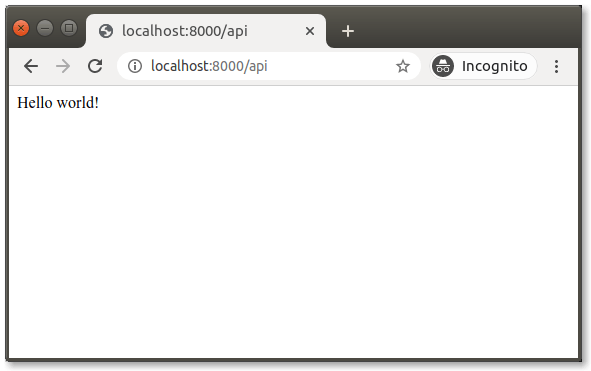
Great! We’ve configured Kong to listen on the /api path. Requests going to that route will forward to our api-server upstream service, which is at http://localhost:3000. To test this out, open your browser and visit http://localhost:8000/api. You should see the following:
It looks just as if we were visiting our Express API endpoint directly (which would have been at port 3000). But remember, our request will go to port 8000 to the /api path, which Kong Gateway then forwards.
We’ve connected all the dots. Now, it’s time to add in the Key Authentication plugin.
## **Step 3: Add Key Authentication Plugin to Protect Route**
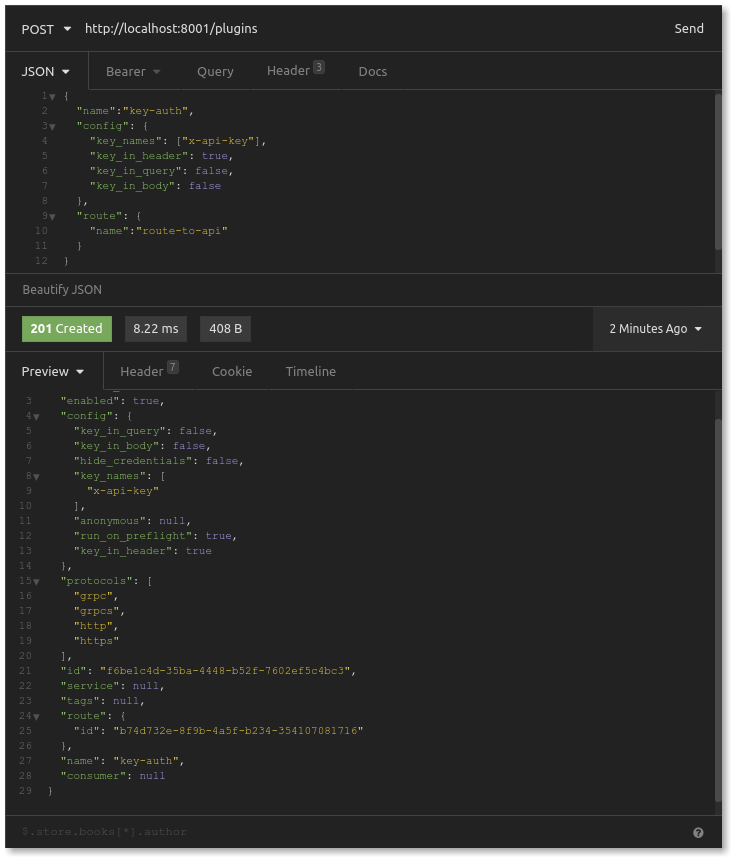
We’ll make another request to the Kong Admin API, this time adding the Key Authentication plugin and associating it with the route we just created. The Key Authentication plugin has several configuration options. For our simple use case, we will tell the plugin that the location of the API key will be in the request header called x-api-key.
Again, we could tell the plugin to look in the body or the query string parameters, and we can specify the name of the body or parameter key. But for now, we’ll go with x-api-key in the header.
You will need to include the route's name for this request, which you configured in the previous request. Also, the name of the plugin we will use is “key-auth.” The name is not arbitrary but refers specifically to the Key Authentication plugin bundled in the Kong Gateway code.
Now that we have created our plugin, let’s see if our request—intended to reach our Express API upstream service—forwards successfully. In your browser, retry that visit to http://localhost:8000/api.
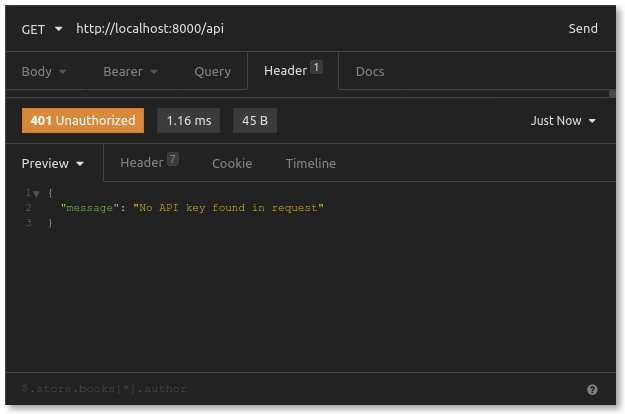
It looks like we don’t have access anymore. That’s a good thing. The Key Authentication and Kong Gateway are doing their jobs! Just for good measure, let’s make a similar GET request in Insomnia to see if we get more information.
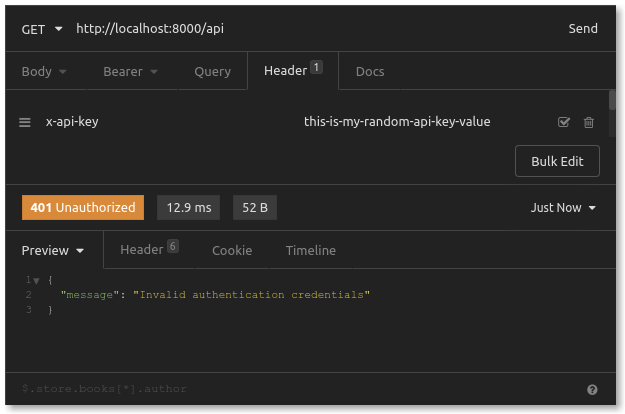
There it is—the 401 Unauthorized response we were expecting. Rejection has never felt more satisfying. The system found no API key in our request. Let’s use Insomnia to add an x-api-key header with a random value just to see what happens.
Great! Kong Gateway *did* notice that we put a value in our x-api-key header. The problem was that the value we provided was invalid. Let’s continue using Kong to generate valid API keys which our API users can use.
## **Step 4: Create a Consumer and Credential**
Now that the Key Authentication plugin is protecting our route, we can generate and distribute API keys to our service’s authorized users. We'll just do this for one user - for example, what we call a “consumer.”
### **Create a Consumer**
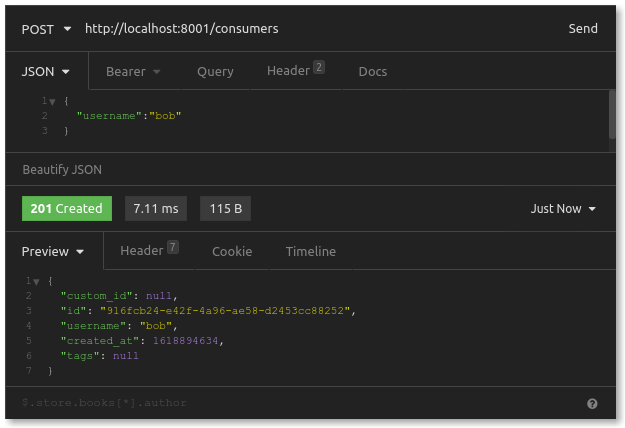
To create a consumer, we send a request to Kong’s Admin API. The consumer is a separate resource not specifically tied to any service or route. This way, a single consumer can use an API key across various services or routes, each protected by the Key Authentication plugin.
In Insomnia, we send a POST request to the Admin API’s /consumers endpoint, including a JSON body with a username for our consumer:
### **Create a Credential (API Key)**
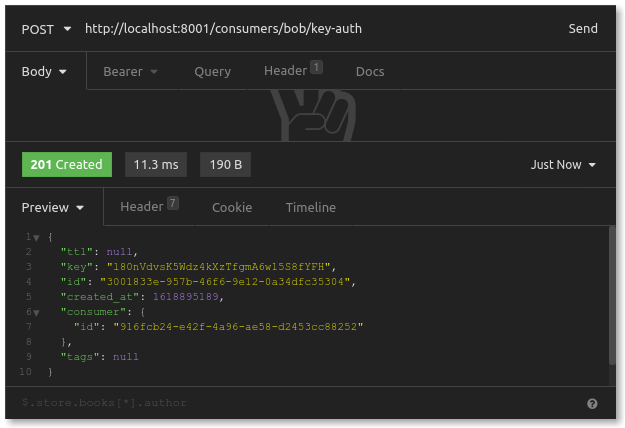
Next, we create a credential for our user. Depending on the kind of authentication plugin you use with Kong, you can make different credentials for a consumer. For our example, we’re creating an API key.
To do this, we send a POST request to the Admin API to an endpoint associated with the consumer we just created and associated with the key-auth plugin. Kong knows, from this combination, that the resulting credential to create is an API key. This request has no body:
We can see the key in the response. It's the API key that our user, bob, would use to access our API server.
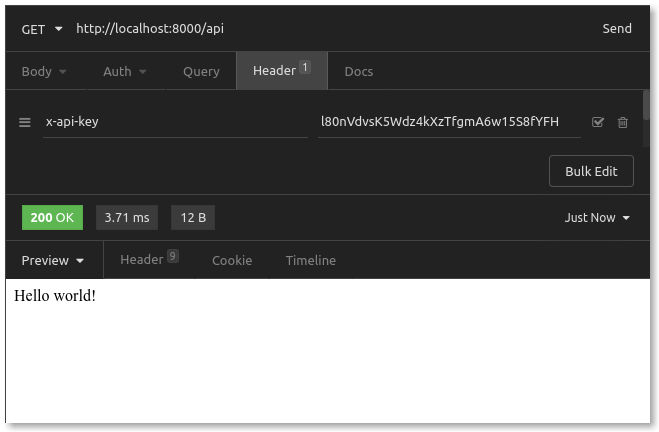
## **Step 5: Test Request with API Key**
Now that we have our API key, we can go back to trying out our request to Kong, to our /api route. We want to copy/paste the key from our credential to create a response and set that as the x-api-key value in our request header. In Insomnia, the request looks like this:
Success! When we attempted to access this endpoint without a value in our x-api-key header earlier or with an invalid value, we received a 401 Unauthorized response. As Kong determines that the request has provided a valid API key, it forwards the request to our API server.
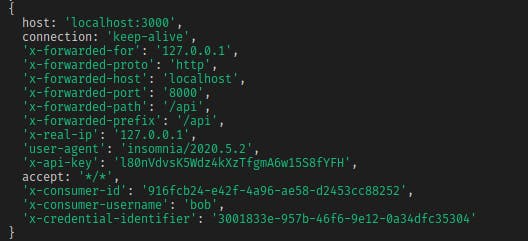
It’s also worth looking at the original terminal window where we are running our Express API server. Do you remember how we were logging the request headers as they came through? Here is how the header looks in our most recent request:
Suppose you compare this output with the output of your initial requests directly to http://localhost:3000. In that case, you’ll notice that there are a few extra header fields, namely x-api-key, x-consumer-id, x-consumer-username and x-credential-identifier. We added x-api-key in our request, but the Key Authentication plugin writes the other three header values after detecting our valid API key.
The plugin determined additional identifying information associated with the provided API key, and it wrote this information to the upstream headers. That way, the upstream service has to identify the user associated with the API key.
## **Additional Cases and Features**
We’ve covered a lot of ground in our simple example above. The Key Authentication plugin has some additional features which we didn’t cover but are worth checking out.
#### **Configuring API Key Location and Name**
In our example, we configured our plugin with the key_in_header=true setting. While some systems may choose to provide API keys in the header, others may choose to send API keys in the request body or the query string parameters.
That's easily configurable in the plugin, where you can specify where to find the API key and what the key name ought to be. You can also configure the plugin to look in multiple possible places (for example, header *and* body) and consider various possible names (for instance, x-api-key and APIkey and api-key).
#### **Protecting Some Routes, but Not Others**
As we demonstrated in our example, you can add the Key Authentication plugin to a route or a service. If a service has multiple routes, you can add the plugin to *some* routes and not others. With thoughtful design, this means intentionally applying a key authentication strategy to some routes which need to remain protected while leaving other routes public (or perhaps protected by a different authentication strategy). The possibilities for configuration are endless.
#### **Allow “Anonymous” Access**
You can also configure the plugin to allow “anonymous” access. Doing so tells Kong to forward the user to the upstream service even if the API key is invalid or not provided at all. As the plugin writes to the upstream header, you’ll see an additional x-anonymous-consumer: ‘true’ value.
This notifies the upstream service that a user has been let through the gateway but does not have a valid API key. At times, this is desirable, as perhaps the upstream service can still provide access, but in a restricted fashion for unauthorized (or “anonymous”) users.
#### **Provide Your Own API Keys**
In our example, when creating a credential for our consumer, we had Kong generate a random API key for us. The Admin API request for creating a credential can also take a value for an API key that you provide and associate that key with the consumer. This allows you to use a third-party system to generate your API keys or enables you to migrate your key authentication strategy from one system over to Kong without having to deploy new API keys to all of your users.
#### **Hide credentials**
When configuring the plugin, there is also the option of hiding the credentials from the upstream service. That is, while Kong Gateway is the gatekeeper ensuring a visitor has a valid API key, perhaps the upstream service itself should not be privy to that API key. This may be an important consideration if there isn’t strong trust between the gateway, which you control, and the upstream services you don’t control.
## **Go Forth and Auth**
And that’s it. That’s a full walkthrough of the common use case for the Key Authentication plugin with Kong Gateway. Though it’s an everyday use case, it should be enough to give you the tools and direction you need to customize the plugin for your own business needs.
Restricting access to your services—whether it’s to keep resource usage in check or to put a more protective wall around your data—is a critical practice to adopt. You might be protecting a database system, an assets server or an API server.
Regardless of the type of upstream service you’re guarding, using a key authentication strategy to protect that service can be quickly and simply deployed with just one plugin and a few configuration steps.
**Once you've successfully set up Kong Gateway key authentication, you may find these other tutorials helpful:**
Ensuring secure access to applications and APIs is critical. As organizations increasingly adopt microservices architectures and cloud native solutions, the need for robust, fine-grained access control mechanisms becomes paramount. This is where the
Raja Ravi Varman
# Adopt a Zero Trust Approach with OAuth 2.0 Mutual TLS Client Authentication
In the modern IT stack, API gateways act as the first line of defense against attacks on backend services by enforcing authentication/authorization policies and validating and transforming requests. When backend services are protected with a token-b
Samuele Illuminati
# Understanding Microsegmentation in Zero Trust Security
With digital transformation shifting networks into the cloud — from remote workforces to online banking — cyberattacks are growing more prevalent and sophisticated. Legacy security models like VPNs and perimeter-based firewalls are proving inadequat
Kong
# Top GraphQL Security Vulnerabilities: Lessons Learned Analyzing 1,500+ Endpoints
With its flexible querying capabilities, GraphQL makes it easy to combine data from multiple sources into a single endpoint. GraphQL and API management go hand in hand to build next-generation API platforms. However, GraphQL's features can als
Kong
# Token-Based Access Control With Kong, OPA and Curity
As APIs and microservices evolve, the architecture used to secure these resources must also mature. Utilizing a token-based architecture to protect APIs is a robust, secure and scalable approach, and it is also much safer than API keys or basic au
Jonas Iggbom
# Solving API Authorization Challenges in Multi-Cloud Environments
As more and more companies move to a multi-cloud strategy and increase usage of a cloud native infrastructure , API providers are under a lot of pressure to deliver APIs at scale in multi-cloud environments. At the same time, APIs should follow eac
Nima Moghadam
# Setting Access Control Policies With Kong and Okta
In our last Kong and Okta tutorial, we will implement a basic access control policy based on Okta’s groups and planes. This series will show you how to implement service authentication and authorization for Kong Konnect and Okta using the OpenI
Claudio Acquaviva
# How to Implement Secure Access Control with OPA and Kong Gateway
Ensuring secure access to applications and APIs is critical. As organizations increasingly adopt microservices architectures and cloud native solutions, the need for robust, fine-grained access control mechanisms becomes paramount. This is where the
Raja Ravi Varman
# Adopt a Zero Trust Approach with OAuth 2.0 Mutual TLS Client Authentication
In the modern IT stack, API gateways act as the first line of defense against attacks on backend services by enforcing authentication/authorization policies and validating and transforming requests. When backend services are protected with a token-b
Samuele Illuminati
# Understanding Microsegmentation in Zero Trust Security
With digital transformation shifting networks into the cloud — from remote workforces to online banking — cyberattacks are growing more prevalent and sophisticated. Legacy security models like VPNs and perimeter-based firewalls are proving inadequat
Kong
# Top GraphQL Security Vulnerabilities: Lessons Learned Analyzing 1,500+ Endpoints
With its flexible querying capabilities, GraphQL makes it easy to combine data from multiple sources into a single endpoint. GraphQL and API management go hand in hand to build next-generation API platforms. However, GraphQL's features can als
Kong
# Token-Based Access Control With Kong, OPA and Curity
As APIs and microservices evolve, the architecture used to secure these resources must also mature. Utilizing a token-based architecture to protect APIs is a robust, secure and scalable approach, and it is also much safer than API keys or basic au
Jonas Iggbom
# Solving API Authorization Challenges in Multi-Cloud Environments
As more and more companies move to a multi-cloud strategy and increase usage of a cloud native infrastructure , API providers are under a lot of pressure to deliver APIs at scale in multi-cloud environments. At the same time, APIs should follow eac
Nima Moghadam
# Setting Access Control Policies With Kong and Okta
In our last Kong and Okta tutorial, we will implement a basic access control policy based on Okta’s groups and planes. This series will show you how to implement service authentication and authorization for Kong Konnect and Okta using the OpenI
Claudio Acquaviva
## Ready to see Kong in action?
Get a personalized walkthrough of Kong's platform tailored to your architecture, use cases, and scale requirements.