Digital transformation has led to a high velocity of data moving through APIs to applications and devices. Companies with legacy infrastructures are experiencing inconsistencies, failures and increased costs. And most importantly, dissatisfied customers.
By providing a widely accepted, standard approach with a carefully designed API gateway, Kubernetes has spawned a thriving ecosystem of products and tools that make it much easier to deploy and maintain complex systems.
## Use Case: Routing API Calls to Backend Services
To keep this article to a manageable size, I will only cover a single, straightforward use case.
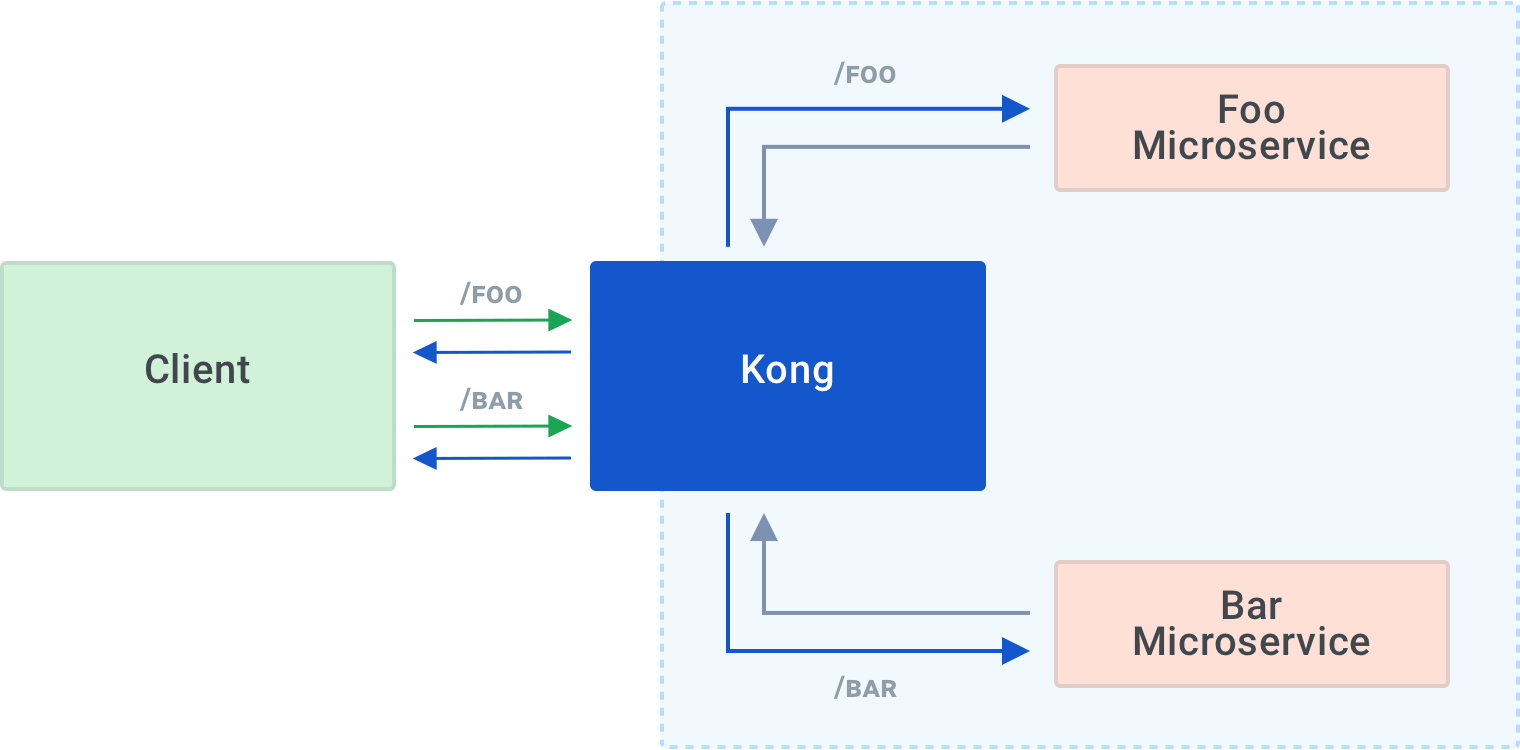
Kong foo/bar routing
I will create a Kubernetes cluster, deploy two dummy microservices, "foo" and "bar," install and configure Kong to route inbound calls to /foo to the foo microservice and send calls to /bar to the bar microservice.
The information in this post barely scratches the surface of what you can do with Kong, but it’s a good starting point.
### **Prerequisites**
There are a few things you’ll need to work through in this article.
*Note: The command spins up a Kubernetes cluster on DigitalOcean. Doing so will incur charges (approximately $0.01/hour, at the time of writing) as long as it is running. Please remember to destroy any resources you create when you finish with them.*
The command creates a cluster with a single worker node of the smallest viable size in the New York data center. It's the smallest and simplest cluster (and also the cheapest to run). You can explore other options by running doctl kubernetes –help.
The command will take several minutes to complete, and you should see an output like this:
$ doctl kubernetes cluster create mycluster --size s-1vcpu-2gb --count 1Notice: Cluster is provisioning, waiting for cluster to be running
....................................................
Notice: Cluster created, fetching credentials
Notice: Adding cluster credentials to kubeconfig file found in "/Users/david/.kube/config"Notice: Setting current-context to do-nyc1-mycluster
ID Name Region Version Auto Upgrade Status Node Pools
4cf2159a-01c1-423c-907d-51f19c3f9a01 mycluster nyc1 1.20.2-do.0false running mycluster-default-pool
As you can see, the command automatically adds cluster credentials and a context to the ~/.kube/config file, so you should be able to access your cluster using kubectl:
$ kubectl get namespace
NAME              STATUS   AGE
default           Active   24m
kube-node-lease   Active   24m
kube-public       Active   24m
kube-system       Active   24m
The last few lines of output should look like this:
...
service/kong-proxy created
service/kong-validation-webhook created
deployment.apps/ingress-kong created
*Note: You may receive several API deprecation warnings at this point, which you can ignore. Kong's choice of API versions allows Kong Ingress Controller to support the broadest range of Kubernetes versions possible.*
*Note: DigitalOcean load balancers incur charges, so please remember to delete your load balancer along with your cluster when you are finished.*
Creating the load balancer will take a minute or two. You can monitor its progress like this:
$ kubectl -n kong get service kong-proxy
NAME                      TYPE           CLUSTER-IP      EXTERNAL-IP   PORT(S)                      AGE
kong-proxy                LoadBalancer   10.245.14.22    <pending>     80:32073/TCP,443:30537/TCP   71s
Once the system creates the load balancer, the EXTERNAL-IP value will change from <pending> to a real IP address:
$ kubectl -n kong get service kong-proxy
NAME TYPE CLUSTER-IP EXTERNAL-IP PORT(S) AGE
kong-proxy LoadBalancer 10.245.14.22167.172.7.19280:32073/TCP,443:30537/TCP 3m45s
For convenience, let’s export that IP number as an environment variable:
$ export PROXY_IP=167.172.7.192 # <--- use your own EXTERNAL-IP number here
Now you can check that Kong is working:
$ curl $PROXY_IP
{"message":"no Route matched with those values"}
*Note: It's the correct response because you haven’t yet told Kong what to do with any API calls it receives.*
The API gateway is a crucial part of a microservices architecture, and the Kong Ingress Controller is well suited for this role in a Kubernetes cluster. You can manage it in the same way as any other Kubernetes resource.
## Cleanup
Don’t forget to destroy your Kubernetes cluster when you are finished with it so that you don’t incur unnecessary charges:
$ kubectl delete -f https://bit.ly/k4k8s  # <-- this will destroy the load-balancer

$ doctl kubernetes cluster delete mycluster
Warning: Are you sure you want to delete this Kubernetes cluster? (y/N) ? y
Notice: Cluster deleted, removing credentials
...
As Kubernetes has become the de facto orchestration platform for deploying cloud native applications , networking and traffic management have emerged as pivotal challenges when managing access to services and infrastructure. The core Kubernetes Ing
Peter Barnard
# A Unified Gateway for APIs + Agentic Applications on VMware VKS with Kong Konnect
Built on top of Kong API Gateway, the Kong AI Gateway is designed to address key challenges in enterprise AI adoption. Modern AI applications rarely rely on a single model; instead, they orchestrate multiple GenAI providers, agent frameworks, Age
Anika Suri
# How to Manage Your Kubernetes Services with an API Gateway
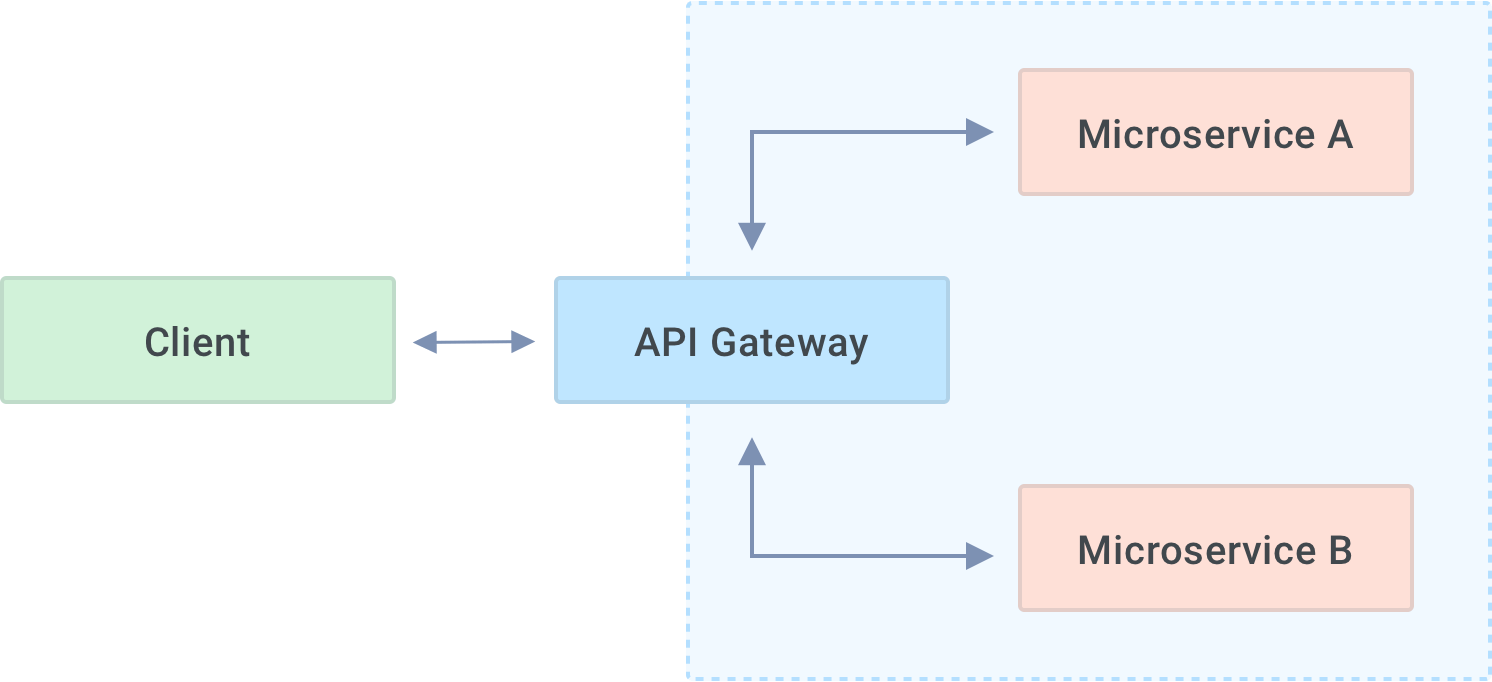
Kubernetes is an open-source container orchestration system for automating deployment, scaling, and management of containerized applications. It groups containers into logical units for easy management and discovery. API gateways sit between client
Peter Barnard
# Sending Traffic Across Namespaces with Gateway API
In this blog post, we’ll demonstrate how easy it is to use Gateway API HTTPRoutes to route traffic to workloads deployed in different namespaces in a single Kubernetes cluster — a process that’s easier than ever. Previously, we only had Ingress API
Grzegorz Burzyński
# Kubernetes Gateway API: An Engineering Perspective
The Kubernetes Gateway API represents a massive collaborative effort and key advancement in Kubernetes networking. Developed by multiple vendors and community members, the Gateway API provides a robust and extensible new standard for managing ingres
The Kong Laboratory – Kong API Gateway The quest for resilience and agility has driven us into the modern age of microservices. Bringing services to market on a microservice architecture demands the utilization of sprawling technology offerings and
Kat Morgan
# Prometheus and Grafana APM on Kubernetes Ingress
While monitoring is an important part of any robust application deployment, it can also seem overwhelming to get a full application performance monitoring (APM) stack deployed. In this post, we'll see how operating a Kubernetes environment using the
Joseph Caudle
# Gateway API vs Ingress: The Future of Kubernetes Networking
As Kubernetes has become the de facto orchestration platform for deploying cloud native applications , networking and traffic management have emerged as pivotal challenges when managing access to services and infrastructure. The core Kubernetes Ing
Peter Barnard
# A Unified Gateway for APIs + Agentic Applications on VMware VKS with Kong Konnect
Built on top of Kong API Gateway, the Kong AI Gateway is designed to address key challenges in enterprise AI adoption. Modern AI applications rarely rely on a single model; instead, they orchestrate multiple GenAI providers, agent frameworks, Age
Anika Suri
# How to Manage Your Kubernetes Services with an API Gateway
Kubernetes is an open-source container orchestration system for automating deployment, scaling, and management of containerized applications. It groups containers into logical units for easy management and discovery. API gateways sit between client
Peter Barnard
# Sending Traffic Across Namespaces with Gateway API
In this blog post, we’ll demonstrate how easy it is to use Gateway API HTTPRoutes to route traffic to workloads deployed in different namespaces in a single Kubernetes cluster — a process that’s easier than ever. Previously, we only had Ingress API
Grzegorz Burzyński
# Kubernetes Gateway API: An Engineering Perspective
The Kubernetes Gateway API represents a massive collaborative effort and key advancement in Kubernetes networking. Developed by multiple vendors and community members, the Gateway API provides a robust and extensible new standard for managing ingres
The Kong Laboratory – Kong API Gateway The quest for resilience and agility has driven us into the modern age of microservices. Bringing services to market on a microservice architecture demands the utilization of sprawling technology offerings and
Kat Morgan
# Prometheus and Grafana APM on Kubernetes Ingress
While monitoring is an important part of any robust application deployment, it can also seem overwhelming to get a full application performance monitoring (APM) stack deployed. In this post, we'll see how operating a Kubernetes environment using the
Joseph Caudle
## Ready to see Kong in action?
Get a personalized walkthrough of Kong's platform tailored to your architecture, use cases, and scale requirements.