Kong Konnect Data Plane Node Autoscaling with Karpenter on Amazon EKS 1.29
In this post, we're going to explore Karpenter, the ultimate solution for Node Autoscaling. Karpenter provides a cost-effective capability to implement your Kong Konnect Data Plane layer using the best EC2 Instances Types options available for your Kubernetes Nodes.
See the previous posts in this series for more on Data Plane Elasticity and Pod Autoscaling with VPA, HPA, and Node Autoscaling with Cluster Autoscaler on Amazon EKS 1.29.
Karpenter
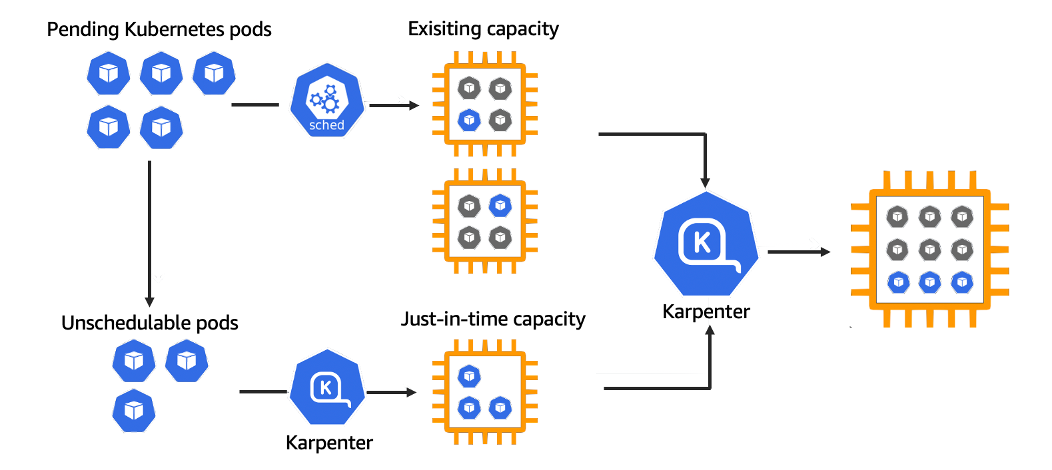
We can summarize Karpenter as a Kubernetes cluster autoscaler that right-sizes compute resources based on the specific requirements of Cluster workloads. In other words, Karpenter evaluates the aggregate resource requirements of the pending pods and chooses the optimal instance type to run them. That improves the efficiency and cost of running workloads.
The Karpenter AWS Provider GitHub repo highlights the main Karpenter capabilities. Karpenter improves the efficiency and cost of running workloads on Kubernetes clusters by:
- Watching for pods that the Kubernetes scheduler has marked as unschedulable
- Evaluating scheduling constraints (resource requests, nodeselectors, affinities, tolerations, and topology spread constraints) requested by the pods
- Provisioning nodes that meet the requirements of the pods
- Removing the nodes when the nodes are no longer needed
Please, check the EKS Best Practices Guide for Karpenter provided by AWS to learn more about it.
The following Karpenter Architecture diagram was taken from the AWS Karpenter Introduction blog post.
![](https://prd-mktg-konghq-com.imgix.net/images/2024/02/65c53dbb-image1-6.png?auto=format&fit=max&w=2560)
Karpenter Installation
Our Karpenter deployment is based on the instructions available in its official site. To make it simpler we are going to recreate the Cluster altogether. First, delete the existing one with:
eksctl delete cluster --name kong35-eks129-autoscaling --region us-west-1
Create the Cluster
Get the following environment variables set:
export KARPENTER_NAMESPACE=kube-system
export KARPENTER_VERSION=v0.33.1
export K8S_VERSION=1.29
export AWS_PARTITION="aws"
export CLUSTER_NAME="kong35-eks129-autoscaling"
export AWS_DEFAULT_REGION="us-west-1"
export AWS_ACCOUNT_ID="$(aws sts get-caller-identity --query Account --output text)"
Karpenter leverages several AWS technologies to run, including Amazon EventBridge, Amazon Simple Queue Service (SQS) and IAM Roles. All these fundamental components are created with the following CloudFormation template.
curl -fsSL -o cloudformation.yaml https://raw.githubusercontent.com/aws/karpenter-provider-aws/"${KARPENTER_VERSION}"/website/content/en/preview/getting-started/getting-started-with-karpenter/cloudformation.yaml
aws cloudformation deploy \
--stack-name "Karpenter-${CLUSTER_NAME}" \
--template-file ./cloudformation.yaml \
--capabilities CAPABILITY_NAMED_IAM \
--parameter-overrides "ClusterName=${CLUSTER_NAME}"
You can check the AWS resources created by the template with:
aws cloudformation describe-stack-resources --stack-name Karpenter-kong35-eks129-autoscaling --region us-west-1 \
--query "StackResources[*].[LogicalResourceId, PhysicalResourceId]" \
--output table
After submitting the CloudFormation template, create the actual EKS Cluster with eksctl
. Some comments regarding the declaration:
Differently from Cluster Autoscaler, Karpenter uses the new EKS Pod Identities mechanism to access the required AWS Services.
The
iam
section uses thepodIdentityAssociations
parameters to describe how Karpenter uses EKS Pod Identities to manage EC2 instances.The
iamIdentityMappings
section manages theaws-auth
ConfigMap to grant permission to theKarpenterNodeRole-kong35-eks129-autoscaling
Role, created by the CloudFormation template, to access the Cluster.We are deploying Karpenter in the
kong
NodeGroup again. The NodeGroup will run on at3.large
EC2 Instance.- The
addons
section askseksctl
to install the Pod Identity Agent.
eksctl create cluster -f - <<EOF
apiVersion: eksctl.io/v1alpha5
kind: ClusterConfig
metadata:
name: ${CLUSTER_NAME}
region: ${AWS_DEFAULT_REGION}
version: "${K8S_VERSION}"
tags:
karpenter.sh/discovery: ${CLUSTER_NAME}
iam:
withOIDC: true
podIdentityAssociations:
- namespace: "${KARPENTER_NAMESPACE}"
serviceAccountName: karpenter
roleName: ${CLUSTER_NAME}-karpenter
permissionPolicyARNs:
- arn:${AWS_PARTITION}:iam::${AWS_ACCOUNT_ID}:policy/KarpenterControllerPolicy-${CLUSTER_NAME}
iamIdentityMappings:
- arn: "arn:${AWS_PARTITION}:iam::${AWS_ACCOUNT_ID}:role/KarpenterNodeRole-${CLUSTER_NAME}"
username: system:node:{{EC2PrivateDNSName}}
groups:
- system:bootstrappers
- system:nodes
managedNodeGroups:
- instanceType: t3.large
amiFamily: AmazonLinux2
name: nodegroup-kong
labels: { nodegroupname: kong }
desiredCapacity: 1
minSize: 1
maxSize: 10
addons:
- name: eks-pod-identity-agent
EOF
Check the main environment variables:
export CLUSTER_ENDPOINT="$(aws eks describe-cluster --name ${CLUSTER_NAME} --query "cluster.endpoint" --output text)"
export KARPENTER_IAM_ROLE_ARN="arn:${AWS_PARTITION}:iam::${AWS_ACCOUNT_ID}:role/${CLUSTER_NAME}-karpenter"
echo $CLUSTER_ENDPOINT $KARPENTER_IAM_ROLE_ARN
Install Karpenter with Helm Charts
Now, we are ready to install Karpenter. By default, Karpenter requests 2 replicas to run itself. For our simple exploration environment, we are changing that to 1.
helm upgrade --install karpenter oci://public.ecr.aws/karpenter/karpenter --version "${KARPENTER_VERSION}" --namespace "${KARPENTER_NAMESPACE}" --create-namespace \
--set "settings.clusterName=${CLUSTER_NAME}" \
--set "settings.interruptionQueue=${CLUSTER_NAME}" \
--set controller.resources.requests.cpu=1 \
--set controller.resources.requests.memory=1Gi \
--set controller.resources.limits.cpu=1 \
--set controller.resources.limits.memory=1Gi \
--set replicas=1 \
--wait
You can check Karpenter Pod's Log with:
kubectl logs -f -l app.kubernetes.io/name=karpenter -n kube-system
Create NodePool and EC2NodeClass
With Karpenter installed we need to manage two constructs:
NodePool: it's responsible to set constraints to the Nodes Karpenter is going to create. You can specify Taints, limit Node creation to certain zones, Instances Types, and Computer Architectures like AMD and ARM.
EC2NodeClass: specific AWS settings for EC2 Instances. Each NodePool must reference an EC2NodeClass using
spec.template.spec.nodeClassRef
setting.
Let's create both NodePool and EC2NodeClass based on the basic instructions provided via the Karpenter website.
NodePool
Note we've added the nodegroupname=kong
label to it. This is important to make sure the new Nodes will be available for the Konnect Data Plane Deployment. Moreover, the nodeClassRef
setting refers to the default NodeClass we create next. Please, check the Karpenter documentation to learn more about NodePool configuration.
cat <<EOF | envsubst | kubectl apply -f -
apiVersion: karpenter.sh/v1beta1
kind: NodePool
metadata:
name: default
spec:
template:
metadata:
labels:
nodegroupname: kong
spec:
requirements:
- key: kubernetes.io/arch
operator: In
values: ["amd64"]
- key: kubernetes.io/os
operator: In
values: ["linux"]
- key: karpenter.sh/capacity-type
operator: In
values: ["on-demand"]
- key: karpenter.k8s.aws/instance-category
operator: In
values: ["c", "m", "r"]
- key: karpenter.k8s.aws/instance-generation
operator: Gt
values: ["2"]
nodeClassRef:
name: default
limits:
cpu: 1000
disruption:
consolidationPolicy: WhenUnderutilized
expireAfter: 720h # 30 * 24h = 720h
EOF
EC2NodeClass
The EC2NodeClass declaration includes specific AWS settings to be used when creating a new Node such as AMI Family, Instance Profile, Subnets, Security Groups, IAM Role, etc. Note we are grating the KarpenterNodeRole-kong35-eks129-autoscaling
Role, created by the CloudFormation template, to the new Nodes.
cat <<EOF | envsubst | kubectl apply -f -
apiVersion: karpenter.k8s.aws/v1beta1
kind: EC2NodeClass
metadata:
name: default
spec:
amiFamily: AL2 # Amazon Linux 2
role: "KarpenterNodeRole-${CLUSTER_NAME}"
subnetSelectorTerms:
- tags:
karpenter.sh/discovery: "${CLUSTER_NAME}"
securityGroupSelectorTerms:
- tags:
karpenter.sh/discovery: "${CLUSTER_NAME}"
EOF
Konnect Data Plane Deployment and Consumption
As we have Karpenter installed and configured, let's move on and install the Konnect Data Plane. Make sure you use the same declaration we used before and set the same CPU and memory (cpu=1500m, memory=3Gi) resources to it.
Since we are going to use HPA and Karpenter together, install the Metrics Server on your Cluster along with the HPA policy allowing 20 replicas to be created.
Finally, create the new Node for the Upstream and Load Generator as well as deploy the Upstream Service using the same declaration.
Start the same Fortio 60-minute-long load test with 5000 qps.
After some minutes we'll see both HPA and Karpenter in action. Here's one of the HPA results I got:
% kubectl get hpa -n kong
NAME REFERENCE TARGETS MINPODS MAXPODS REPLICAS AGE
kong-hpa Deployment/kong-kong 37%/75% 1 20 15 21h
And here's the new Nodes Karpenter created:
% kubectl get nodes -o json | jq -r '.items[].metadata.labels | select(.nodegroupname=="kong") | ."node.kubernetes.io/instance-type"'
m3.medium
t3.large
m3.medium
c5a.xlarge
c5a.large
% kubectl top node --selector='karpenter.sh/nodepool=default'
NAME CPU(cores) CPU% MEMORY(bytes) MEMORY%
ip-192-168-110-150.us-west-1.compute.internal 194m 20% 1270Mi 39%
ip-192-168-71-115.us-west-1.compute.internal 696m 74% 386Mi 11%
ip-192-168-82-234.us-west-1.compute.internal 1281m 32% 5742Mi 83%
ip-192-168-91-24.us-west-1.compute.internal 839m 43% 3175Mi 99%
Cluster Consolidation
One of the most powerful Karpenter capabilities is Cluster Consolidation, that is, the ability to delete or replace Nodes to a cheaper configuration.
You can see it in action if you leave the test load running a little longer. We'll see that Karpenter has consolidated the multiple Nodes into a single one:
% kubectl get hpa -n kong
NAME REFERENCE TARGETS MINPODS MAXPODS REPLICAS AGE
kong-hpa Deployment/kong-kong 32%/75% 1 20 15 21h
% kubectl get nodes -o json | jq -r '.items[].metadata.labels | select(.nodegroupname=="kong") | ."node.kubernetes.io/instance-type"'
t3.large
c5a.2xlarge
% kubectl top node --selector='karpenter.sh/nodepool=default'
NAME CPU(cores) CPU% MEMORY(bytes) MEMORY%
ip-192-168-75-198.us-west-1.compute.internal 2056m 25% 4241Mi 28%
From the API consumption perspective, here are the results I got. As you can see the Data Plane layer with all its replicas was able to honor the QPS requested with expected latency time.
The P99 latency: for example,
# target 99% 0.0484703
The number of requests sent along with the QPS:
All done 18000000 calls (plus 800 warmup) 98.065 ms avg, 4999.8 qps
As a fundamental principle of Elasticity, if we stop the load test, deleting the Fortio Pod, we should see HPA and Karpenter reducing the resources allocated to the Data Plane.
kubectl delete pod fortio
% kubectl get hpa -n kong
NAME REFERENCE TARGETS MINPODS MAXPODS REPLICAS AGE
kong-hpa Deployment/kong-kong 1%/75% 1 20 1 22h
% kubectl get nodes -o json | jq -r '.items[].metadata.labels | select(.nodegroupname=="kong") | ."node.kubernetes.io/instance-type"'
t3.large
Conclusion
Kong takes performance and elasticity very seriously. When we come to a Kubernetes deployment, it's important to support all Elasticity technologies available to provide our customers flexibility and a lightweight and performant API gateway infrastructure.
This blog post series described Kong Konnect Data Plane deployment to take advantage of the main Kubernetes-based Autoscaling technologies:
- VPA for vertical pod autoscaling
- HPA for horizontal pod autoscaling
- Cluster Autoscaler for node autoscaling based on EC2 ASG (Auto Scaling Groups)
- Karpenter for flexible cost-effective node autoscaling implementation.
Kong Konnect simplifies API management and improves security for all services infrastructure. Try it for free today!