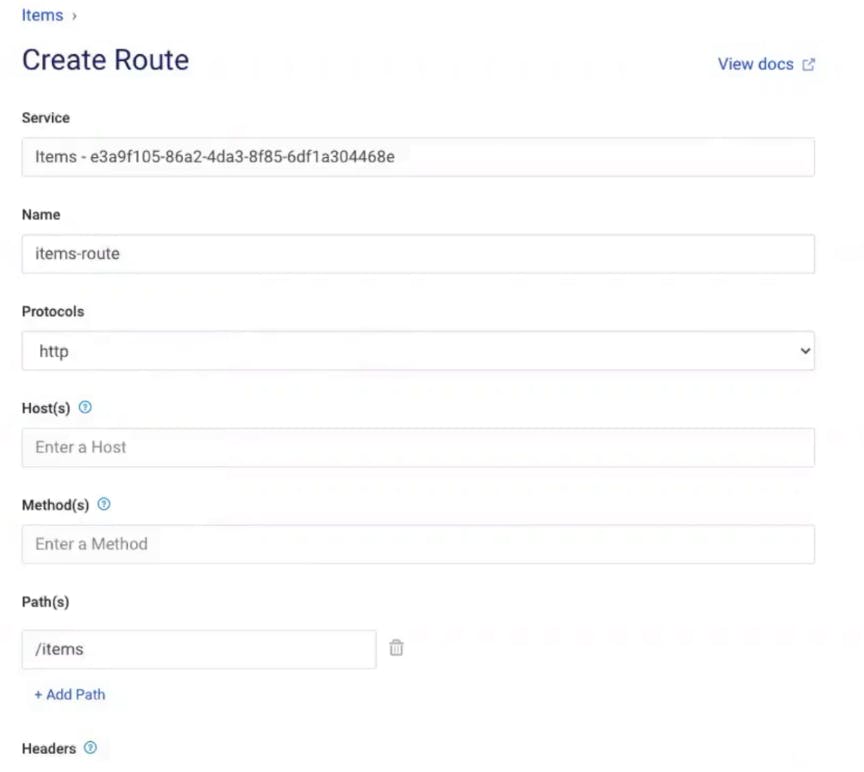
See what makes Kong the fastest, most-adopted API gateway
Check out the latest Kong feature releases and updates
Single platform for SaaS end-to-end connectivity
Enterprise service mesh based on Kuma and Envoy
Collaborative API design platform
How to Scale High-Performance APIs and Microservices
Call for speakers & sponsors, Kong API Summit 2023!
9 MIN READ
In this Kong Gateway tutorial, you’ll learn how to:
Keep in mind that these instructions are a starting point. You may need to change some of the steps to harden your environment when running in production. For more detailed information, visit our Kong Gateway documentation.
One of the reasons that companies like UnitedHealth Group/Optum deploy Kong Gateway is to modernize a monolithic application and make it more scalable.
For example, in the application diagram below, if I wanted to scale up the “Items” service to handle more load, I would have to scale up the whole application. Instead, I want to break the application into smaller pieces called modular services or microservices. Then I can scale each service as needed, distribute the service close to its data source and focus on building that service’s business logic.
As I build and migrate to the new service, I need to abstract the actual upstream location from the client (on the left in the above diagram) without the client knowing that I’m modifying the service.
As you do this for many services, you’ll need to abstract each service and build common code into each service. Over time, this will require multiple load balancers, and your team will have to maintain many different libraries of the same common code for your microservices.
Kong Gateway can simplify this approach by being the abstraction layer that routes clients to your existing upstream service while building a new service. It also applies a common policy for each request and response no matter where the target service is. The benefit of this is that you gain architectural freedom and modernize your application without impacting your clients.
To start, install Kong Gateway in your preferred environment. Kong Gateway works with many different environments, including Docker, Kubernetes and CentOS. In my example, I’m running on Amazon Linux 2. Feel free to follow along if you’re doing the same. If not, skip ahead once you’ve installed Kong Gateway.
$ sudo amazon-linux-extras install postgresql9.6 $ sudo yum install postgresql postgresql-server
$ sudo /usr/bin/postgresql-setup --initdb $ sudo systemctl enable postgresql.service $ sudo systemctl start postgresql
Note: Modify your PostgreSQL configuration to allow MD5 connections if you’re on PostgreSQL 9.6, as specified in the Kong documentation.
$ sudo systemctl restart postgresql
In my example, I’ll point it to the Kong Manager URL using my EC2’s public IP address and admin GUI port.
Note: the Kong_Password is something you can templatize and keep in a secure vault.
Kong will be running without a license. You can send an HTTP request to the admin port and see all the services.
If you navigate to the Kong node’s public IP and use port 8002 for Kong Manager, you should see the Kong Manager user interface. Through the Kong Manager GUI, you can add services, routes and plugins.
To configure a service in Kong Manager, click on “Services” in the menu on the left-hand side of the screen. Then create a new service and give it a URL to specify the service location. In my example, I’m building a service called “Items” that routes to the service location at http://httpbin.org/anything.
Suppose you want to expose this service on the Kong host machine at the path /items. If you navigate http://<kong-host>:8000/items, you should see the message “no route matched with those values.” That’s because I still have to tell Kong to expose the service to the client using a route.
In Kong Manager, click on the “Items” service you created above. This service needs a corresponding route to tell Kong how to expose this service to clients. Click “Add a Route.” Give the route a name (items-route). In my example, I’ll tell Kong to route anything that matches the “/items” path to this service. There are many other parameters that you can use to match the incoming requests to Kong.
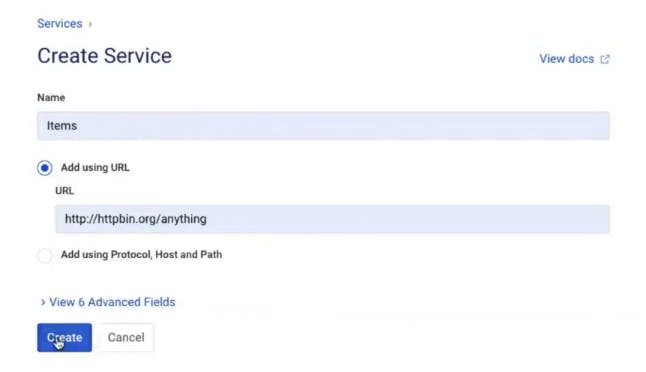
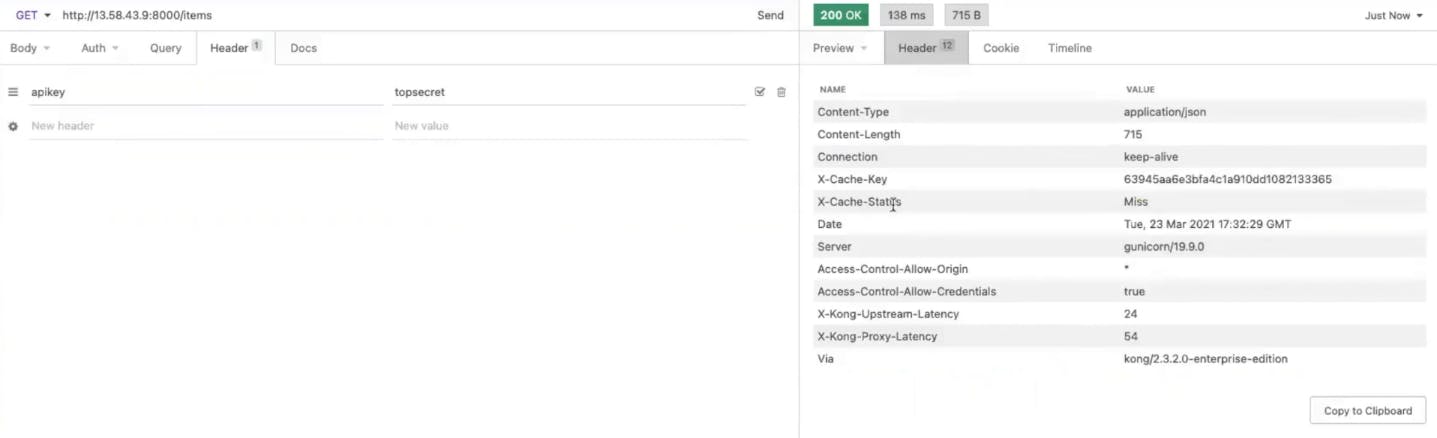
Now, if you go back to your browser client and refresh the screen (with http://<konghost>:8000/items in the address bar), you should see that Kong is routing to the http://httpbin.org/anything endpoint that I specified for the Items service.
Great, I’m are successfully using Kong to abstract our upstream service from our client and exposing it on the /items path. Now I can create/modify a new upstream service and route the client to it whenever I’m are ready.
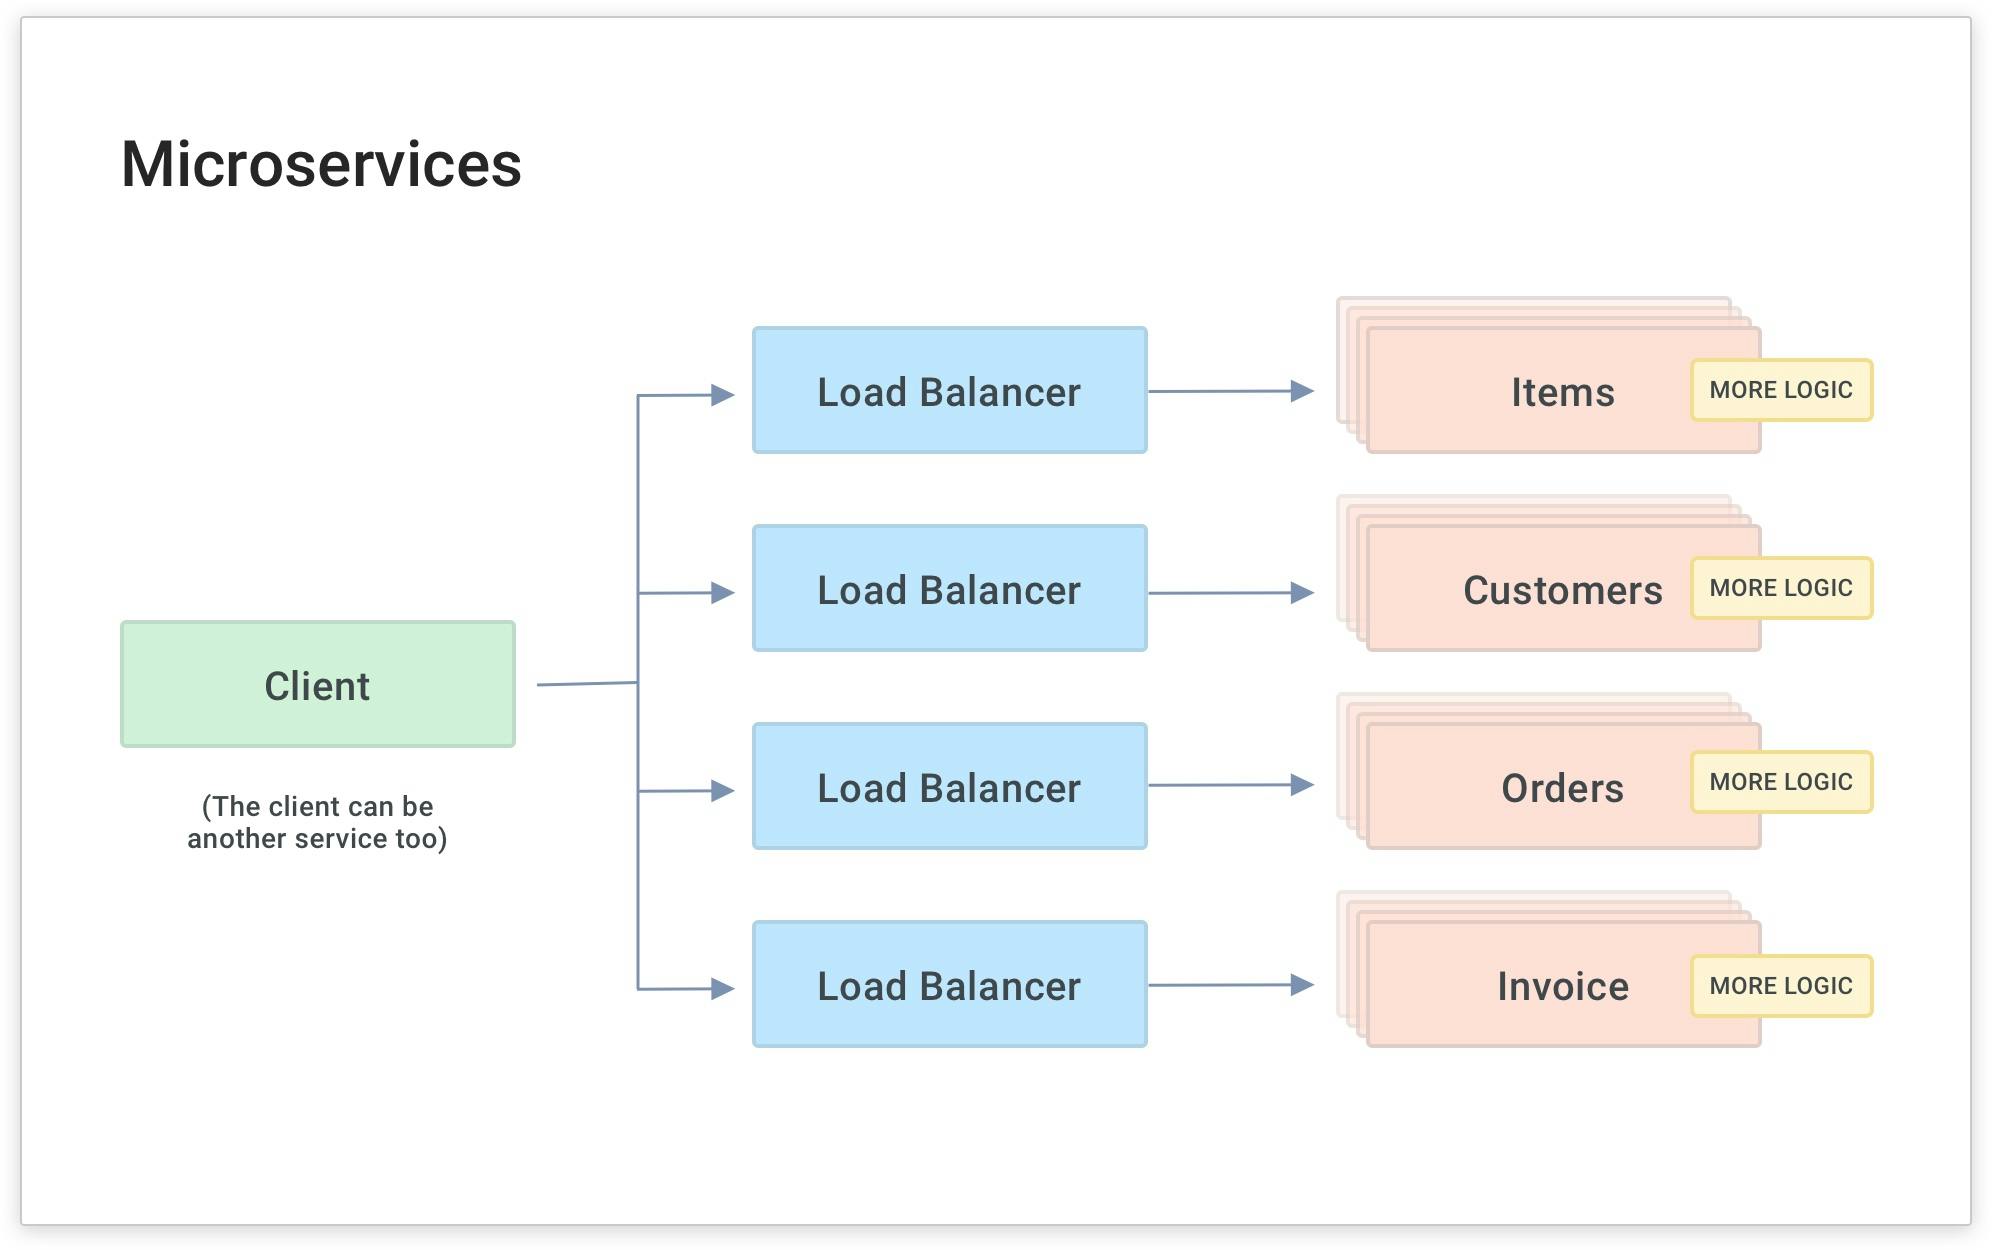
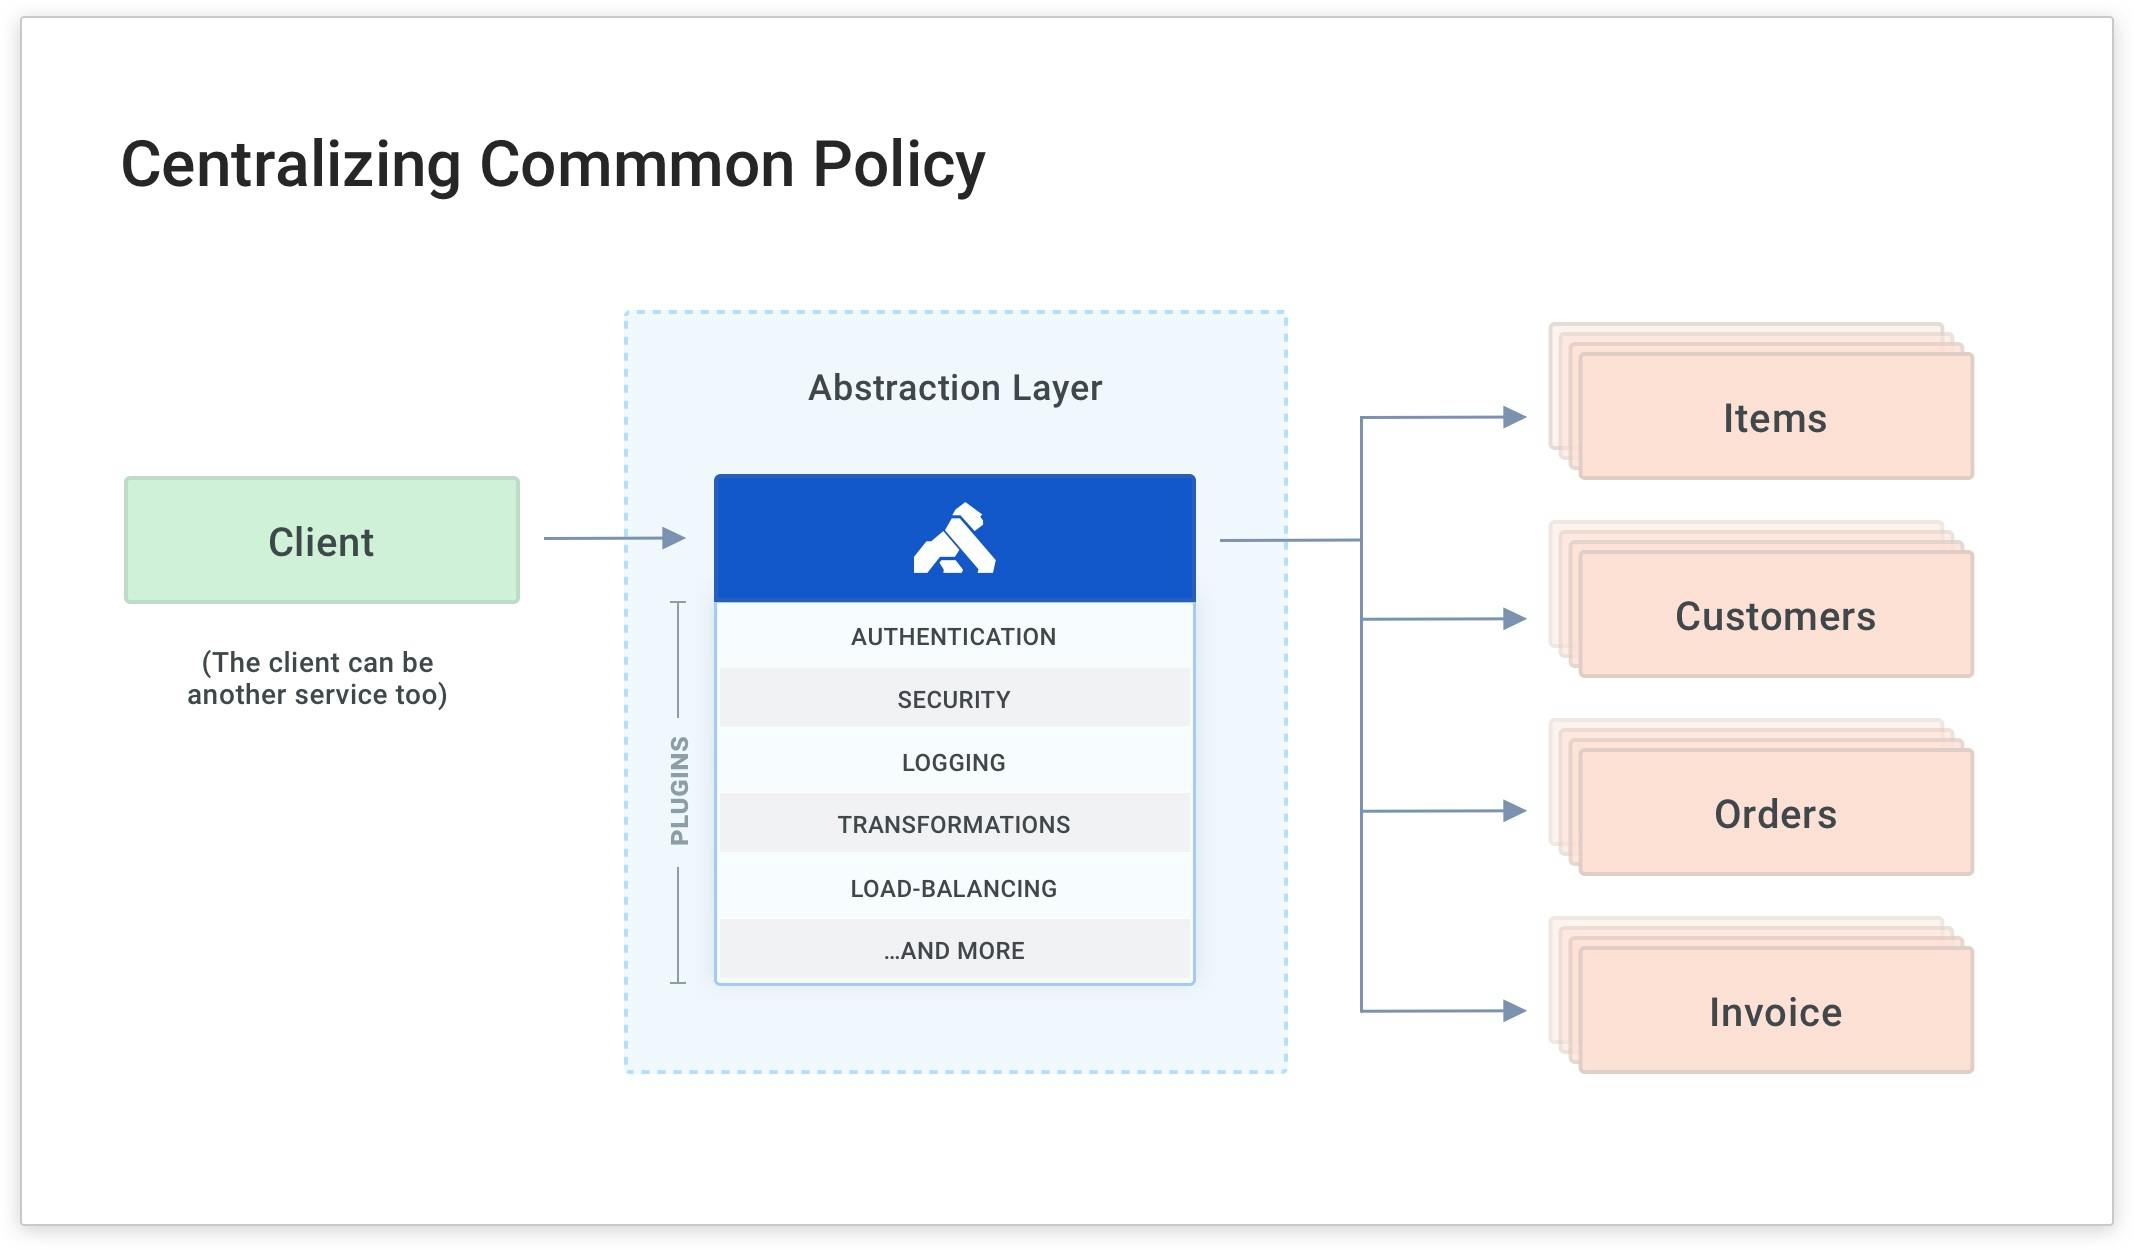
As you do this with more and more services (and microservices), your developers will inevitably write common code for each service to handle functionality that’s common to many services. In the above diagram, the yellow boxes represent common functionality like API authentication, rate limiting and caching. These are all things that your services need to perform. If they’re built into each service separately, they’ll have to be built and maintained by each development team. This is a source of overhead and complexity because each team will spend time maintaining a common layer of code for each microservice that gets built.
This way, your developers can build the business logic and fun stuff (rather than the common, tedious code like authentication).
In our example, Kong Gateway is already abstracting the “Items” service and routing the client’s request to the service on the /items path. Next, I’ll show you how to add a common policy for authentication using a plugin. Kong plugins enable you to enforce policies without having to write code in the service itself.
Next, I’ll show you how to add a KeyAuth plugin and a consumer so you can protect your service with an API key.
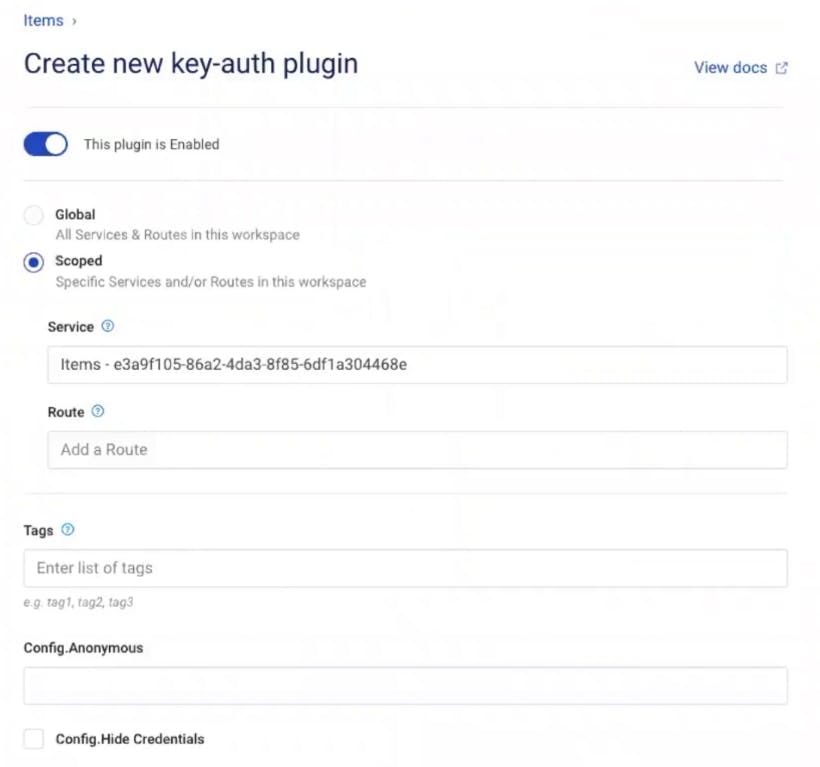
In Kong Manager, under your service, go to the “Add a Plugin” button. Then, find and enable the “Key Authentication” plugin.
In my example, I’m going to use the defaults, but note that you can change the scope and specify the API key name that you want to use.
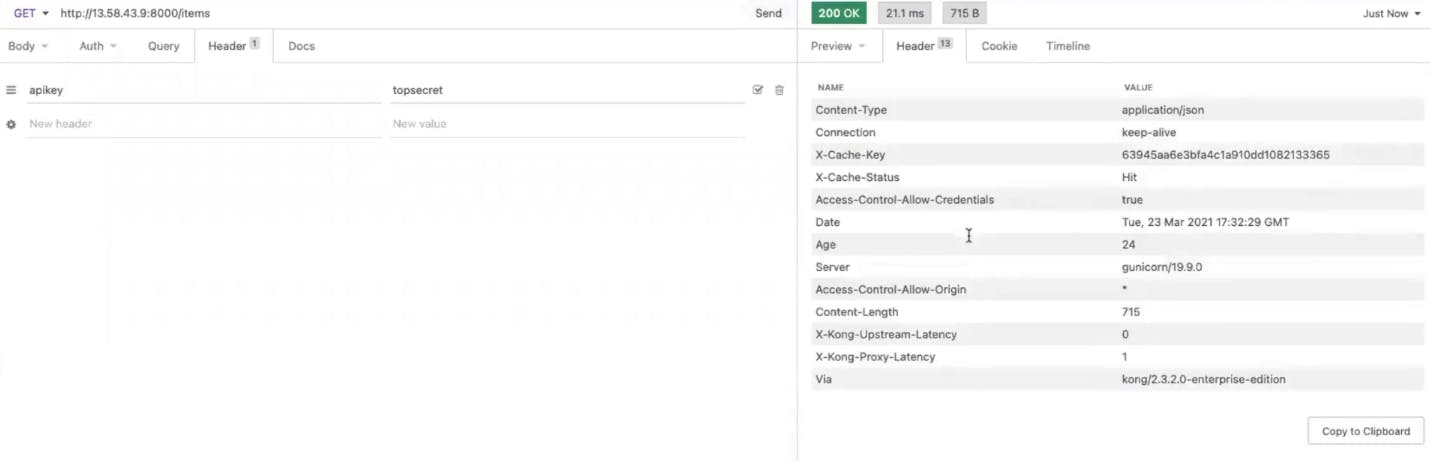
In your browser, refresh your endpoint. You should get the error message “No API keys found in request.” The error message means Kong is enforcing key authentication on your endpoint. This is exactly what I want!
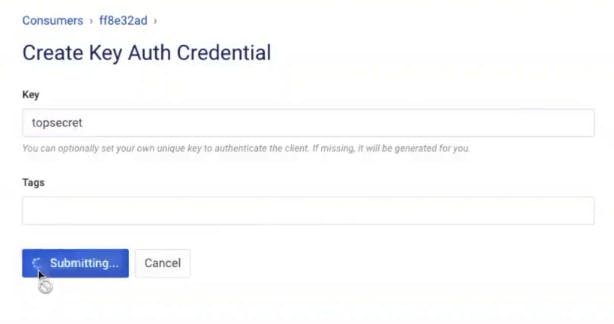
To authenticate this request (so Kong accepts it), I need to add a consumer to Kong Gateway and assign that consumer an API key for authentication.
Create a consumer using the menu on the left in Kong Manager. Give the consumer a username and custom_id. You can use the custom_id to store an existing unique ID for the consumer if you want to map Kong with users in your existing identity store.
Click on the Credentials tab for the Consumer and add a key authentication credential so Kong Gateway can identify the consumer. As long as Kong can identify my consumer with an API key, it will allow the request to pass through.
Let’s test this plugin using Insomnia, Kong’s open source API design, debugging and testing tool.
Install Insomnia if you haven’t already.
Create a new request in Insomnia called /items.
Copy and paste your URL.
Send the same request you sent before in the browser (NOTE: your IP address will be different below). You should still see the “No API key was found in the request message.”
With Insomnia, you can easily add a new header called API Key. Make sure the name matches the API key value you created earlier for your consumer.
Once you send this request, you should be able to access the upstream API. Excellent, now your service is protected, and your client can authenticate with an API key.
Another functionality you can abstract to Kong Gateway is caching. It’s best practice to protect your services with caching. This way, when you have duplicate requests coming to your services, they won’t get bombarded by the same requests again and again. Kong Gateway will cache the incoming request and then send the response back to the client without sending it to your upstream service.
In Kong Manager, go back to your service. Click “Add a Plugin” again. Find and enable the proxy cache plugin. Note that you can configure the plugin to store your cache in memory, Kong’s database or Redis. Press create once you have all of your settings configured (I am using the defaults).
Back in Insomnia, clear your responses and make the request again. You should now receive a cache status of “miss.” Take note of the latency headers coming back from Kong.
If you send this request again, you should get a cache hit. That means Kong Gateway doesn’t have to send the request to the upstream. It responds immediately. That makes the upstream latency zero.
Proxy caching is very helpful because as you build many microservices, you’ll want to cut down the latency and response times for each request since these will add up to slow down your client’s experience.
To recap, in this Kong Gateway tutorial, I installed Kong on an AWS 2 Linux machine. Then I configured Kong to route traffic to my upstream microservice, httpbin.org. Next, I exposed that service through Kong Gateway on a path called “Items.” Finally, I applied key authentication and caching functionality as plugins to avoid building or maintaining that functionality into my microservices.
Have questions or want to stay in touch with the Kong community? Join us wherever you hang out:
⭐ Star us on GitHub
🐦 Follow us on Twitter
🌎 Join the Kong Community
🍻 Join our Meetups
❓ ️Ask and answer questions on Kong Nation
💯 Apply to become a Kong Champion
Now that you’ve successfully set up Kong Gateway, you may find these other tutorials helpful:
Share Post
Learn how to make your API strategy a competitive advantage.