The Payment Card Industry Data Security Standard (PCI-DSS) is a set of requirements to ensure that all companies that process, store or transmit card information maintain a secure environment. Every system component that processes, stores or transmits such information comes under the PCI system scope. Such companies are required to undergo annual audits where the system under scope is reviewed and certified.
Companies adhering to PCI-DSS requirements need to design secure and compliant systems that are easy to audit and develop on. A key consideration in these designs would be to limit the scope of the systems that come under PCI scope.
## **Leveraging Kong for the Ideal PCI Compliant Architecture**
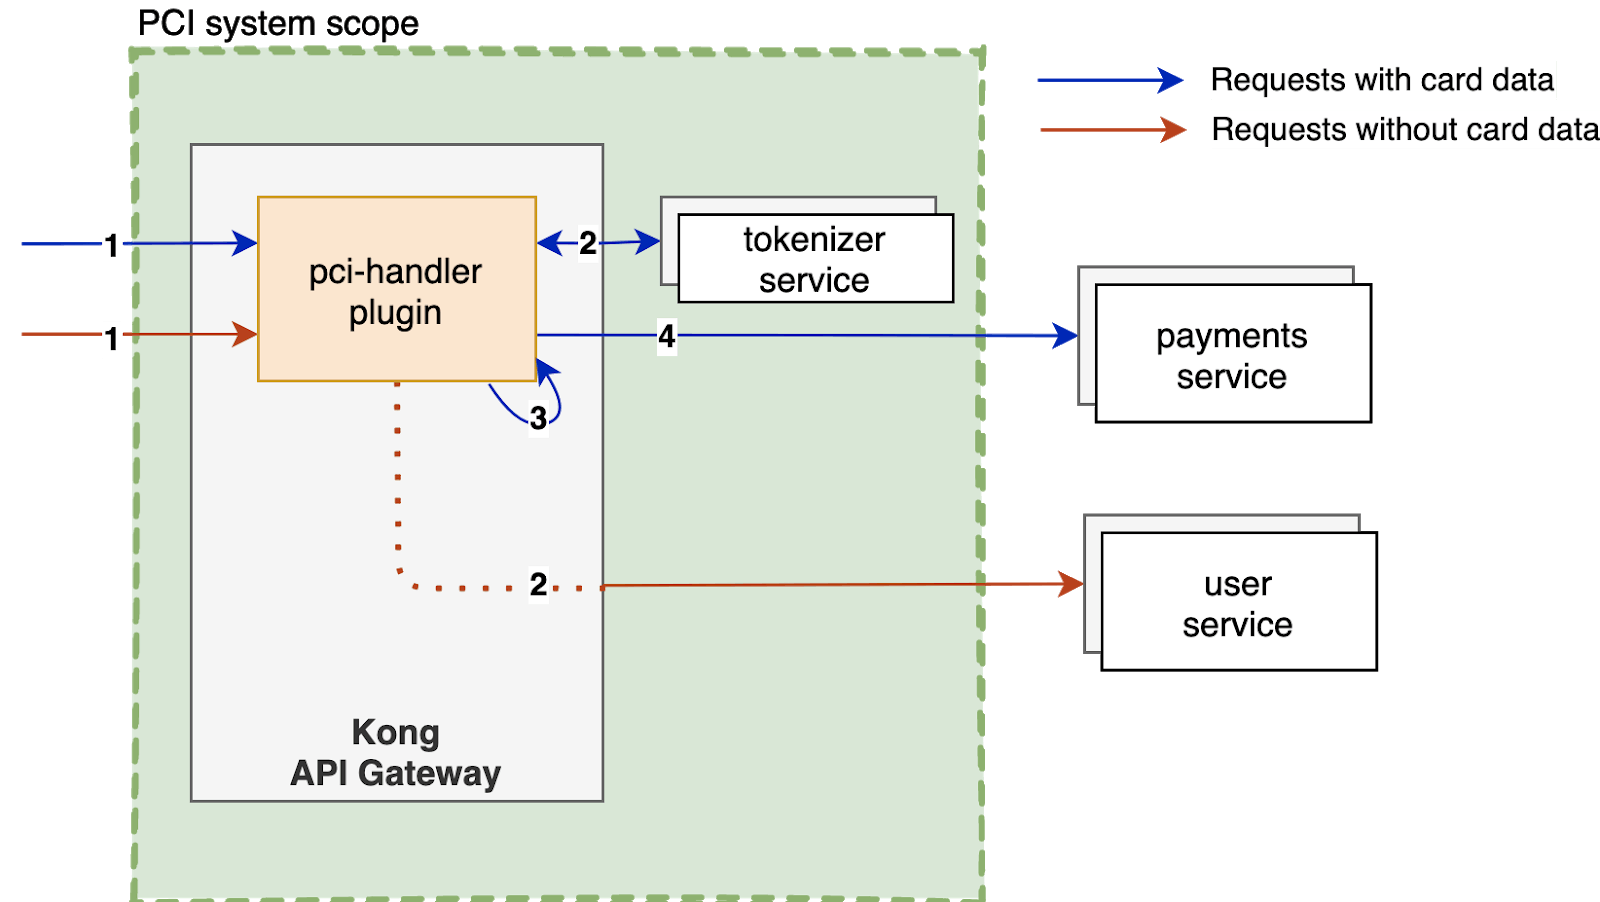
If your systems need to work with credit card information, an ideal architecture with PCI compliance in mind would be exposing a minimal number of system components to this information in its raw form. Here's an example of what that would look like with Kong:
The diagram above shows that the components exposed to card data are limited to Kong itself and a tokenization service. Microservices upstream receive a tokenized version of the card data and are hence out of PCI scope. Other upstream services that need to access raw card information, such as those that communicate with third-party payment gateway APIs, can do so by exchanging the token on the tokenizer. By accessing card data, these services are also brought under PCI scope. Let's break this down.
### **The Tokenization Service**
This service replaces sensitive card information with a unique, randomly generated identifier called a *token*. The system can then pass this token onto upstream services without exposing card data. The tokenization service itself is out of the scope of this article. It's enough to think of it as an abstraction that provides two operations: tokenize and detokenize. In production environments, this service needs to be highly secure and PCI compliant itself. At Razorpay, we use [Hashicorp's Vault](https://github.com/hashicorp/vault)Hashicorp's Vault for this purpose.
### **The PCI Handler Plugin**
The plugin is a new custom Kong plugin that you would need to enable on API routes that accept card data. Its key functions are:
*1. Payload Introspection* – A request payload may not always have card data. The plugin will first introspect incoming request payloads to determine whether card data is present and if further action is required. Payload attribute details are available as plugin configuration.
*2. Validation –* This is the basic input validation of the card attributes in the payload.
*3. Handle Tokenization –* The system makes an API request to the tokenization service with card attributes. Then, it captures the token response.
*Payload Transformation –* The plugin transforms the request payload to replace the sensitive card attributes with the token. The new attribute is a plugin configuration.
git clone --recurse-submodules -j8 https://github.com/razorpay/kong-template.gitcd kong-template
make init
make up
This makes Kong Admin APIs available on 127.0.0.1:8001, whereas the service APIs are accessible on 127.0.0.1:8000. Verify if everything's up and running: curl -i http://127.0.0.1:8001/status.
-- Validates card attributes in the request body
local function validate_body_params(conf, card_fields_conf, body)
...
end
-- Extracts card attributes from the request body as per config
-- specified in card_fields_conf and saves it tp a new table:"card_data"local function set_card_data(card_fields_conf, body)
...
end
-- Transforms the request body. Removes the card_fields attributes
-- and adds a new attribute with the generated token string
local function transform_body(card_fields_conf, body, token)
...
end
-- Makes a HTTP call to the tokenizer service for card tokenization
local function tokenize_card(conf, card_data)
...
end
function PciHandler:access(conf)
PciHandler.super.access(self)
local card_fields_conf = { ...
}
...
if is_json_body(kong.request.get_header(CONTENT_TYPE)) then
-- Parse the JSON body, to a lua table
req_body = parse_json(kong.request.get_raw_body())
-- Validates body for card attributes
if not validate_body_params(conf, card_fields_conf, req_body) then
...
end
has_card_data = true end
if has_card_data then
-- Extracts card data from the request body and sets it to the
-- format defined in the the card_fields_conf table
local card_data = set_card_data(card_fields_conf, req_body)
-- Tokenize the card attributes
local token = tokenize_card(conf, card_data)
-- Transform the request body - replaces the card attributes with
-- token received in the previous step
new_req_body = transform_body(card_fields_conf, req_body, token)
-- Reset the request body
local new_req_body_json = cjson.encode(new_req_body)
set_raw_body(new_req_body_json)
set_header(CONTENT_LENGTH, #new_req_body_json)
end
end
return PciHandler
2. Add the plugin name to the "plugins" list: **plugins = bundled,pci-handler**
3. Reload kong for changes to take effect. If you're using the kong-template starter kit, you can do this by running the following command: **docker-compose exec kong kong reload**
### **3. Set Up the Tokenization and Upstream Services**
Given below are two snippets to set up sample tokenization and upstream services with NodeJs.
mkdir -p kong-services kong-services/upstream-example kong-services/tokenizer
# To setup the upstream-example service:cd kong-services/upstream-example
npm init
npm install express
touch index.js
node index.js
# Similarly, to setup the tokenizer service:cd kong-services/tokenizer
npm init
npm install express
touch index.js
node index.js
**kong-services/tokenizer/index.js:**
const express = require('express')
const crypto = require('crypto')
const server = express()
const port = 8885
server.use(express.json());
var algorithm = 'aes256';
var key = 'example_encryption_key_123456789';
var iv = "example_iv_12345"// Serve a POST /tokenize API call server.post('/tokenize', (req, res) => {// req.body should be validated first here.
data = JSON.stringify(req.body)
// encrypt the card data attributes to create a token var cipher = crypto.createCipheriv(algorithm, key, iv);
var token = cipher.update(data, 'utf8', 'hex') + cipher.final('hex');
json = {"token": token
};
res.status(200).send(JSON.stringify(json))
})
// Serve a POST /detokenize API callserver.post('/detokenize', (req, res) => { var token = req.body.token;
// decrypt a token and return the original payload var decipher = crypto.createDecipheriv(algorithm, key, iv);
var decrypted = decipher.update(token, 'hex', 'utf8') + decipher.final('utf8');
res.status(200).send(decrypted)
})
server.listen(port, () => { console.log(`Server is listening on http://localhost:${port}`)})
**kong-services/upstream-example/index.js:**
const express = require('express')
const server = express()
const port = 8881
server.use(express.json());
server.post('/payments', (req, res) => { console.log(req.body);
res.status(200).send(req.body)
})
server.listen(port, () => { console.log(`Server is listening on http://localhost:${port}`)})
With the above setup, we now have these microservices running:
1. "Tokenizer" service, on port 8885
2. "upstream-example" service, on port 8881
### **4. Define Service and Routes, and Enable the Plugin**
We see in the response above that the upstream-service simply responded with the request body that it had received. In this case, the card attributes were replaced with a card_token attribute, meaning our pci-handler plugin is working as expected!
Designing systems that work well with PCI-DSS is not trivial but is important to get right. With the rapid adoption of microservices taking place, delegating such mission-critical components to the API gateway makes a lot of sense. Kong's plugin architecture allowed us to significantly reduce our PCI scope, thereby increasing security and agility.
Unify the API and Eventing Developer Experience with the Kong Event Gateway and API Platform Introduction: The EDA and API worlds are converging . . . finally For the past several years, there have been murmurs of an incoming convergence between API
As of May 2024, Kong Gateway Enterprise 3.3.x.x will enter its End Of Life (EOL) phase and will no longer be a part of the full support cycle. Following this, Kong Gateway Enterprise 3.3.x.x will enter a 12-month sunset support period, exclusively f
We're thrilled to announce the general availability of Kong Gateway Enterprise 3.6. This version brings security, efficiency, and standards conformance to enterprise applications. Plus, Kong AI Gateway , which you can learn more about here . Let’s
As of February 2024, Kong Gateway Enterprise 3.2.x.x will enter its End Of Life (EOL) phase and out of the full support cycle. Following this, Kong Gateway Enterprise 3.2.x.x will enter a 12-month sunset support period, exclusively focused on helpin
Veena Rajarathna
# Kong Gateway Enterprise and Amazon EKS Anywhere Bare Metal
Power up application modernization and migration using Kong Gateway Enterprise and Amazon EKS Anywhere Bare Metal One of the most critical requirements for an Application Modernization project is to support workloads running on multiple platforms. I
In this episode of Kongcast , I spoke with Grant McKeen and Jonathan White from IntegrationWorks about how open banking and BIAN (Banking Industry Architecture Network) work with Kong Gateway to create simplicity from complexity in the ba
Kaitlyn Barnard
# Protecting Australian Consumer Data Rights (CDR) with Kong Gateway
This post highlights how you could use Kong Gateway to implement a solution for the Australian Consumer Data Standards (CDS) , which is part of the Consumer Data Right legislation introduced by the Australian Government in November 2017. As det
Steve Young
# It’s Time to Bring Kafka Event Streaming into Your API Platform
Unify the API and Eventing Developer Experience with the Kong Event Gateway and API Platform Introduction: The EDA and API worlds are converging . . . finally For the past several years, there have been murmurs of an incoming convergence between API
As of May 2024, Kong Gateway Enterprise 3.3.x.x will enter its End Of Life (EOL) phase and will no longer be a part of the full support cycle. Following this, Kong Gateway Enterprise 3.3.x.x will enter a 12-month sunset support period, exclusively f
We're thrilled to announce the general availability of Kong Gateway Enterprise 3.6. This version brings security, efficiency, and standards conformance to enterprise applications. Plus, Kong AI Gateway , which you can learn more about here . Let’s
As of February 2024, Kong Gateway Enterprise 3.2.x.x will enter its End Of Life (EOL) phase and out of the full support cycle. Following this, Kong Gateway Enterprise 3.2.x.x will enter a 12-month sunset support period, exclusively focused on helpin
Veena Rajarathna
# Kong Gateway Enterprise and Amazon EKS Anywhere Bare Metal
Power up application modernization and migration using Kong Gateway Enterprise and Amazon EKS Anywhere Bare Metal One of the most critical requirements for an Application Modernization project is to support workloads running on multiple platforms. I
In this episode of Kongcast , I spoke with Grant McKeen and Jonathan White from IntegrationWorks about how open banking and BIAN (Banking Industry Architecture Network) work with Kong Gateway to create simplicity from complexity in the ba
Kaitlyn Barnard
# Protecting Australian Consumer Data Rights (CDR) with Kong Gateway
This post highlights how you could use Kong Gateway to implement a solution for the Australian Consumer Data Standards (CDS) , which is part of the Consumer Data Right legislation introduced by the Australian Government in November 2017. As det
Steve Young
## Ready to see Kong in action?
Get a personalized walkthrough of Kong's platform tailored to your architecture, use cases, and scale requirements.