
Think back to when your development team made the switch to Dockerized containers. What was once an application requiring multiple services on virtual machines transitioned to an application consisting of multiple, tidy Docker containers. While the result was a streamlined system, the transition likely was daunting.
Now, it’s time for another transformational leap: moving from a single set of containers to a highly available, orchestrated deployment of replica sets using Kubernetes. This may seem like a massive transformation, but you can reduce the bumps in the road by using an open source ingress controller to simplify your task and provide plugins that you can customize based on your need.
In this tutorial, we’ll start with a Dockerized application made up of three containers: a web server, a database and a key-value store. We will walk through how to deploy this application with Kubernetes (K8s) using Kong’s Kubernetes Ingress Controller (documentation) to expose the container’s ports for external access. Lastly, we’ll get familiar with how to set up some Kong plugins with the ingress controller.
Core Concepts
Before we dive in, let’s look briefly at some core concepts for our walkthrough.
Docker
Docker is often used in platform as a service (PaaS) offerings, approaches application development by isolating individual pieces of an application into containers. Each container is a standardized unit of software that can run on its own.
For example, a Postgresql database pegged to a specific version can run entirely within its own Docker container. The container is standard and runs on any developer’s machine. There are no longer questions like, “Why does the query work on my machine but not on your machine? What’s your environment setup?” When you run your application services within Docker containers, you ensure that everybody runs the same application within the same environment.
Kubernetes (K8s)
Applications quickly progressed from single Docker containers to a composition of multiple containers working together. One might use an application like Docker Compose to deploy a multiple container application.
However, the next step of the progression is to orchestrate multiple replicas of the same application as a cluster, distributing the load across replica nodes within the cluster and providing fallback nodes in case a single application node fails. Today’s de facto standard for this orchestration and management is Kubernetes. Many cloud service providers—including AWS, Azure and Google Cloud—offer Kubernetes.
Kong Kubernetes Ingress Controller
Ingress is a critical part of K8s, managing external access to the services inside of a Kubernetes cluster. Within a cluster, the web server container may talk to the database container, but what good is it if the external world can’t talk to the web server? In K8s, communication with the external world requires an ingress controller. The open source Kong Kubernetes Ingress Controller wraps around Kong Gateway and Kong’s various plugins to play this critical role.
The Basic Use Case
In our basic use case, we have an application composed of a web server (NGINX), a database (PostgreSQL) and a key-value store (Redis). This application typically runs as three Docker containers. We need to transition this application to K8s, but we need to set up an ingress to access our services from outside our K8s cluster.
Our Mini-Project Approach
For our mini-project walkthrough, we’re going to take this approach:
- Create a simple, low-cost K8s cluster using Google Kubernetes Engine (GKE).
- Use kubectl to configure the cluster for deploying our multi-container application.
- Configure and integrate Kong Kubernetes Ingress Controller, giving us external access to our application’s services.
- Add in the use of a cert-manager for HTTPS support, as well as Kong plugins for external logging and request routing.
What You’ll Need
To journey alongside us in this walkthrough, you’ll need a Google Cloud Platform account, which has a starting free tier with an initial usage credit.
On your local machine, you’ll need to be comfortable working at the command line with the following tools installed:
- kubectl — for running configuration commands on K8s clusters
- Google Cloud SDK — for connecting to your GKE cluster, making it your kubectl context.
Are you ready to dive into containers and clusters? Here we go!
Step 1: Create a GKE Cluster
Assuming you have set up your Google Cloud Platform account, navigate to the Console and create a new project through the project list drop-down in the upper left:

Choose a name for your project (for example: k8s-with-kong) and create it. Working within that project, navigate through the left menu sidebar to find “Kubernetes Engine → Clusters.”
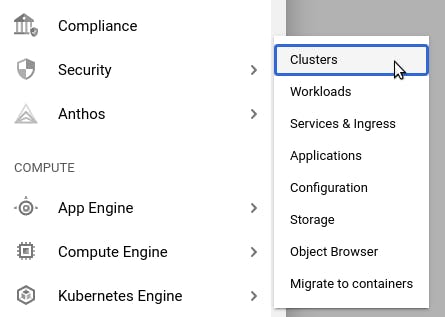
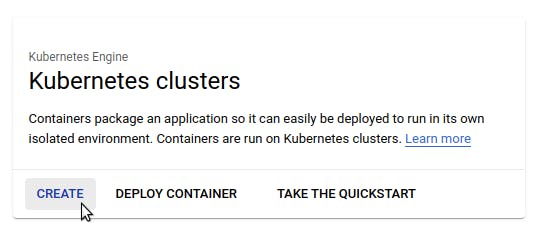
On the resulting page, click on the “Enable” button to use GKE with your project. This process might take one to two minutes for Google to start everything up for your project. After that, you’ll find yourself on the clusters page for GKE. Click on “Create.”
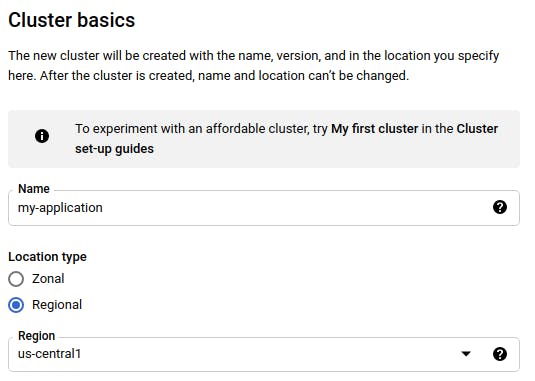
Choose to configure a “Standard” cluster. Set a name for your cluster, along with a region.
Next, in the left menu bar, find “NODE POOLS” and click on “default-pool:”
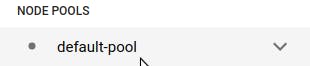
For the node pool, set the size to 1. We’ll keep the resource usage for our cluster small since this is just a demo mini-project.

Click “Create” at the bottom of the page.
![]()
Your K8s cluster will take a few minutes to spin up.
Use gcloud to configure cluster access for kubectl
With our GKE cluster up and running, we want to set up access to our cluster through kubectl on our local machine. To do this, we follow the simple steps on this GKE documentation page.
Next, we’ll generate a kubeconfig entry to run our kubectl commands against our GKE cluster. For this step, you will need the cluster name and region you specified when creating your cluster:
With that, we can start running commands through kubectl to configure our deployment.
Step 2: Deploy Application Through kubectl
To deploy our application, we will need to create a deployment.yml file and a service.yml file. The deployment.yml file should look like this:
Our deployment will run a single replica of our application, which consists of three containers. We have an nginx web server, which we will call server. The server’s container port of interest is port 80.
Next, we have a Postgresql database running in a container called postgres. The default user for this database container image is postgres. We’ll also set the password for that user to postgres. The database container’s port is 5432.
Lastly, we have our Redis key-value store, which will expose port 6379 on the container. On startup of the Redis server, we’ll set the password to redis.
With our deployment configuration in place, let’s apply this to our cluster:
After a few minutes, you can verify that your deployment is up:
Next, we need to configure service.yml so that the ports on our cluster’s containers are accessible from outside the cluster.
Here, we are configuring a K8s Service, mapping incoming ports on our pod to target ports on the individual containers in a pod. For simplicity, we’ll use the same values for port and targetPort. If we can get a request to port 80 on our K8s pod, that request will be sent to port 80 of the server container (our nginx container). Similarly, requests to port 5432 will be mapped to port 5432 on our postgres container, while requests to port 6379 will map to port 6379 on our redis container.
Let’s update our cluster with this new service configuration:
After a moment, we can check that our configuration is in place:
This is all good and fine, but you might notice from looking at the endpoint IP addresses that—while our ports are all exposed and mapped—we’re still working within a private network. We need to expose our entire K8s cluster to the outside world. For this, we need an ingress controller. Enter Kong.
Step 3: Configure Kong’s Kubernetes Ingress Controller
Configuring Kong’s Ingress Controller is fairly straightforward. Let's go through the steps one at a time.
Deploy Kong Kubernetes Ingress Controller to GKE
Taking our cues from Kong’s documentation page on Kong Ingress Controller and GKE, we first need to create a ClusterRoleBinding to have proper admin access for some of the GKE cluster configurations we’re going to do momentarily. Create a file called gke-role-binding.yml with the following content:
Let’s apply this role binding:
Next, we deploy the Ingress Controller, using the deployment and service configuration file that Kong has custom written and made available at https://bit.ly/k4k8s.
Check that the Ingress Controller deployed. It might take a minute for the kong-proxy EXTERNAL_IP to be provisioned:
Then, we set up an environment variable, PROXY_IP, to hold the IP address associated with the Kong proxy.
Excellent. Our Kong Kubernetes Ingress Controller has deployed, and it is reachable at the PROXY_IP. It just needs to be configured for proper request routing.
Add an ingress to map HTTP requests to the web server
Next, let’s configure the Kong Kubernetes Ingress Controller to listen for HTTP requests to the root / path, then map those requests to port 80 of our K8s Service (which maps that request to port 80 of the NGINX server container). We’ll create a file called http-ingress.yml:
We apply the Ingress configuration:
Now, when we perform a curl request. Here is the result:
It works! We’ve successfully configured our Kong Kubernetes Ingress Controller to take HTTP requests and map them through our K8s Service and onto our NGINX container.
What if we want to talk to a container and port through a TCP connection rather than an HTTP request? For this, we’ll use Kong’s custom TCPIngress.
Add TCPIngress to map connection requests
By default, the Kong Proxy service set up through the Kong Kubernetes Ingress Controller listens on ports 80 and 443. This is why we were able to configure our Ingress to map HTTP requests to our NGINX server since HTTP requests go to port 80 by default.
For our use case, we need Kong to listen for TCP traffic on several additional ports that we’ll use for Postgres and Redis connections. Earlier, we deployed the Kong Kubernetes Ingress Controller by applying the custom configuration that Kong provided at https://bit.ly/k4k8s. Now, we want to apply two patches to that configuration to accommodate our specific TCP streaming needs.
First, create a file called patch-kong-deployment.yml, containing the following:
Here, we’re configuring Kong’s TCP stream to listen on ports 11111 (which we’ll use for postgres connections) and 22222 (which we’ll use for Redis connections). Next, create a file called patch-kong-service.yml, containing the following:
This patch modifies the K8s Service related to Kong Kubernetes Ingress Controller, exposing the ports that we need. Now, we apply these two patches:
Now that we’ve patched Kong to listen for TCP connections on the proper ports, let’s configure our TCPIngress resource. Create a file called tcp-ingress.yml:
This configuration listens for TCP traffic on port 11111. It forwards that traffic to our K8s Service at port 5432. As you may recall, that Service maps port 5432 traffic to the postgres container at port 5432. Similarly, our TCPIngress forwards traffic on port 22222 to our Service’s port 6379, which subsequently reaches the redis container at port 6379.
Let’s apply this configuration:
That should be everything. Now, let’s test.
We were able to connect to the postgres container! Now, let’s try Redis:
We’re in! We’ve successfully configured Kong Kubernetes Ingress Controller to map our HTTP requests to the web server and our TCP connections to the database and key-value store. At this point, you should have quite a foundation for tailoring the Kong Kubernetes Ingress Controller for your own business needs.
Before we wrap up our walkthrough, let’s experiment a bit by integrating some plugins with our Ingress Controller.
Step 4: Integrating Plugins With the Ingress Controller
Certificate Management and HTTPS
We’ll start by configuring our Ingress Controller to use cert-manager, which manages the deployment of SSL certificates. This will enable our NGINX web server to be accessible via HTTPS.
Install cert-manager to GKE cluster
To install cert-manager, we follow the steps outlined on the Kubernetes documentation page. The documentation steps mention creating a ClusterRoleBinding for cluster admin access if you are using GKE. However, we already did this earlier in our walkthrough.
Next, we install the CustomResourceDefinition to our cluster with cert-manager, and then we verify the installation:
Set up the domain name to point to kong-proxy IP
You’ll recall that we stored our kong-proxy IP address as PROXY_IP. Assuming you have control over a domain name, add a DNS record that resolves your domain name to PROXY_IP. For this example, I’m adding an A record to my domain (codingplus.coffee) that resolves the subdomain kong-k8s.codingplus.coffee to my kong-proxy IP address.

With our subdomain resolving properly, we need to modify our http-ingress.yml file to specify a host for HTTP requests rather than just use an IP address. You will, of course, use the domain name that you have configured:
Let’s apply the updated http-ingress.yml file:
Now, our curl request using our domain name reaches the NGINX server:
Request SSL Certificate
Next, we create a ClusterIssuer resource for our cert-manager. Create a file called cluster-issuer.yml, with the following content (replace with your own email address):
Create this resource:
Lastly, we want to update http-ingress.yml once again to provision a certificate and use it:
Let’s apply the updated http-ingress.yml manifest:
Our certificate has been provisioned. Now, we can send requests using HTTPS:
Step 5: Adding Plugins
Integrate Kong’s HTTP Log plugin
Next, let’s configure our Ingress Controller to use a Kong plugin. We’ll go with the HTTP Log plugin, which logs requests and responses to a separate HTTP server.
Create a Mockbin to receive log data
We’ll use Mockbin, which gives us an endpoint to tell our plugin to send its data. At Mockbin, go through the simple steps for creating a new bin. You’ll end up with a unique URL for your bin.
Create HTTP Log Plugin resource
Create a file called http-log-plugin.yml with the following content. Make sure to use your own Mockbin endpoint URL:
Create the plugin using this manifest file:
Update Ingress manifest
Next, we’ll update http-ingress.yml again, making sure that our Ingress Controller knows to use our new plugin as it handles HTTP requests to the Nginx server:
Apply the updated file:
Send request, check Mockbin
Now that we added our plugin, we can send another request to our web server:
We can check the request history for our bin at Mockbin. We see our most recent request posted to Mockbin, along with data about our request in the Mockbin request body:
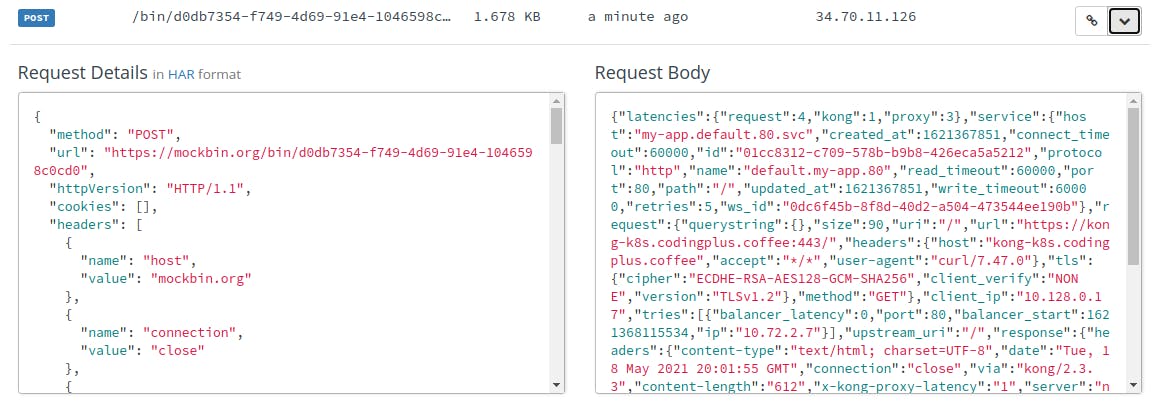
It looks like our HTTP Log plugin is up and running!
Integrate Kong’s Correlation ID Plugin
Lastly, we’ll integrate one more Kong plugin: Correlation ID. This plugin appends a unique value (typically a UUID) to the headers for every request. First, we create the Correlation ID Plugin resource. Create a file called correlation-id-plugin.yml:
In our plugin configuration, we’re adding a header called my-unique-id to all of our requests. It will contain a UUID. Install the plugin:
Next, we add the plugin, alongside our HTTP Log plugin to our http-ingress.yml manifest:
Apply the changes to the Ingress Controller:
With our plugins configured, we send another curl request:
And again, we check our Mockbin history for the latest request. This time, when we look closely at the headers, we see my-unique-id, which comes from our Correlation ID plugin.
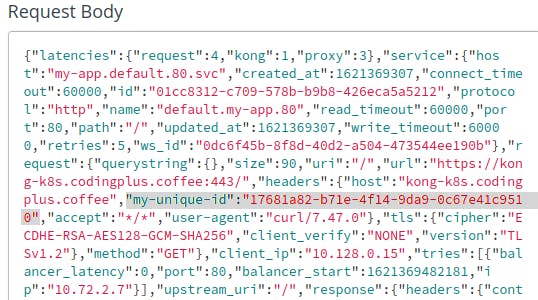
Success! Our Correlation ID plugin is working!
Conclusion
We’ve covered a lot of ground in this walkthrough. We started with a simple application consisting of three Docker containers. Step by step, we deployed our containers with Kubernetes, and we deployed the open source Kong Kubernetes Ingress Controller to manage external access to our cluster’s containers. Lastly, we further tailored our Ingress Controller by integrating cert-manager for HTTPS support and a few Kong plugins.
With that, you now have a comprehensive foundation for deploying your Dockerized application to Kubernetes with the help of Kong’s Kubernetes Ingress Controller. You’re well equipped to customize your deployment according to your own business application needs. 👍
If you have any additional questions, post them on Kong Nation. To stay in touch, join the Kong Community.
You may find these other Kubernetes tutorials helpful: